
Configuring Connectors
Updated:
This section gives the overall idea about configuring connection,
touchpoint creation, lookup addition, environment setup and execution of the sync
process. You have to Login to APPSeCONNECT- To View the Connection details page.
| Modules | Details |
|---|---|
| Searching Connections | Search functionality enables the user to search the connections from the list of existing connection |
| Configuring Connector while Creating Connection | The Configure Connector button would be available only when you create a custom application or a technology application.Before proceeding with the integration process, users need to configure the connector for creating the connection. |
| Creating Connection & Executing the touchpoint | To create a connection between applications, you have to come to this page & create the connection. You will also see the existing connection for a particular organization on this page |
| Copy Connection | This Feature enables the user to copy the connections that was previously created. |
| Editing Connection | This section of the document helps the user to implement the steps to edit touchpoints in portal. |
| Creating Organisation Touchpoint/ Workflow | This document helps the user to implement the steps to create organisation touchpoints in portal. |
| Choosing Touchpoint/Workflow | After the creation of the connection, users need to choose the touchpoint/ Workflow for the object that needs to integrate. For E.g. Business Partner Add, Sales Order Add. etc. |
| Lookups | Lookup Mapping is an integral part of data synchronization between two independent applications |
| Transformation & Mapping | After choosing touchpoint, user needs to map the attributes with the attributes of the destination application. |
| Deploying connection/ Workflow | After the configurations are done, the touchpoint/Workflow needs to be deployed to the environment in which it is to be integrated |
| Environment Configuration & setup | Users can setup the environment for the completion of the integration process |
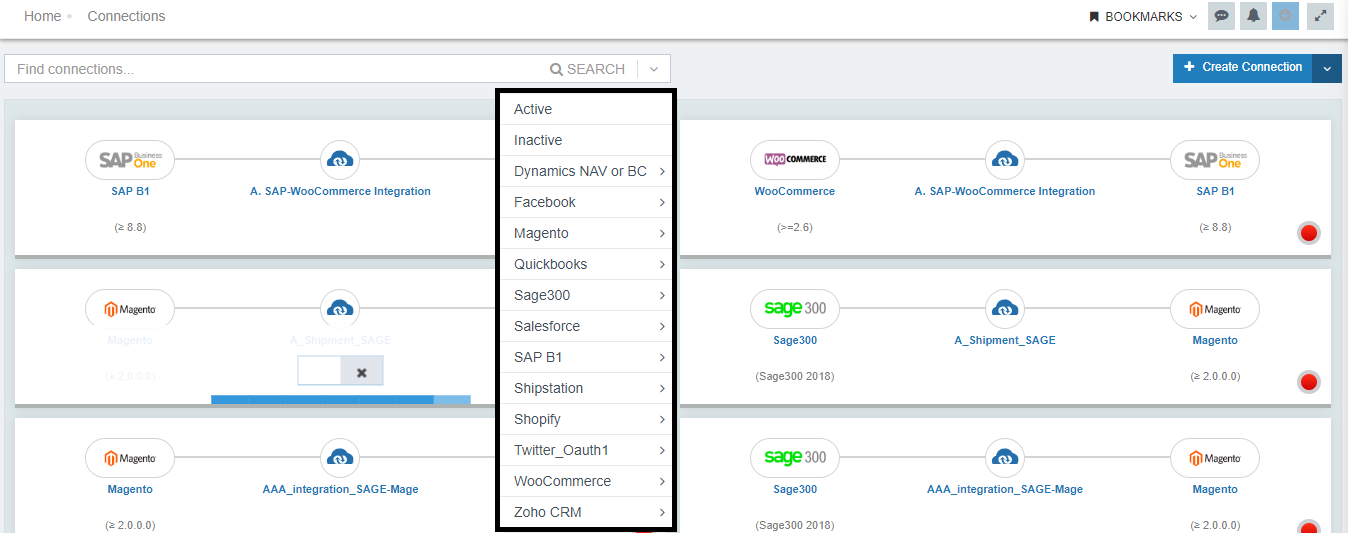
Search Connection
You can also filter your connection list through the SEARCH option. You can perform the SEARCH operation as per the following criteria.
1) Search using Connection Name: You can search the connection using the connection name provided.
2) Search using Application Name: You can search the connection as per the application name used in the connection.
3) Search using Connection Status: You can filter your connections as per the status of the connection, Active/Inactive.
Configuring Connector while Creating Connection
When working with organisational Applications - Custom Applications & Technology Applications, Connectors are not pre-packaged. Hence, the users need to configure the connector first before creating the connection.
Note: The Configure Connector button would be available only when you create a custom application or a technology application
Steps to configure the connector for Organisational Applications
- Click create connection button. The screen for creating connection appears.
- Now Click
configure connectorbutton in the given screen.
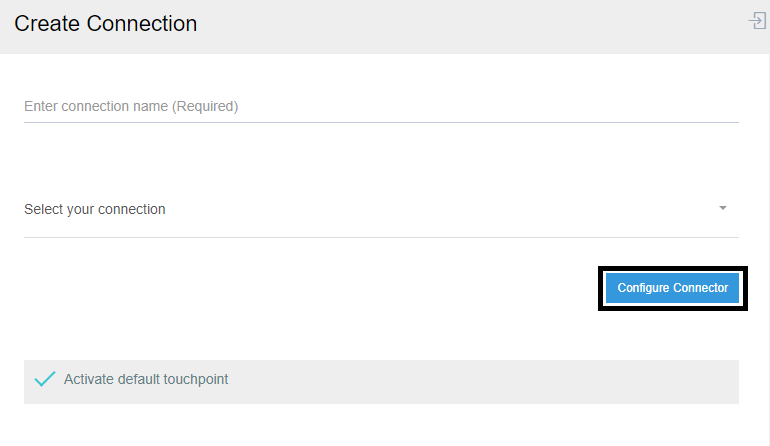
- The screen for configuring the connector opens.
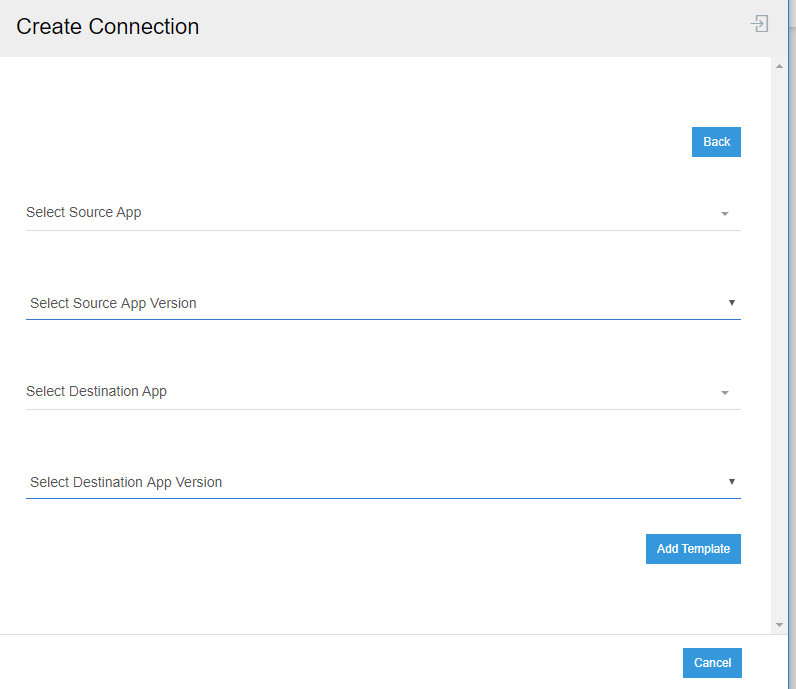
- Enter the Application Name (Source and Destination) and their versions in the screen and
Click
Add templatebutton.
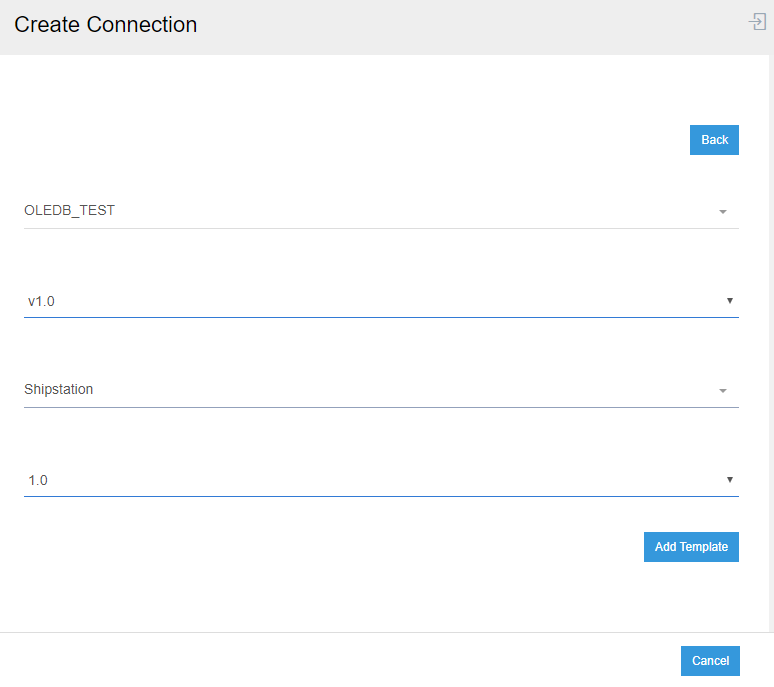
- On adding the template, the connector will be visible in the connector page. Both side of the connector (A to B, B to A) will deployed on adding the template.
Creating Connection & Executing the touchpoint
The Connection Page of the Cloud Portal is needed for creating connection between two different Applications.
For Example, if you want to create a connection between SAP B1 to Magento 2, you have to come to this page & create the connection. You will also see the existing connection for a particular organization on this page.
- Login to portal with the valid details of a user.
- Navigate to the following path: Manage -> Connection
- To find existing Connection, Click Search button. An existing connection opens up
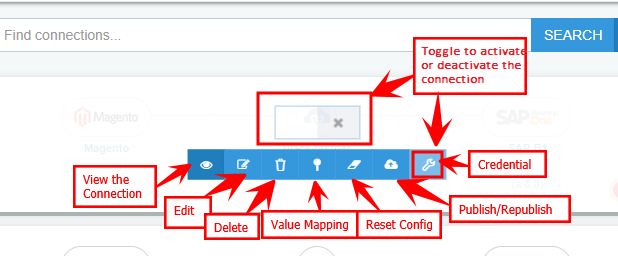
- A typical connection has the following buttons attached to it.
- All the existing connection of the project will be displayed here. One can activate or deactivate connection by the toggle button.
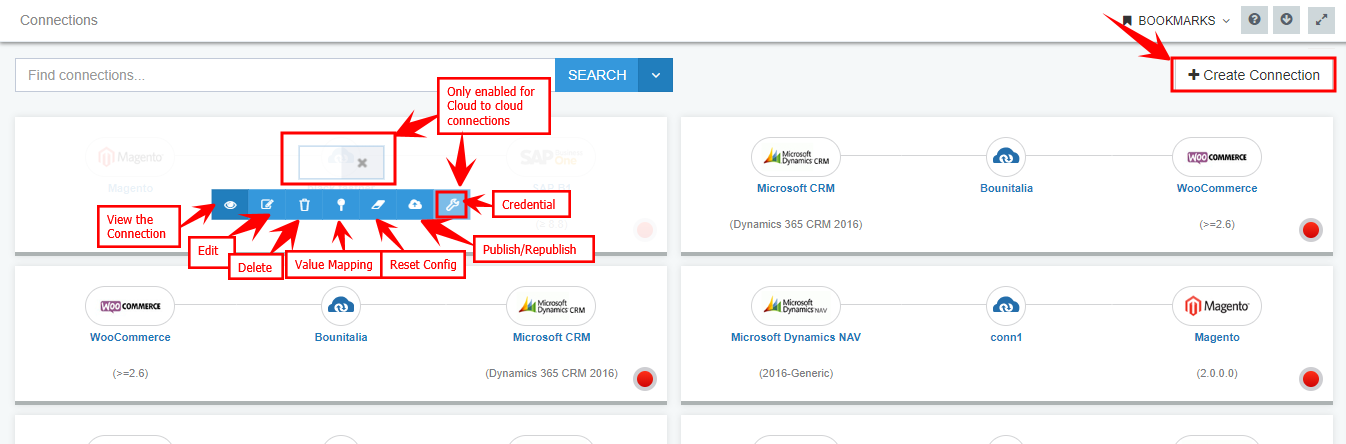
- You can create a new connection by clicking
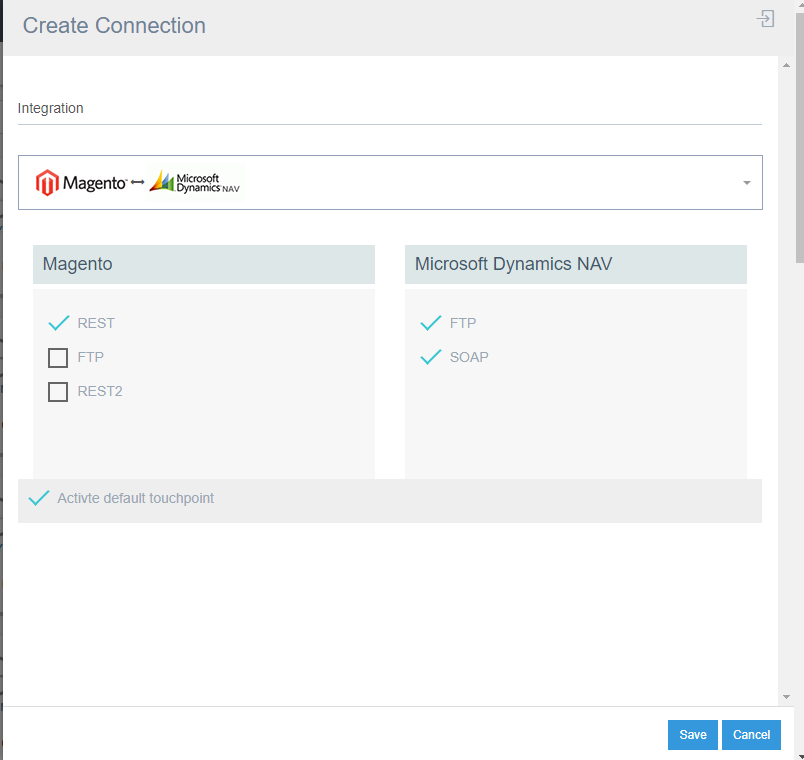
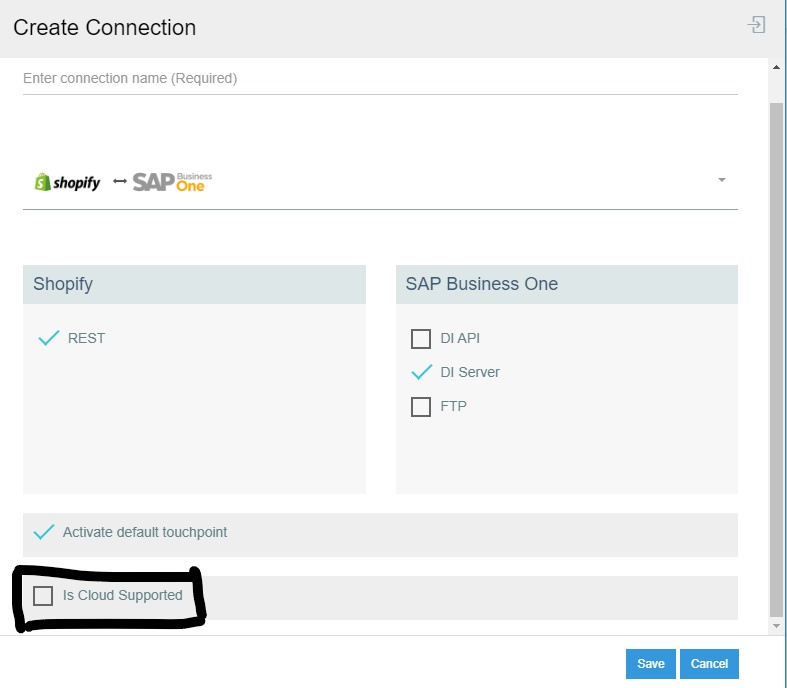
Create Connectionbutton. - The following page opens up where you have to input the new connection details.

- If the template is not created for the connection. You can create the connector by clicking on the Configure Connector button.
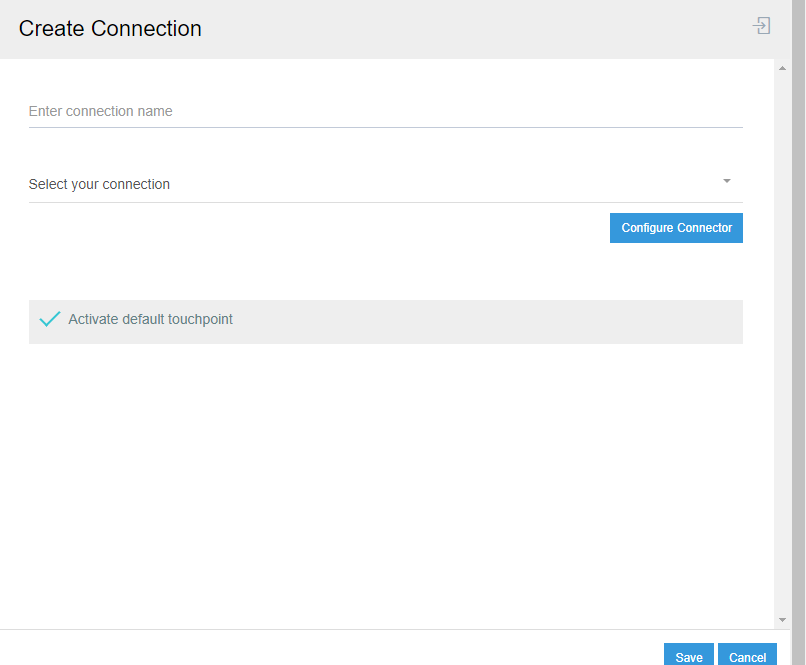
- Activate default touchpoint button will be checked by default. Select the connection, provide the connection name and select the protocol. Click on Save to save the connection details.
Note: For Applications having multiple versions, the user can hover the cursor on the application image to identify the required version of the app.
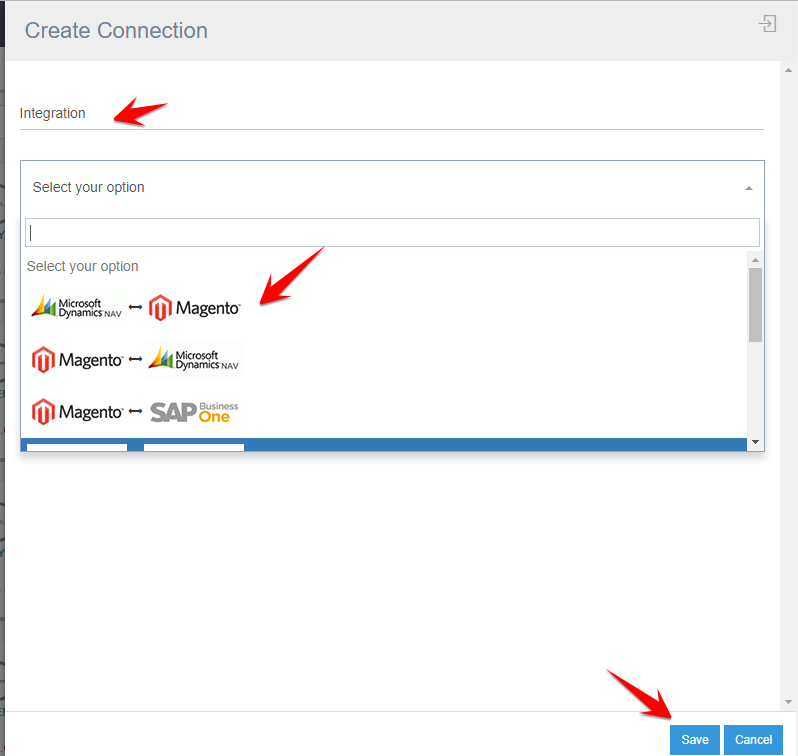
On selecting the connectors, the protocol will be displayed for it. One can select multiple protocols for a connection.
Protip Users need to enable the cloud support checkbox for enabling the cloud supported connection. The checkbox for enabling cloud support will appear only when the chosen applications are cloud supported as shown below.
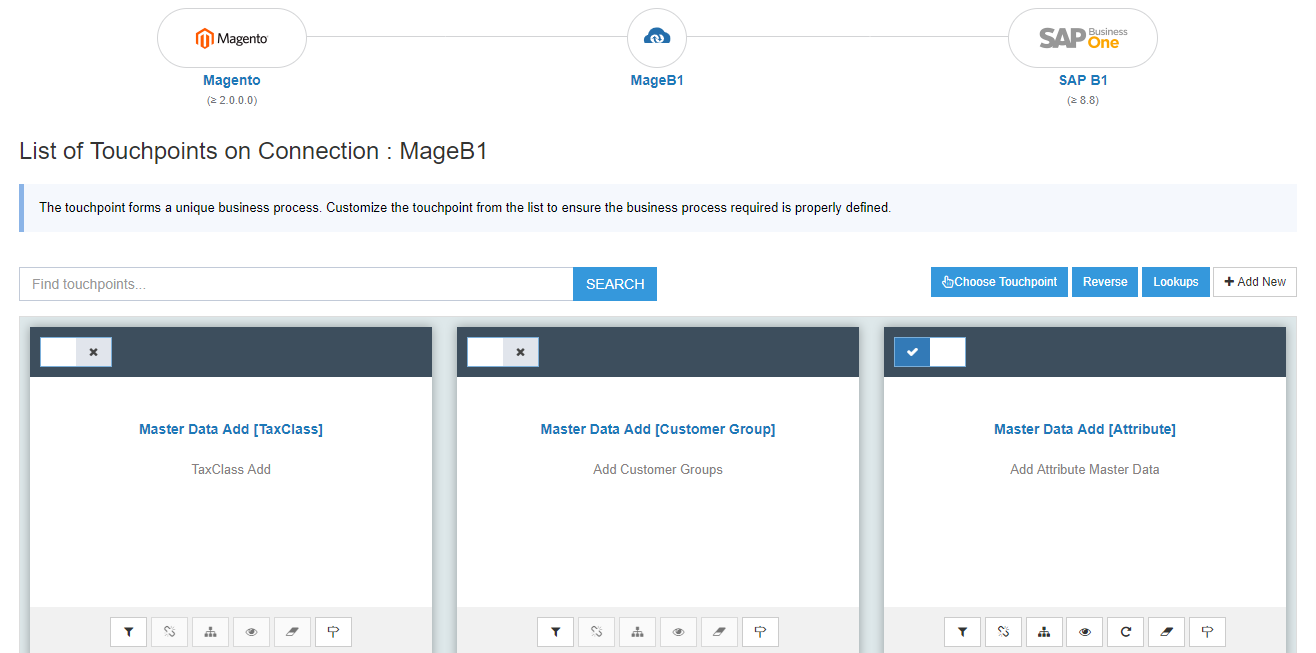
On selecting View connection, all the touchpoints of the connection will be displayed.
 Once you Publish the touch-point it will be shown in the AEC Agent. From the second time onwards you will have Republish option.
Protip On the Touchpoints page, there will be a Reverse button (only if applicable, for e.g here NAV to Magento connection is also available). The connection will be reversed. On clicking the Publish button, all the Touchpoints will be published under the connection. Once a connection has been published, the Republish button will appear instead of Publish button
Lookup Mapping is an important function under touchpoint selection.
Value mapping is a concept which allows the implementer to configure value mapping specific to the application environment such that when the source value is processed, it will be transferred to the destination value automatically. The Value-Mapping is a way to map the special values which needed to be converted by the applications during transformation.
Details of Value Mapping will come in subsequent section of the document.
Copy Connection
This Feature enables the user to copy the connections that was previously created. This not only copies the connection but also the Attribute Mapping and the Lookup Mapping.
This document helps the users to understand and implement the Copy Connection Feature.
Prerequisites for Copy Connection
- Need to have a valid APPSeCONNECT Account.
- A connection should be ready for it to be copied.
Steps to Implement Copy Connection
- Login to the APPSeCONNECT Portal and Navigate to the Connection Page under MANAGE.
- Create a connection, if no connection is created.
- On the portal, click on the Drop-Down Button present on the Right Hand, Top-Side Corner of the screen, and select the
Copy Connectionoption.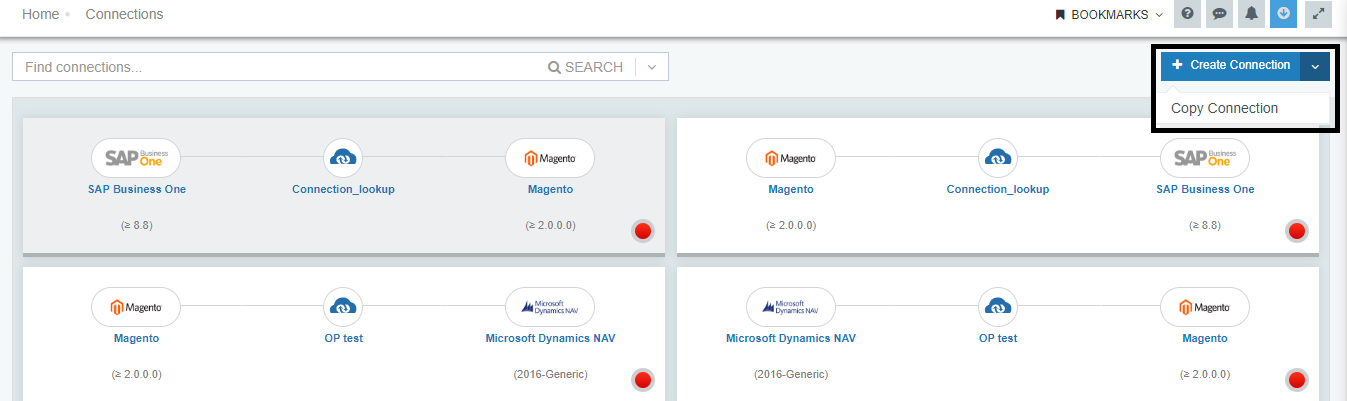
- The Copy Connection window opens. Select the connection from the Drop-Down, which needs to be copied.


- After selecting the connection, enter the connection name. There are two checkboxes here
a. Copy Reverse Connection - Enabling this, it copies the both sided connections.
b. Copy Lookup Database - This enables to copy the Lookup Mappings. - Click on the SAVE Button after the details are incorporated.
Note: The Copy Connection feature copies the Attribute Mapping too.
Editing Connection
- Editing feature enables the user to edit an exisiting touchpoint.
- Click on Edit button in the Connection you want to edit and the following window appears

- The Edit Connection window enables you to edit the following fields:
- Connection Name: This is an editable field.
- Protocols for the selected app: This section is also editable. The user can change the protocols of the selected app.
- Cloud Hosting enabling or disabling: This section enables you to switch to cloud hosting and vice versa as required.
- Following the above proces helps you to edit an existig touchpoint.
After editing the connection, you need to deploy the connection to the environment for execution.
Creating Organisation Touchpoint/ Workflow
For mapping the source Entity with the destination entity, for a particular action (like Customer Add, Invoice Add, Sales Order add), touchpoints are executed which pulls and pushes the data from source to destination or vice-versa. With APPSeCONNECT, one can define or create these touchpoints.
This document will help the readers to implement the steps to create organisation touchpoints in portal.
Prerequisites for Creating Touchpoint/ Workflow
- Need to have valid Credentials for logging into the portal.
- Select the apps and create the connection for which the touchpoint is to be created.
- Identify the template where the touchpoint needs to be created (For Example: Shopify > Priority or Priority > Shopify).
Note: APPSeCONNECT follows certain naming conventions, while a touchpoint is created and that is:
{EntityName}: {Action Name} [Special Option/Protocol]
Where: Entity Name = Destination (or Target) Applications Entity.
Action Name can be:
**Add: Adding a new item in the Target Application.
Update: Update existing item in the Target Application.
Sync: Add new or Update existing item as per the Item(s) existence in the target application.
Delete: Delete / Remove an existing item from the target application.**
[Special Option/Protocol] can be:
- Guest Customer
- Di API
- Special Price.
For Example: Business Partner Add (Guest Customer), Master Data Add [Di API], Item Master Data Add [Simple Product]
Steps to create an Organisational Touchpoint/ Workflow
1) Login to the APPSeCONNECT Portal and navigate to the Connections Page under MANAGE.
2) Select the Template where you want to create the touchpoint. Make sure the template is selected according to the transformation flow.
3) The Connection Page opens. Click on the Add New Button for creating the touchpoint.
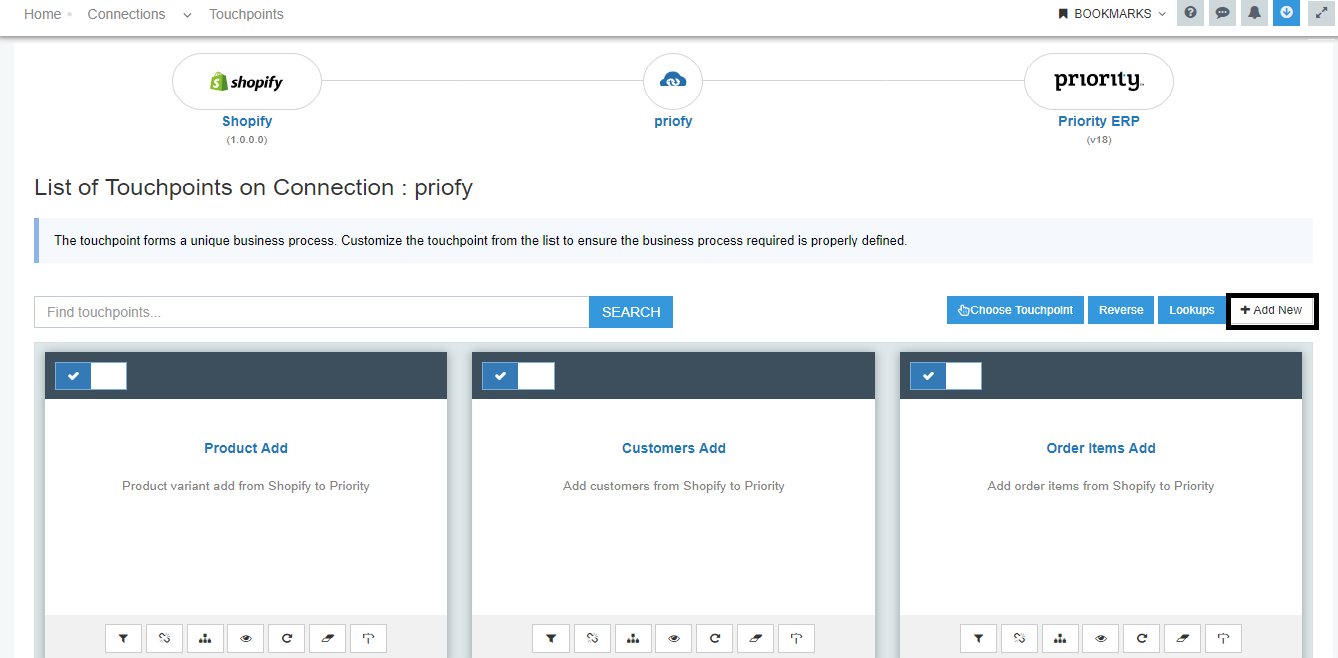 4) The Touchpoint Information Page opens. Fill-up the fields marked with a mandatory symbol (a red coloured asterix) and click on the Continue Button.
- Name: The name should be the touchpoint name. Ensure that the APPSeCONNECT naming Convention is used for the touchpoint.
- Group: Select the group type, whether it is
Transactional Touchpoint or Configurational.
Note: Enable the checkbox for Show in Agent or else, the touchpoint will not be appearing in the Agent even if the touchpoint is ready.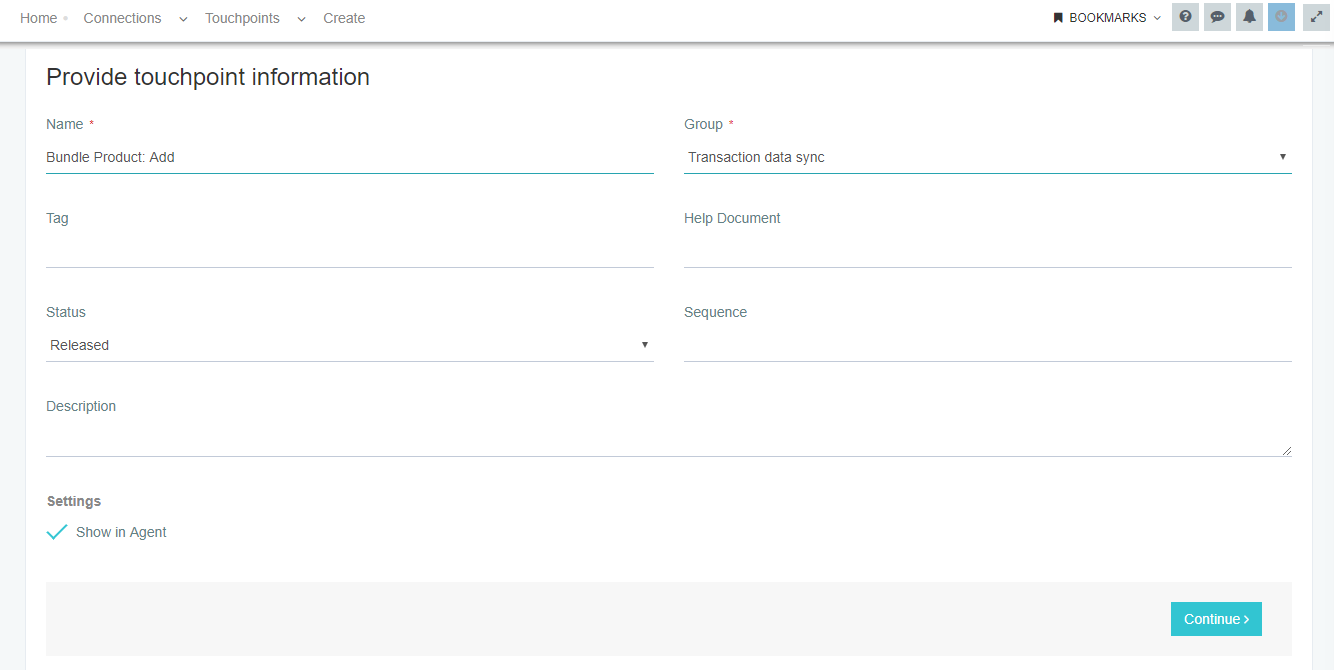
The field description is given below:
- Tag - This field is for providing unique tags to the touchpoints.
- Help Document - Users can add URL related to the document for this touchpoint
- Status - Status remains as Released by default.
- Sequence - This is to add dependency sequence to the touchpoint.
- Description - This field is for adding descriptions to the touchpoint for briefing the behaviour of the touchpoint. (For Ex: Adding Bundle Product for Shopify to Priority.)
5) The Source Setup Page opens. Select the mandatory fields - Schema, Action, Protocol and the Method. You can also Add New Schema & New Action, by clicking on the respective buttons. Click on the Continue button.
Note: The Schema and the Action should be selected according to the nature of the touchpoint. Suppose, the touchpoint is of Product Add, the Schema and the Action should be selected for the Product only.*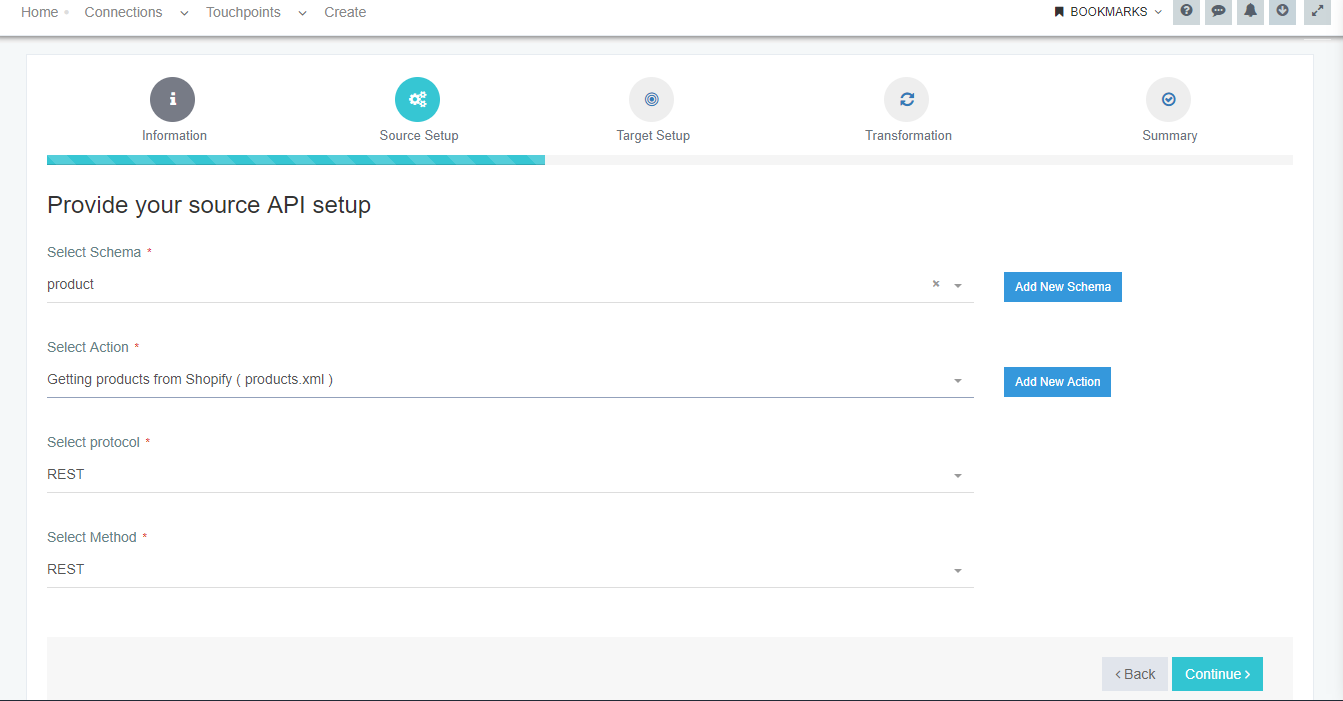 6) The Target Setup page opens. Fill the mandatory fields - Schema, Action, Protocol, and Method. Similar, to the Source Setup here too
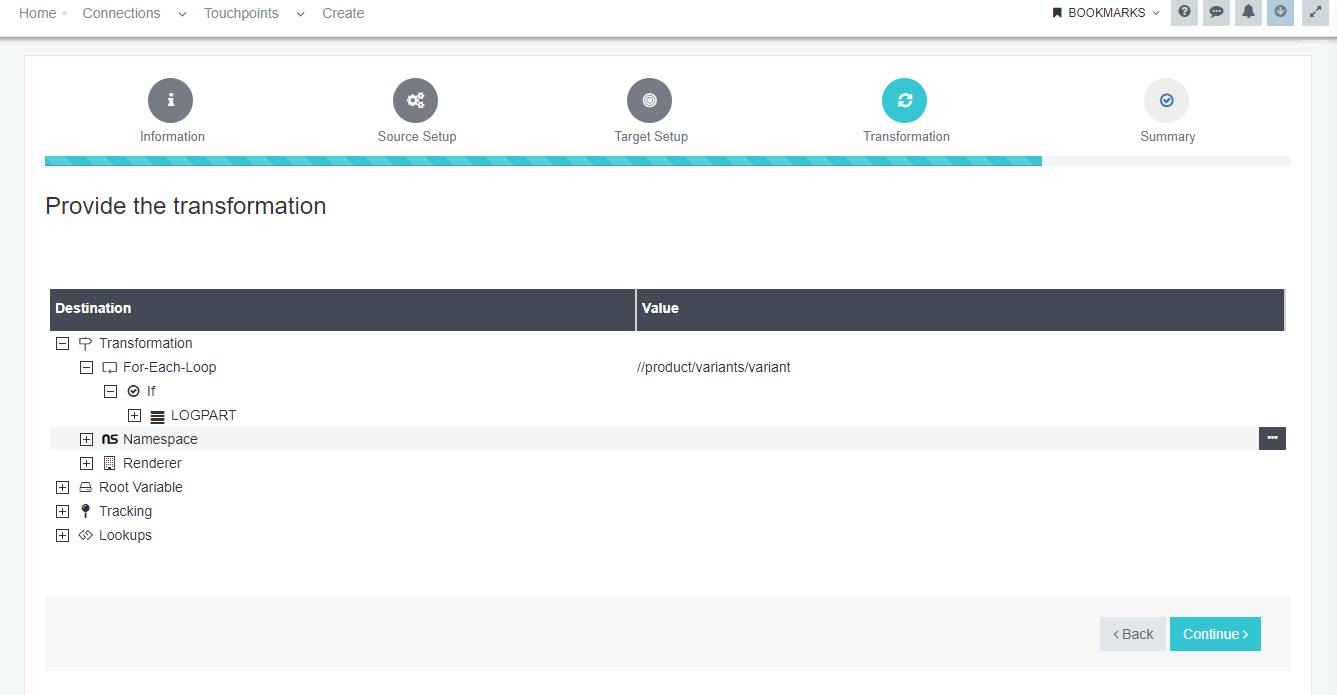
 New Schema/New Actioncan be added by clicking on the respective buttons. Click Continue Button.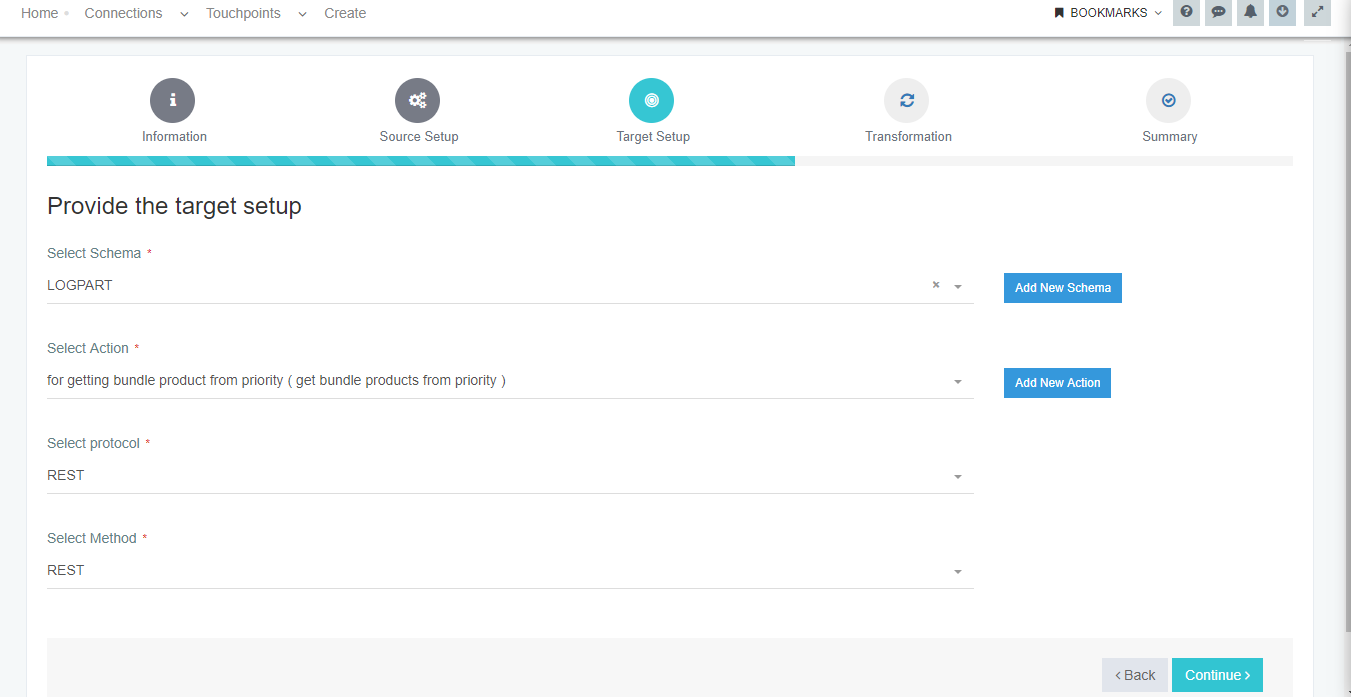 7) The Transformation/Mapping Page opens. Click Here to know more about the Transformation Concept. Click Continue button.
 8) The summary page opens. This page displays the complete details provided for creating the touchpoint. Click FINISH Button.
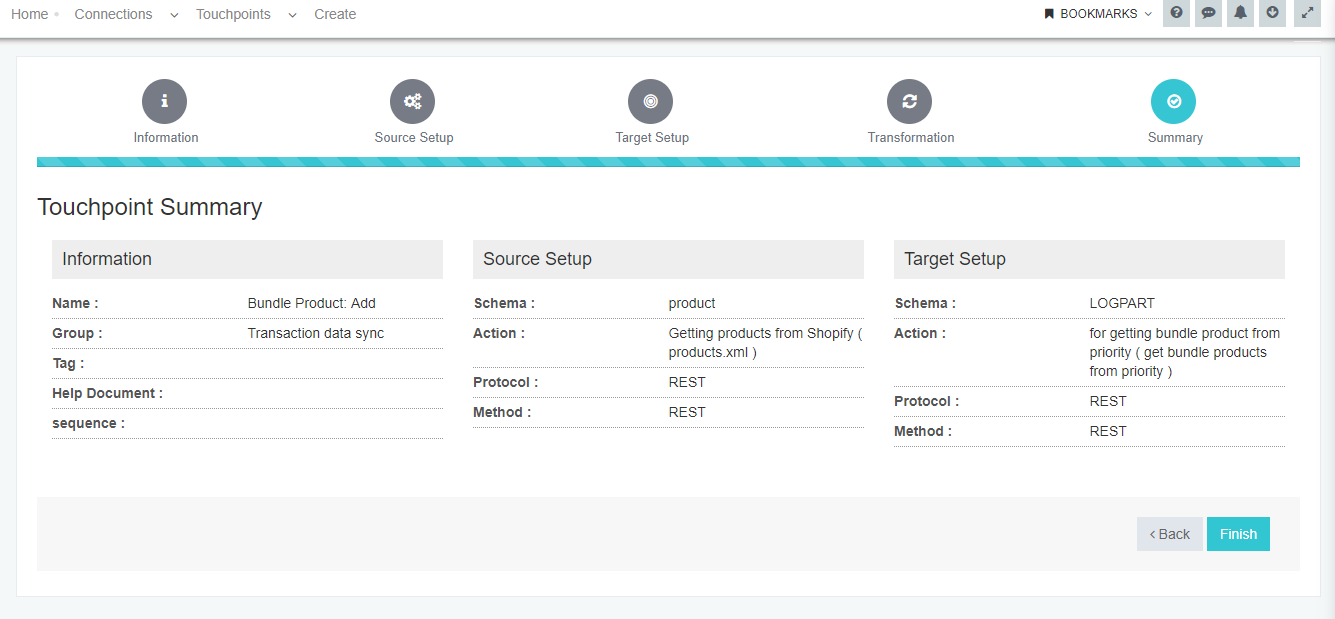 Note: Only the Transformation module of the Touchpoint can be edited anytime. Users cannot change or modify Touchpoint Information, Source Setup and the Target Setup of the touchpoint.
This completes the process of creating an organisational touchpoint. Navigate to the Touchpoint page. Click on the Choose Touchpoint option
and click the SELECT Button beside the created Touchpoint. The Touchpoint will be visible in the Touchpoints Page.
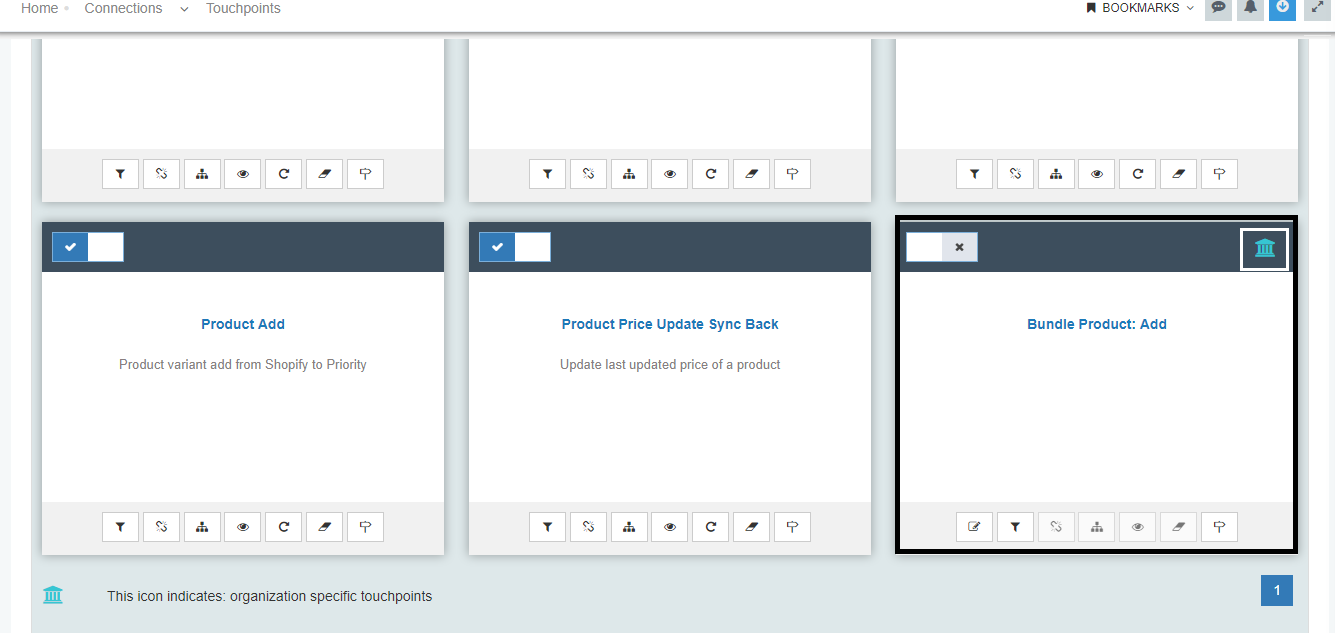
Protip Once an organization specific touchpoint is created, it will appear on all the similar type connections (in this case, it is created from Shopify to Priority, then this touchpoint will appear for any number of connections for the selected apps) for that organization in the inactive state. Once the connection is activated, it will appear in the Agent. The organization specific touchpoint is once created can only be used inside an organization.
Note: Touchpoints can be also be created while designing a workflow. Navigate to Workflow > Create Workflow > Drag a template and click on the Create a Touchpoint button available in the template wizard. The flow remains the same as stated above.
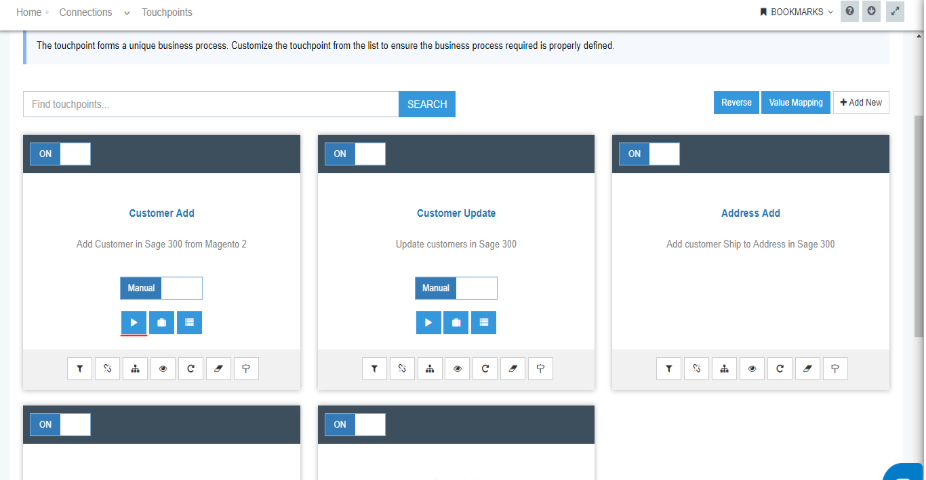
Choosing Touchpoint/ Workflow
APPSeCONNECT is one such product which always tries keep its process simpler. Features are developed keeping
the usability in mind. Choosing Touchpoint feature enables the user to select touchpoint from a drop-down list.
Prerequisites for Choosing Touchpoint
- Need to have a valid APPSeCONNECT Account.
- Choose the Application from the APPS Section.
- Create a connection for the chosen application.
Steps to implement Choosing Touchpoint/Workflow
- Login to the AEC Portal with valid credentials and Navigate to the connections page for creating a connection.
- On creating the connection, enable the check box for activating the default touchpoints.
Note: Default Touchpoints are the touchpoints that are available by default, as per the user requirement.
On Enabling, all the default touchpoints will be activated for that connection. - Click on View the Connection button to navigate to the touchpoint page.
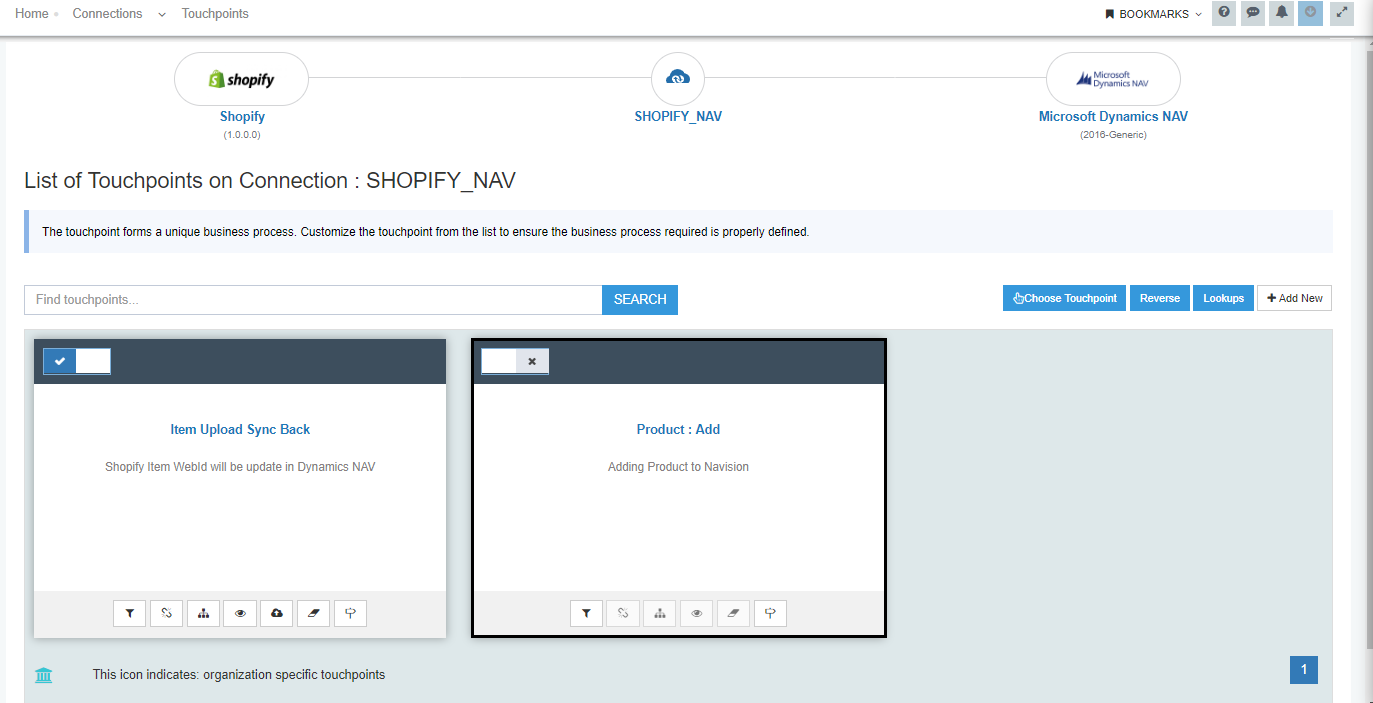
- On opening the touchpoint page, all the default touchpoints for that connection, are displayed in the page.
Also, if any touchpoints are required apart from the default touchpoints, the user can select those from the Choose
Touchpoint option.
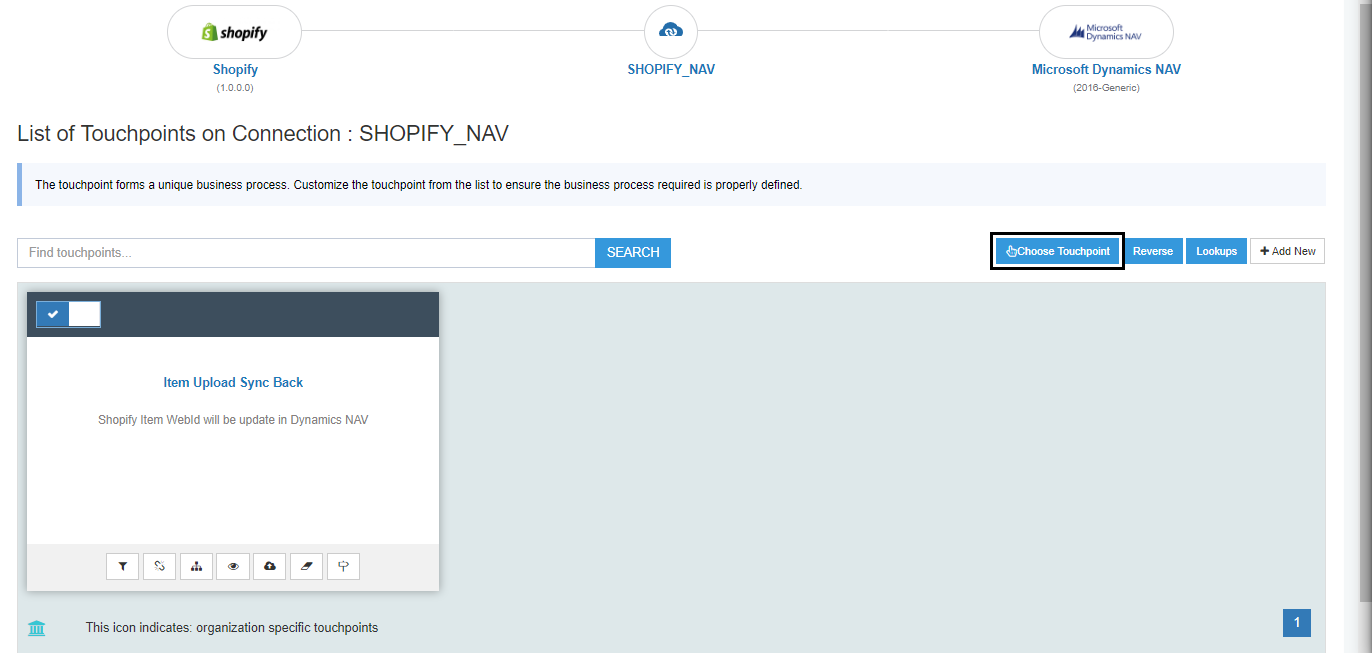
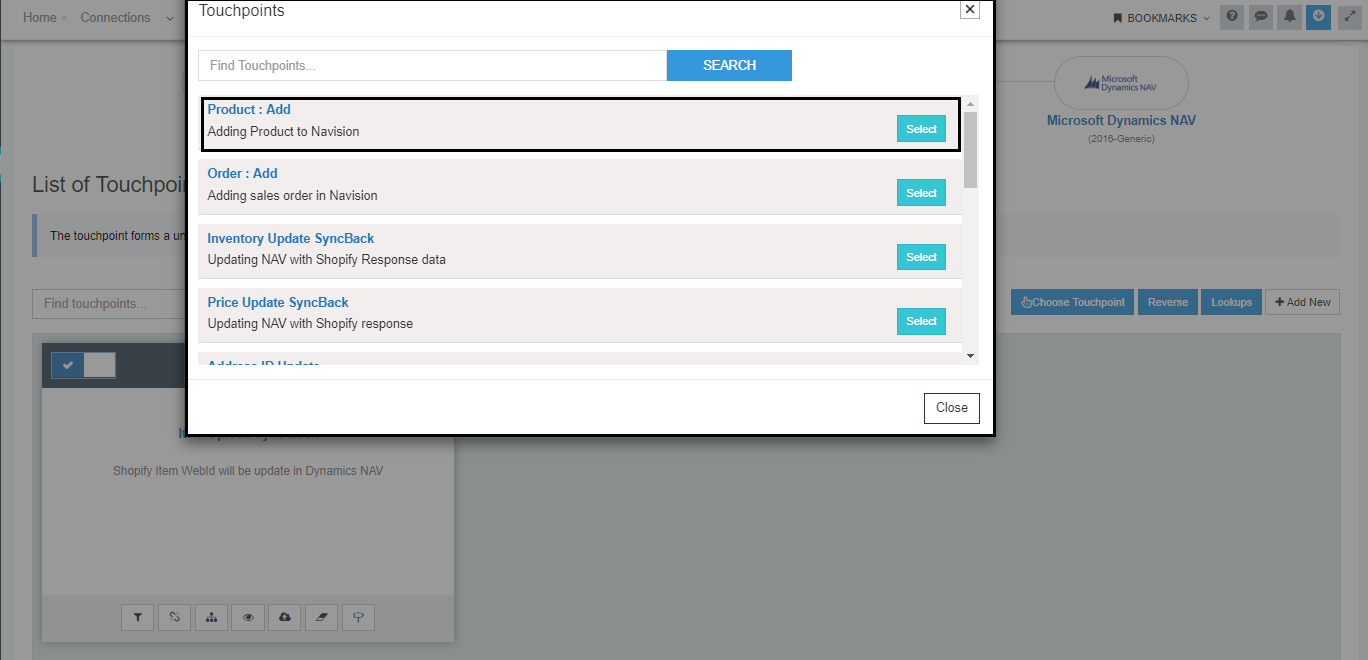
- On clicking the Choose Touchpoint option, list of touchpoints drops down which has the option SELECT.

- The user can also search the touchpoints present in the list from the Find Touchpoints option. Click on the SELECT Button to activate the same.
Here, the Product: Add touchpoint is Selected.
The above steps complete the process of Choosing Touchpoint.
Reverse Touchpoint
This functionality helps in reversing the source and destination application (vise-versa) per requirement. Reverse Touchpoint helps in reversing the touchpoints as and when required.
Configuring Environment - Agent download / Cloud agent configuration
APPSeCONNECT On-Premise Agent is a hybrid tool that sits on your own server and is configured on cloud and does the actual data synchronization with the help of other concerned adapters while the Cloud agent is a similar tool that performs the same function as the on-premise agent but is present on cloud itself. No server is required to configure or sync using the cloud agent. To know more about Configuring Environment, Click here
NOTE: APPSeCONNECT Users with On-Premise Agent version 4.4.0.0 & above, please refer to this environment configurationdocument
Environment setup of the on-premise agent:
- Login to the portal and download the Agent from the Downloads section as shown below.
 You can also download the agent from the Environment page
 - Run the setup folder to install the Agent in the system.
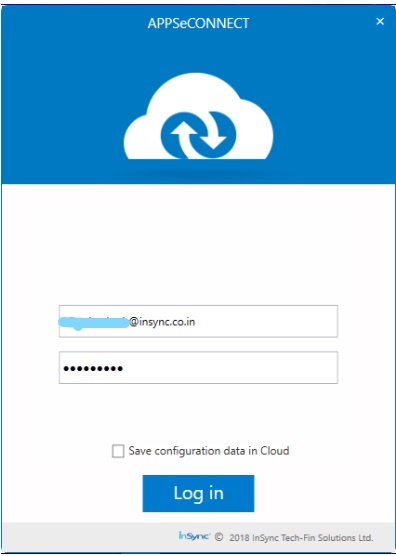
- Open the installed Agent on your machine.
- Login to the agent with your portal credentials.
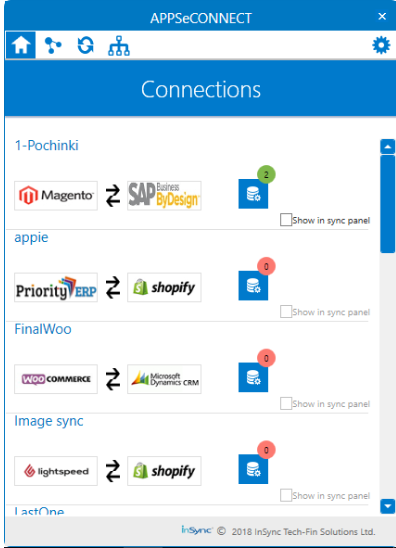
- There are four icons as shown below:
- The home icon shows the connections in the project’
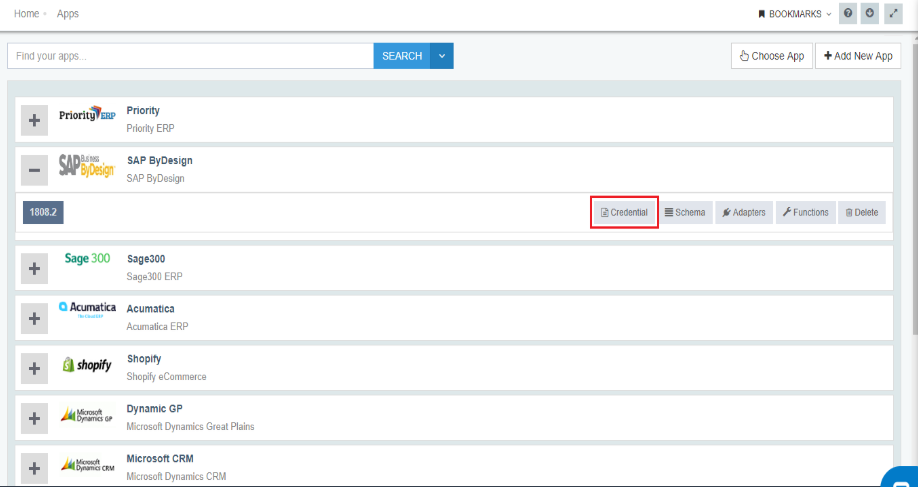
- The app configuration panel displays the applications that are selected in the portal for Integration. Credentials for each application adapters are provided in the
App Configuration panelof the agent. View here know about providing credentials to application adapters. - The sync panel displays the connections deployed successfully for sync. It is visible after you have checked the Show in sync panel checkbox in the Connections page.
- The last one is the Workflow option that displays the configured workflows in the project.
Environment setup of the Cloud agent
Pre-requisites:
- The project should be cloud supported.
- The two apps between which data has to be synced should be cloud supported.
- The connection between the two applications should be cloud supported.
View for creating a cloud agent for an organisation
1) Login to the portal and under the apps section provide the respective app credential data (similar to the configuration of the app in the on-premise Agent).
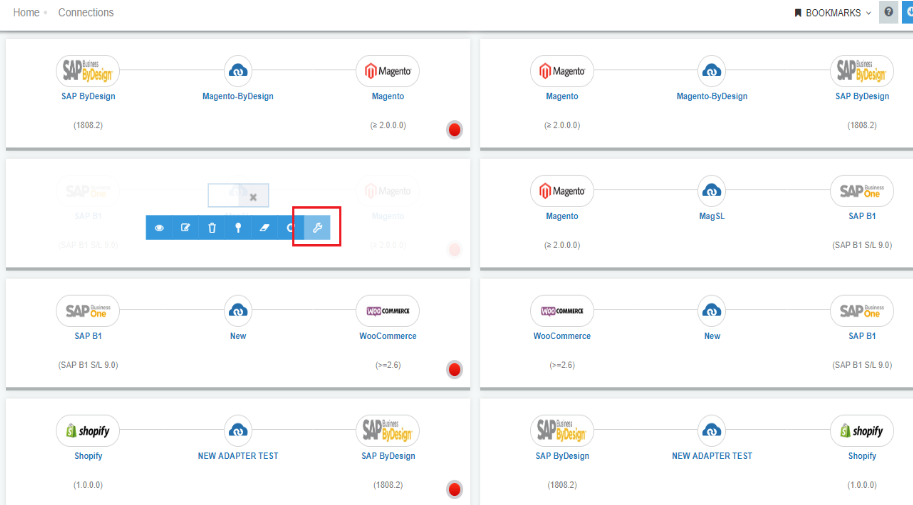
 2) After providing the credentials to the applications, navigate to the Connections page and click on the configuration assignment button setup option as shown below.
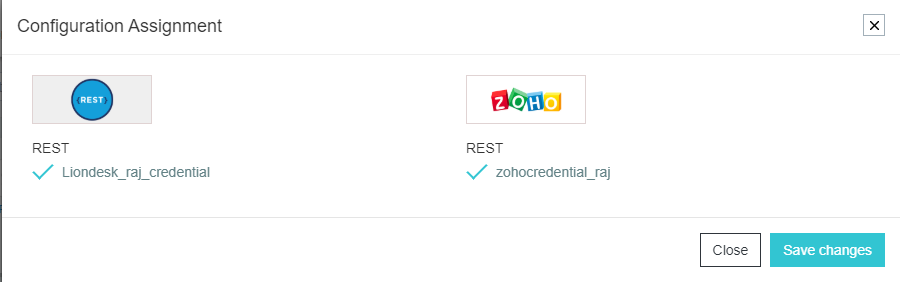
 3) Enable the assigned credential to the connection by choosing the configuration
4) Enable the toggle button on the connector.
 5) Click on the View the Connection icon and navigate to the touchpoints page and then Click on the play button to run the sync process.
Default Notification for Transactions
As we go on improving and deploying the integration, a number of failures you might encounter. Some are based on incorrect logic which misses a particular data structure that needs improvement on the connector, or else some related to application specific implementation issues. With APPSeCONNECT, we provide daily transaction reports emailed to you by default, once you setup the connector and execute it on your profile. Even though you can setup this section to send you multiple emails per day according to the schedule defined by you, you will get daily notification on the amount of transactions being performed through APPSeCONNECT.
Setting up email notification
- If you have installed on - premise agent, open the agent console and select Settings panel to open settings section of agent.
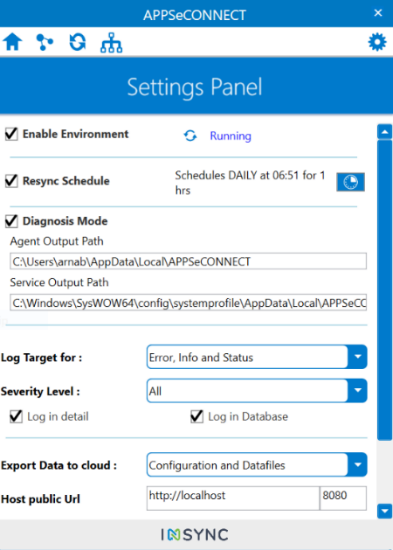
- In the settings panel, you can open Scheduler for Email Notification. You would see the Email notification is by default checked and schedule for mail once at 12 AM is automatically setup.
- Click on the schedule section and add as many schedule you want.
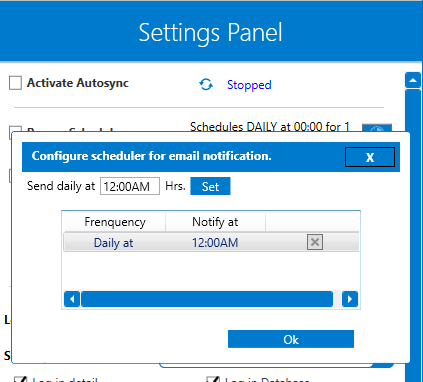
- Once setup, you can re-run the autosync to reset the settings.
Note: The morning report is dependent on Auto - Sync service and hence to receive reports, you must keep auto-sync service active.

