
Prestashop
Updated:
Application configuration is an integral activity prior to the process of integration. If your chosen application is Prestashop, credentials need to be provided for validating the agent. Here you will find the detailed description on how to configure the agents for the application Prestashop, Troubleshooting issues, the attributes and its action.
Prestashop is a REST (CRUD type) application which supports the Webservices authentication. The adapter of the application Prestashop provides the leverage to communicate and adapt with the AEC Portal. This section provides you the detailed process of validating the credential of the application Prestashop.
Pre-requisites for Prestashop Configuration
- Create an account in Prestashop and Login into it.
- Username and Password to access the application.
- Click here to know the APIs of the application.
On-Premise Agent Configuration
Installation of On-Premise Agent
You need to install the agent on your local server. To Know about On-Premise Agent Configuration, Click here.
Configure the Prestashop Application in the Agent
- Create and Deploy ProcessFlows in the cloud portal.
- Open the agent and click the checkbox in Settings Panel.
- Move into the App Configurational Panel of the agent and configure the details of the respective application.
Steps to Configure Prestashop Credential in OP Agent
- In the App Configuration panel of the agent, click on the + button, beside the app Prestashop.
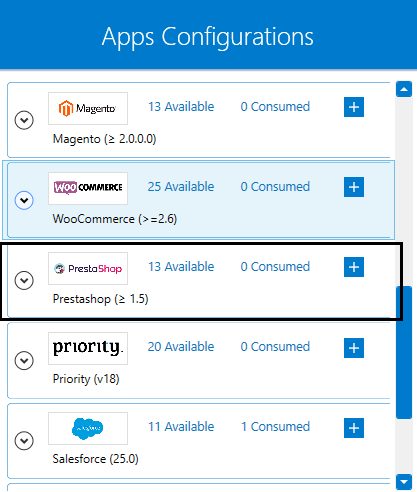
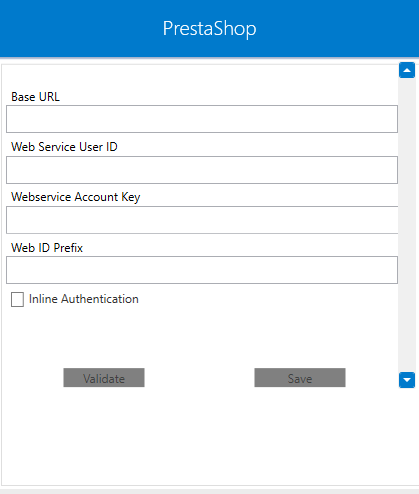
- On clicking the + button, the credential panel opens for the application Prestashop.
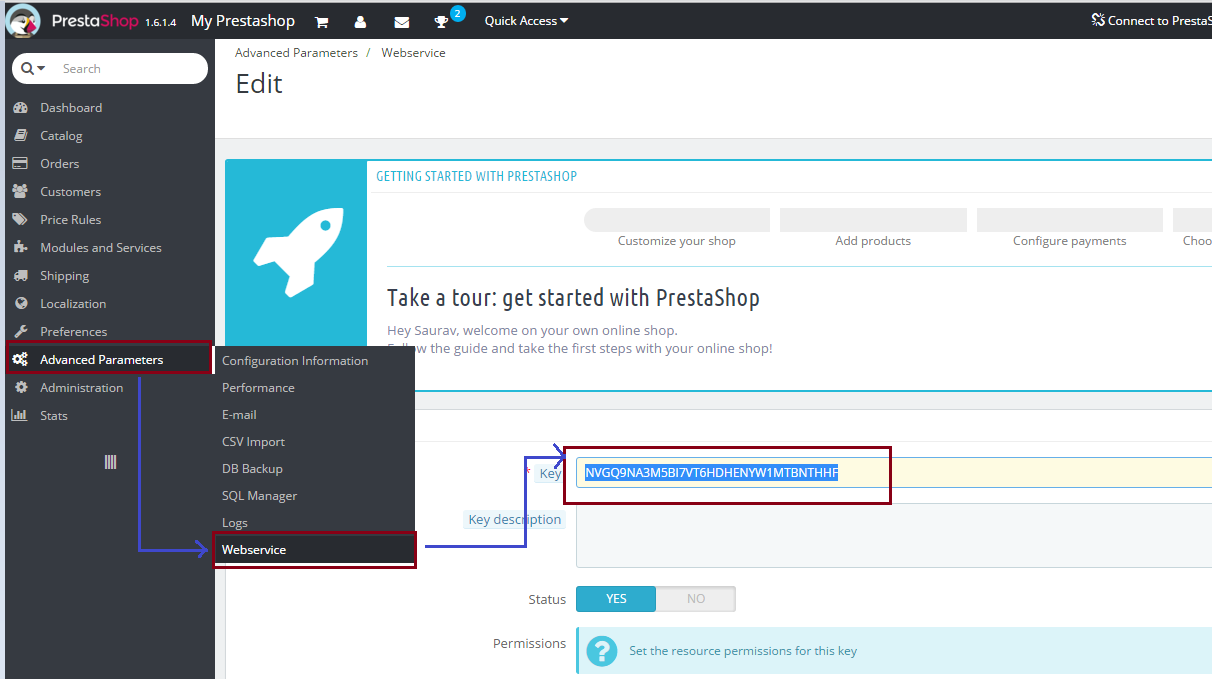
- Prestashop users can fetch the webservice key from Prestashop portal only.
Navigate to Advanced Parameters > Webservice > Key. For more details related to webservice, click here.
Note :Web Id Prefixis an optional field. However, user can provide the detail as per the requirements. - Web Id Prefix is generally used when the Prestashop is having multiple Store in the same installation. The prefix of the respective store is provided in the Web Id Prefix to segregate the data coming from multiple stores.
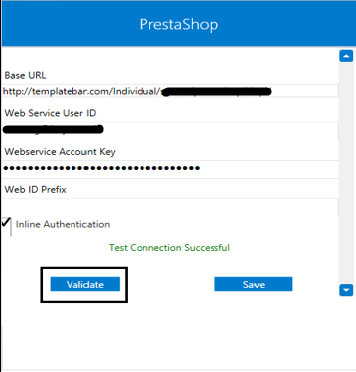
- After providing the credentials, click on
Validatebutton followed bySAVE.
Following the above process, the Prestashop application can be configured in the OP agent.
Cloud Agent Configuration
Configuring the Prestashop Application in Cloud Agent
-
Login to APPSeCONNECT portal with valid credentials.
-
Navigate to Manage > App. Expand the Prestashop application and click on
Credential. -
Expand the
RESTnode, click onAdd New Credential. -
Provide the necessary information
Credential Name,Base Url,Web Service User ID,WebService Account Key,Web Id PrefixandInline Authentication.
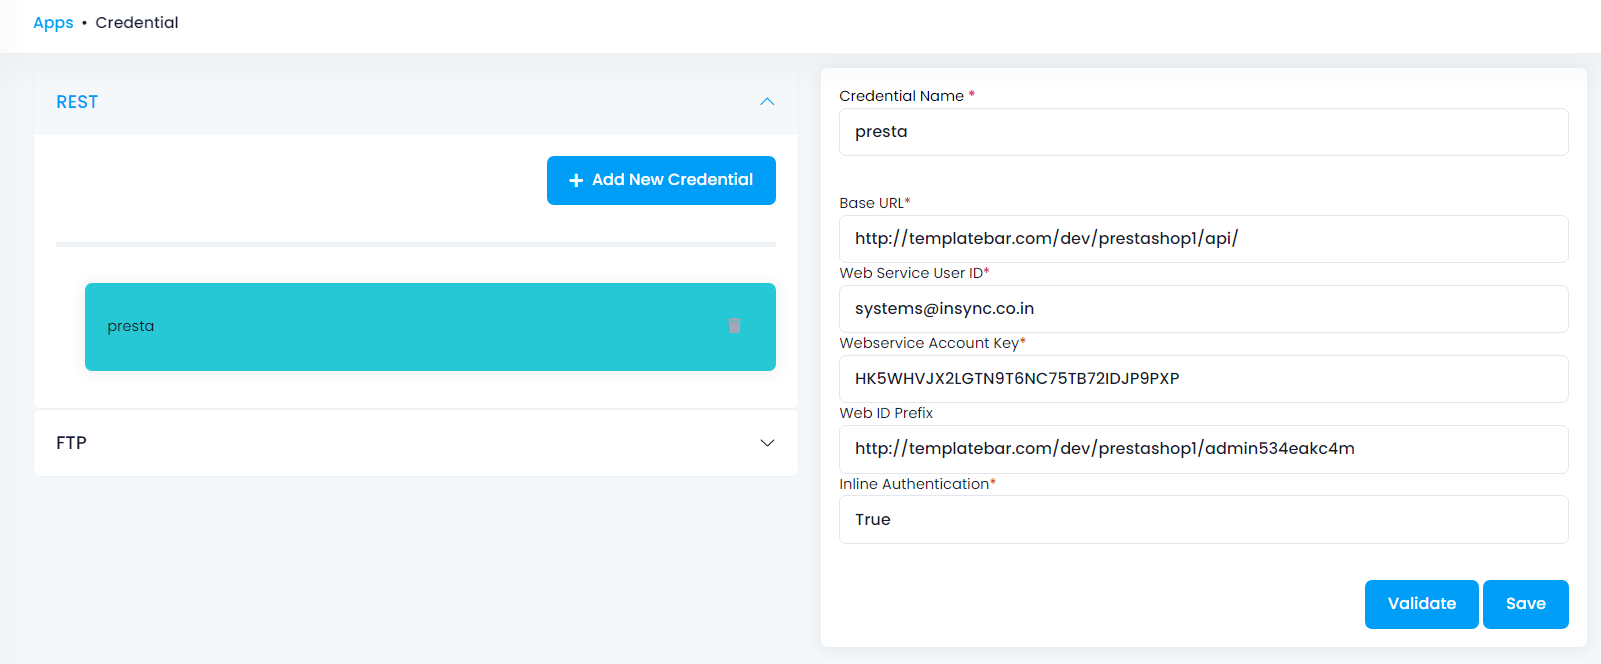
-
Click on Save and a toaster message will be displayed confirming the same.
Troubleshooting
ISSUE 1 : Cannot POST data, Source application returned False
Cannot POST data, Source application returned False even if Data is present in the Source Application (Prestashop).
Some of the basic troubleshooting issue happens due to improper validations. In this case, check for the proper validations of the credential for the source application adapter. Also, try deleting the Temp and Cache files from the portal and the system, and try validating the adapter again. Once validated, re-deploy and execute the processflow for its successful execution.
Attributes and Actions
While defining a connection to an API in Prestashop, you require clear understanding about the data requirements and endpoint configurations. You can refer to this document to find all the endpoint details of your Prestashop installation. To define the endpoint in APPSeCONNECT, you need to define Schemas and Actions. Actions are specifically targeted for an endpoint while schema is the data needed to execute the API. Here is the list of some of the pre-packaged API actions defined for you which you can easily plug and play while doing your integration.
Prestashop has a generic API Document and Authentication following the CRUD type REST API protocols.
| Endpoint | Action | Action Type | Schema | UI Help | API Help |
|---|---|---|---|---|---|
| customers | customers | GET | Customer | Fetching customers from Prestashop and posting it into Destination Application | customer |
| addresses | addresses | GET | address | Fetching customer address from Prestashop and posting it into Destination Application | alladdresses |
| orders | orders | GET | Order | Fetching orders from Prestashop and posting it into Destination Application | orderhistrory |
| order_invoices | order_invoices | GET | order_invoices | Fetching invoices from Prestashop and posting it into destination application | order_invoices |
| POST customers | POST customers | POST | customer | Posting customers from Source Application to Prestashop | customer |
| POST products | POST products | POST | product | Posting products from Source Application to Prestashop | products |
Action Filter implementation
Data is fetched from source application using APIs, and as you are aware of, API provides filters
which will allow you to specify a subset of data from the whole bunch of data created in the server,
the same can be specified through Actions and Action filters. The Action generally defines the
endpoint of the application which is being fetched, while the filters define the search criteria
of the data. You can add these parameters in the action filter to define the search criteria.
-
The
displayparameter can be used to return all fields when used with thefullvalue. You need to put thedisplayparameter in the key field andfullin the value field of the action filter asdisplay=full. This will return all the fields of an endpoint that have been requested by you. -
displayparameter enables you to specify selected fields as per your requirement. Mention a list of field names in brackets as :display=[id,lastname,firstname,phone_mobile]. You need to mention thedisplayparameter in the key field andid,lastname,firstnameor any other field name in the value field of the action filter. -
The
filterparameter controls which items to be returned. You need to specify the field name in[].-
The
EQUALoperator is used when you need to get specific items. For example, if you want the addresses for customer #1, you can filter your GET request with the filter parameter asfilter[id_customer]=1where id_customer is a field of the addresses endpoint. This will fetch the addresses of those customers who have 1 as their id_customer. Similarly, you can use any other field and its corresponding value. -
The
LIKEoperator is used when you need to search for items. For example, if you want the addresses with cities starting with SAINT, use the filter asfilter[city]=[saint]%where city is a field of the addresses endpoint. This will return the addresses of those customers who have their city starting withsaint. -
The
ORoperator is used when you need to get items matching several criteria. Use the filter asfilter[city]=[paris|lyon]where city is a field of the addresses endpoint. This filtering condition will provide you with those addresses where the city belongs toparisorlyon. -
You can also use
filterin combination with thedisplayparameter. Let say you want to get the mobile phone numbers of customers #1, #7 and #42. You need to use the filtering condition asfilter[id_customer]=[1|7|42]anddisplay=[phone_mobile]. Write the conditions seperately as key-vaule pair in the action filter and join them using&&operator. -
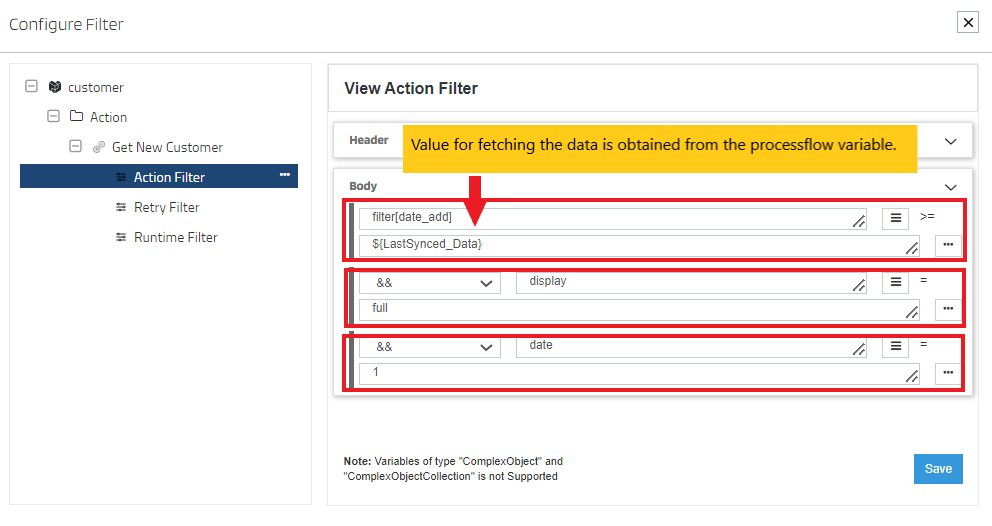
If you need to filter the entries in the input packet according to their date, then you should always specify
date=1parameter to allow date filtering.
-
Let us consider the API structure of customer schema in Prestashop application. If you need to fetch a group of customers from the application,
you can specify the condition in the action filter by taking any field from the xml structure of the respective APIs. For instance, to fetch customer with id as 1
use filter[id_customer] in the key field and 1 in the value field. To display specific fields from customer schema, such as firstname,
lastname and email, use display in the key field and firstname,lastname,email in the value field.
<prestashop xmlns:xlink="http://www.w3.org/1999/xlink">
  <customer>
    <id><![CDATA[]]></id>
    <id_default_group><![CDATA[]]></id_default_group>
    <id_lang><![CDATA[]]></id_lang>
    <newsletter_date_add><![CDATA[]]></newsletter_date_add>
    <ip_registration_newsletter><![CDATA[]]></ip_registration_newsletter>
    <last_passwd_gen><![CDATA[]]></last_passwd_gen>
    <secure_key><![CDATA[]]></secure_key>
    <deleted><![CDATA[]]></deleted>
    <passwd><![CDATA[]]></passwd>
    <lastname><![CDATA[]]></lastname>
    <firstname><![CDATA[]]></firstname>
    <email><![CDATA[]]></email>
    <id_gender><![CDATA[]]></id_gender>
    <birthday><![CDATA[]]></birthday>
    <newsletter><![CDATA[]]></newsletter>
    <optin><![CDATA[]]></optin>
    <website><![CDATA[]]></website>
    <company><![CDATA[]]></company>
    <siret><![CDATA[]]></siret>
    <ape><![CDATA[]]></ape>
    <outstanding_allow_amount><![CDATA[]]></outstanding_allow_amount>
    <show_public_prices><![CDATA[]]></show_public_prices>
    <id_risk><![CDATA[]]></id_risk>
    <max_payment_days><![CDATA[]]></max_payment_days>
    <active><![CDATA[]]></active>
    <note><![CDATA[]]></note>
    <is_guest><![CDATA[]]></is_guest>
    <id_shop><![CDATA[]]></id_shop>
    <id_shop_group><![CDATA[]]></id_shop_group>
    <date_add><![CDATA[]]></date_add>
    <date_upd><![CDATA[]]></date_upd>
    <reset_password_token><![CDATA[]]></reset_password_token>
    <reset_password_validity><![CDATA[]]></reset_password_validity>
    <associations>
      <groups>
        <group>
          <id><![CDATA[]]></id>
        </group>
      </groups>
    </associations>
  </customer>
</prestashop>
- You can retrieve Customers from
Prestashopby creating a variable at processflow level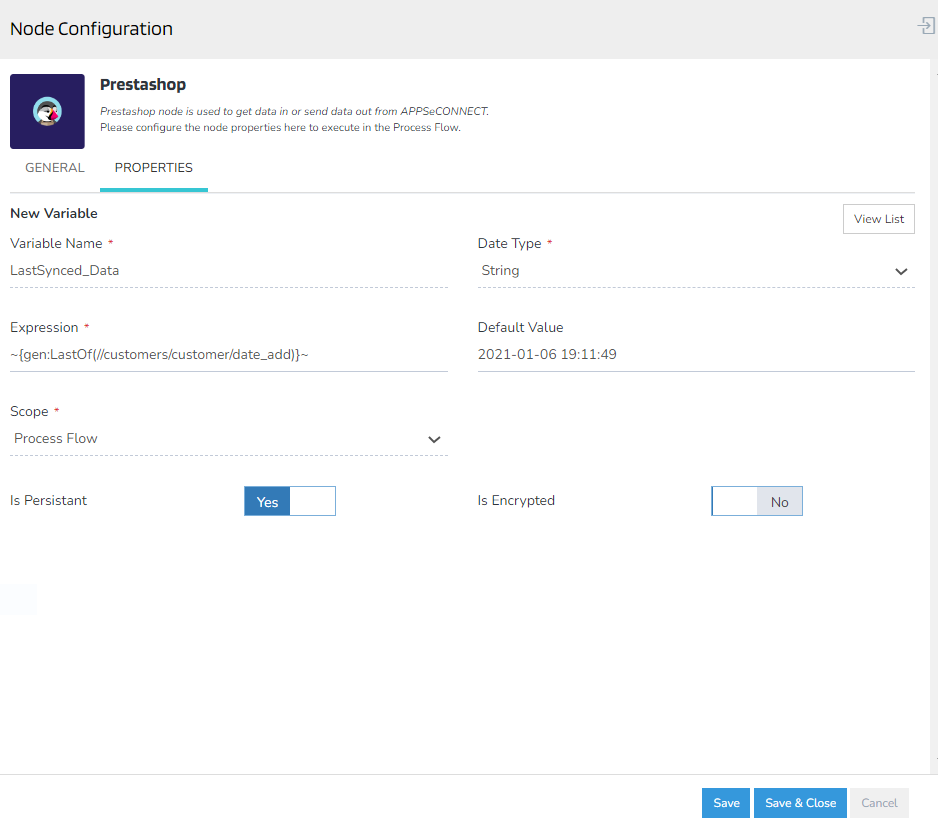
and using it in the action filter.
- Fetch the updated customer information from
Prestashopusing a variable at processflow level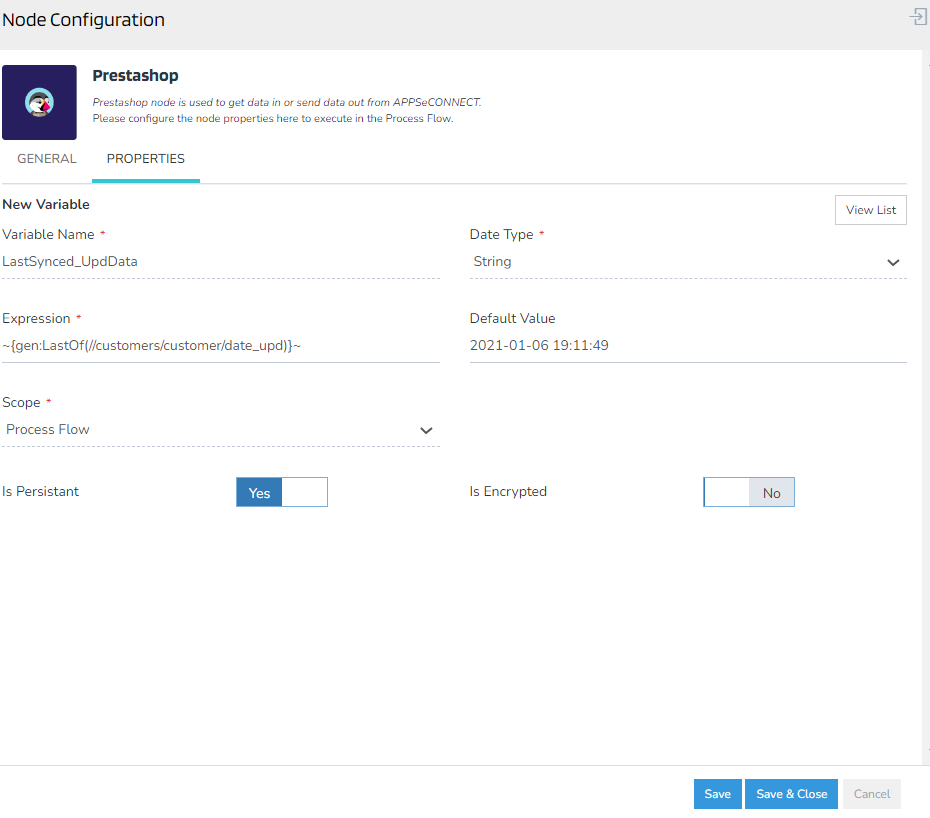
and using it in the action filter.

Click here to know the usage of filters other than the mentioned above.

