
Basic Authentication
Updated:
Process to Configure Basic Authentication in Rest Adapter - On Premise
To configure the Basic Authentication Type for Rest Adapter follow the steps given below:
- Login to APPSeCONNECT Portal and go to the app section to choose the desired application (Rest Supported Application).
-
Create Technology Application using rest adapter. Choose
RESToption while creating technology application for REST based protocol. - Create Connection between the application.
Protip: You can use either both technology app or one tech app and one prepackaged app while creating a connection.
Also you need to click Configure Connector button for creating connection as your desired connection is made of custom application.
Protip: Here you will get a connection for Shopify (REST Supported Application) where you can view the validation details as required.
Once the connection is created, Login to the agent.
Go to the App Configuration page on your OP Agent and Click on Update Configuration.
You can now view the chosen applications in your agent. Here SHOPIFY is BASIC AUTH supported Application,
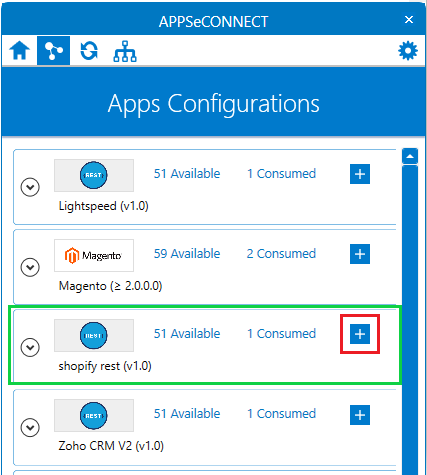
Click on the + icon beside the shopify app and the following screen appears.
 .
.
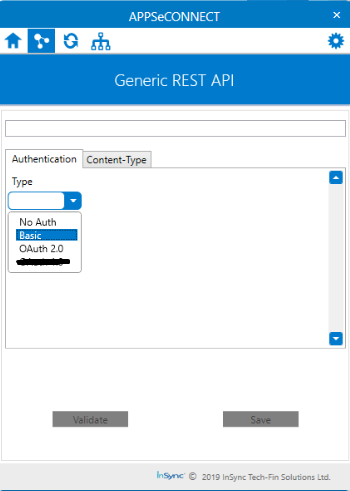
The Rest api screen contains the following fields:
- URL - The URL of the server to connect to. This can be an http or https address but must be URL encoded.
- Authentication - Identifies the secure login type.
a) No Auth — No login information in required.
b) Basic — Basic uses base64 encoding. Because user passwords are not encrypted and the target server is not authenticated, Basic is not a secure authentication.
c) OAuth 2.0 - OAuth 2.0 is the industry-standard protocol for authorization. The OAuth 2.0 authorization framework enables a third-party application to obtain limited access to an HTTP service, either on behalf of a resource owner, or by allowing the third-party application to obtain access on its own behalf.
Choose the Authentication Type as Basic from the drop down list. The following screen appears
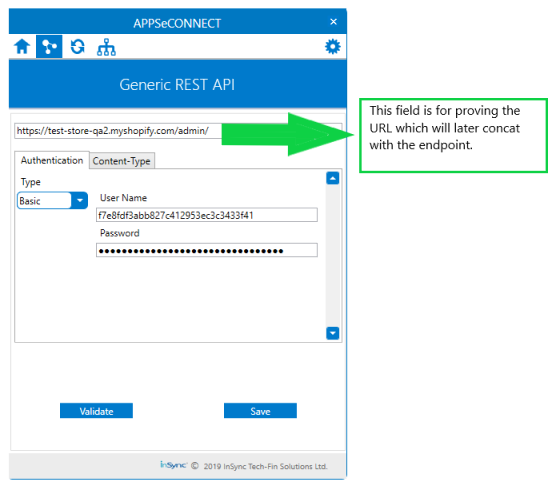
Input the required details on the basic authentication screen of the REST ADAPTER.
- Base URL - Input the Base URL of the Rest Supported APP
- User Name - The user name for authentication.
- Password - The password for authentication.
Protip Here the username is the API KEY generated against your PRIVATE APP created on Shopify
The pathway for generating new Private App in Shopify is: APP>Manage Apps>Create a New Private app
Now click on the Content-Type Tab and the following screen appears .
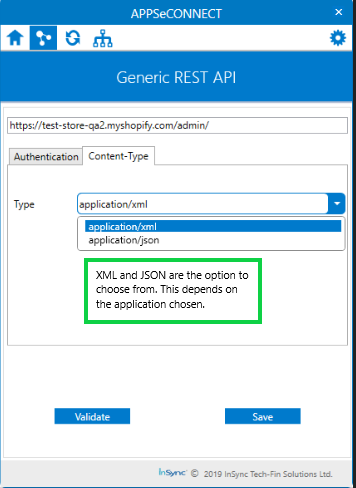
- Content-Type - This is the content type section that includes the file format types like XML, JSON
Presently the REST Adapter supports two set of content type conversion- XML and JSON - Support for uploading sample XML documents to define schema for XML content during REST Adapter configuration.
- Support for uploading sample JSON documents to define schema during REST Adapter configuration.
Select the Content-Type from the drop down list. Click on VALIDATE and SAVE after providing the credentials.
Protip XML documents passed to a REST endpoint that support the XML content type must comply with the
XML schema specified during trigger (inbound) REST configuration. When the REST invokes a target endpoint,
the XML response must comply with the XML schema specified during invoke (outbound)
REST response configuration.
-
Similarly go to App Configuration option and enter the server details for the application (here we have choosen SAP B1 as another application) which is not based on REST API.
-
Click on Validate button for validating the URL.
-
Now Go to the sync panel to run the sync process.
After the validation, the workflows are published for integration between the REST application SHOPIFY and SAP B1.
The touchpoint is executed for the Sync Process by clicking on the START SYNC NOW button.
Process to Configure Basic Authentication in Rest Adapter - Cloud
Follow the steps given below to configure Basic Auth in Rest Adapter in Cloud Enviornment.
- Login to APPSeCONNECT Portal
-
Create Technology Application using rest adapter. Choose
RESToption while creating technology application for REST based protocol. - Create Connection between the application.
Protip: You can use either both technology app or one tech app and one prepackaged app while creating a connection.
Also you need to click Configure Connector button for creating connection as your desired connection is made of custom application.
- Go to the
App sectionof the portal and you can view the selected application. - Click Credential button for the choosen application and the following screen appears. Click on the
Add new Credentialbutton.
Note: If you don’t have a cloud environment created on your organisation, You will be getting this message Please create an cloud environment to Grant the credentials on clicking the Add new Credential button.
To know more about creating Cloud Environment, Click Here
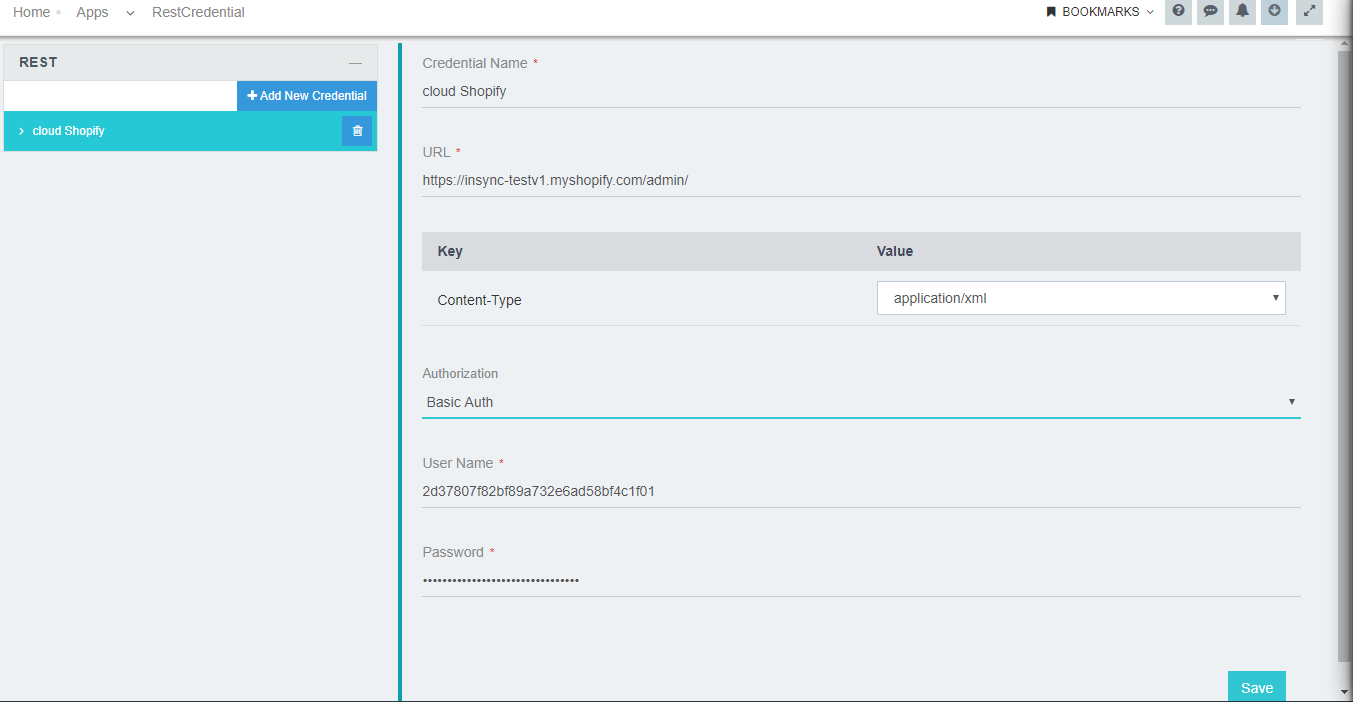
Here you need to enter the following details as shown:
- Credential Name: Enter the Credential Name.
- URL: This is the base URL, input the URL
- Key & Value: This is the content type section that includes the file format types like XML, JSON. Input the value from the drop down list of content type field.
- Authorization: Select Basic Auth from the drop down list.
- User Name: Enter the user name
- Password: This is non- mandatory fields. Some apps only use api key as username and no password is required.
Click Save button. The Reset based Cloud Credentials for Basic Authentication is saved successfully.
Protip: By default, organisations will only be On-Premise enabled. Users of the organisation needs to contact the APPSeCONNECT team for enabling cloud hosted organisation so that users can integrate cloud application using the cloud agent.

