
SAP ECC
Updated:
Application configuration is an integral activity prior to the process of integration. If your chosen application is SAP ECC, credentials need to be provided for validating the agent. Here you will find the detailed description on how to configure the agents for the application SAP ECC, attributes, action and the Troubleshooting issues.
SAP ECC stands for SAP ERP central component. This central component integrates digital information from all of the various areas of an organization in real-time, so decision-makers can get a holistic view of the entire organization’s operations and make decisions based on this information. For example, if there is a sale made in one area of the business, SAP ECC updates the data in all other affected areas of the business, such as inventory and materials.
**Note : This document is for SAP ECC in On-Premise Agent only
Pre-requisites for SAP ECC Configuration
- Create an account in SAP ECC and Login into it.
- Username and Password to access the application.
- Server Host, System Number, System ID, SAP Client ID and SAP Language.
On-Premise Agent Configuration
Installation of On-Premise Agent
You need to install the agent on your local server. To Know about On-Premise Agent Configuration, Click here.
Configure the SAP ECC Application in the Agent
- Create a triggered processflow with SAP ECC as source or destination application, and deploy the processflow in On-Premise agent.
- Open the agent and click the checkbox in Settings Panel.
- Move into the App Configurational Panel of the agent and configure the details of the respective application.
Steps to Configure the credentials in the Agent
1) Open APPSeCONNECT Agent by providing correct credentials.
2) In the Apps Configurational panel of the agent, you will be able to view the SAP ECC application. Click on the + icon to add the credential.
3) Provide the credentials of SAP ECC application.
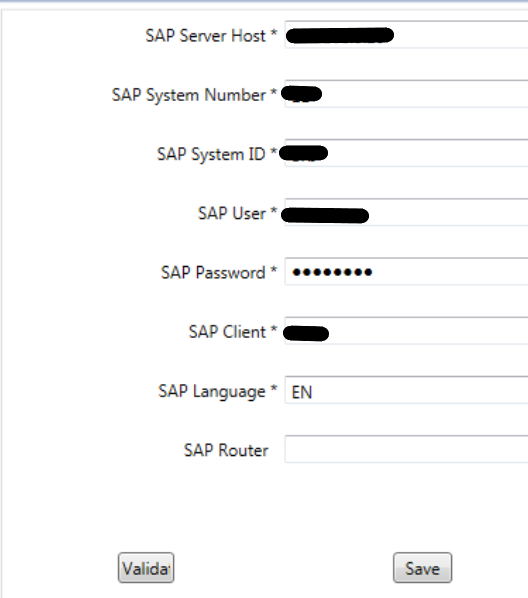
4) After providing all the credentials. Click “Save” button. A message “Connection Data Saved” will appear if all the credentials provided by you for SAP ECC is valid.
5) Click on the “Validate” button, to validate the connection. A message “Test Connection Successful” will appear if all the credentials provided by you for SAP ECC is valid. In this way, you can configure the credentials of SAP ECC.
Troubleshooting
Issue 1 : Source Application Data Not Found even if Data is present is the Source Application
Some of the basic troubleshooting issue happens due to improper validations or even if it is
accurately validated, the processflows do not sync. This basic issue resolves after removing
the Temp and Cache files from the portal and from your system. Therefore after clearing all
this, you need to re-deploy and execute the processflow again.
For Example, if the “Source Application Data Not Found” in the log file appears, the probable cause is due to the presence of the Temp and Cache Files.
Issue 2 : In SAP , we use various tables to store data related to product, order, inventory etc. If any error arises, you need to check the field mapping settings for the selected ECC condition tables.
Understanding IDOCS
SAP IDOC or Intermediate documents are an object that transports business transaction data in the form of an electronic message from one system to another. IDOC is an acronym for Intermediate Document.
IDOCs or Intermediate Documents are commonly used in case of data migration between SAP systems or between SAP and legacy system or vice versa.
Here the steps involved in configuring a new IDOC will be provided along with various transactions that are used while working with IDOCs.
IDOCs can be classified into two types as Inbound IDOCs and Outbound IDOCs.
-
Inbound IDOC : These are IDOCs which get the data into SAP system from external source i.e any SAP system or any other external system.
However, while integrating data using
APPSeCONNECTwe shall not be using any Inbound IDOCs and it is highly discouraged to do so. - Outbound IDOC : These are IDOCs which are sent out from SAP system to any other system. i.e any SAP system or any other external system.
These IDOCs contain information related to master data like customers, materials etc. as well as transaction information like Orders, Delivery, Invoice etc. Each master and transaction data has attributes of its own. Below are main IDOC types
- ORDRSP (Order)
- DESADV (Delivery)
- INVOIC (Invoice)
- MATMAS (material master)
- DEBMAS (customer master)
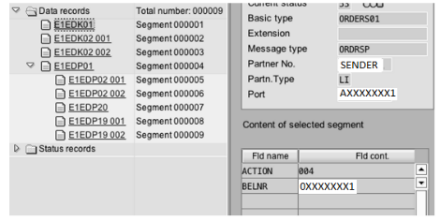
SAP IDOC structure is divided into Control Record, Data Records and Status records.
These records are stored in the transparent tables in SAP.
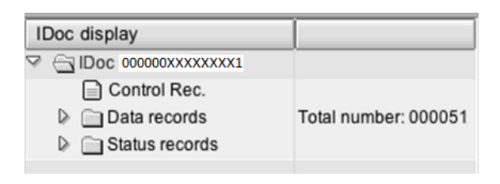
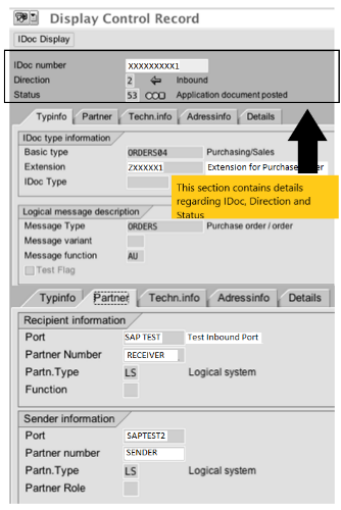
CONTROL RECORD
It contains information such as IDoc number, direction, IDoc Status, Basic Type, Message Type,
Partner (Sender/Receiver), date and time of creation/update, Interchange File or ISA number,etc.
This control record section also provides you with four tabs Type info, Partner,
Technical info, Addresinfo and Details. Each of these tabs has different functionalities.
-
Type infotabs contains information regarding Basic Type, Extension, Message Type, and Message Function. -
Partnertabs will provide you with bothsenderandreceiverinformation.
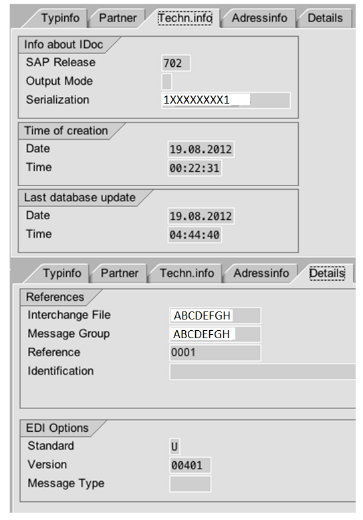
Technical info tabs will provide you SAP Release, Time of creation and Last database update informations.
DATA RECORD
It contains the details of the IDoc segments. In data record section, you will view various segments in which
the details corrosponding to the data being transffered will be stored. Suppose HR master data of an employee
is being processed from a SAP system to another SAP or a non-SAP system, then the details of each employee will
be stored in various fields as a segment under data record.
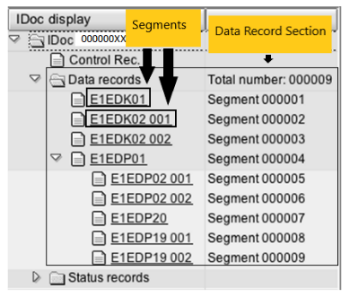
Click on any segment and IDoc segment will open up displaying various fields along with the data that needs to be processed.
STATUS RECORDS
IDoc Status defines the processing status of the IDoc. IDoc statuses are used to track the IDoc and its various processing states. Status Numbers represents IDoc status. Current status of the IDoc is present in Control record.
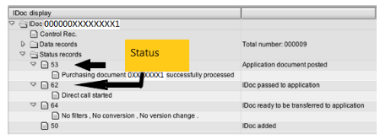
Initial Status numbers are 64 for inbound and 03 for outbound. Successful status is 53 for inbound and 16 for outbound IDocs.
Advantage of IDOCs
- Reduces manual work by automating data exchange.
- Supports ANSI and EDIFACT standards and make integration simple.
- Can support real time data transfer.
- Reduces dependency on Polling since a realtime execuion is having at the current scenerio.
Steps to configure IDOC
To setup new RFC Destination
-
Navigate to SM59. Enter transaction SM59 in the command field and hit Enter. The following screen will appear.
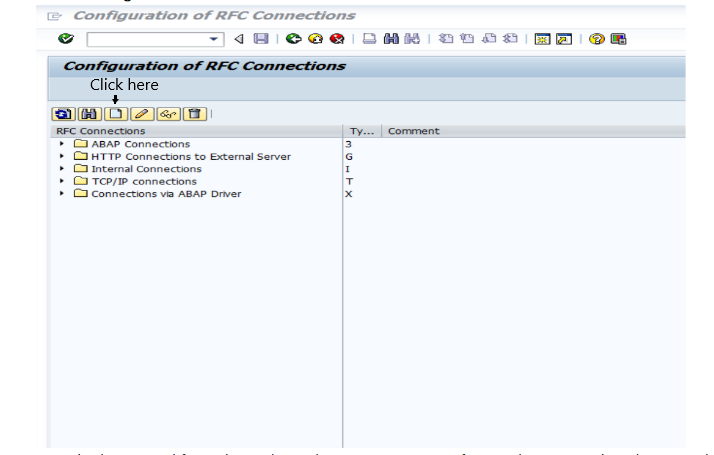
-
Click on ‘Create’ button. Provide the inputs RFC Destination, Connection Type, Description, Target Host, Service No and Path Prefix. In case of realtime execution, a
Processflow URLwill be generated after deploying the processflow in theOPagent. From theProcessflow URL, use the path URL as theTarget Hostand the query string asPath Prefix.
New port configuration for IDOC communication to APPSeCONNECT Agent
-
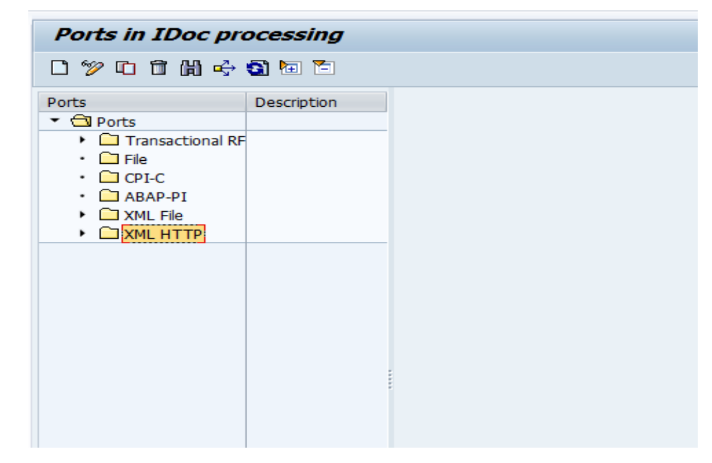
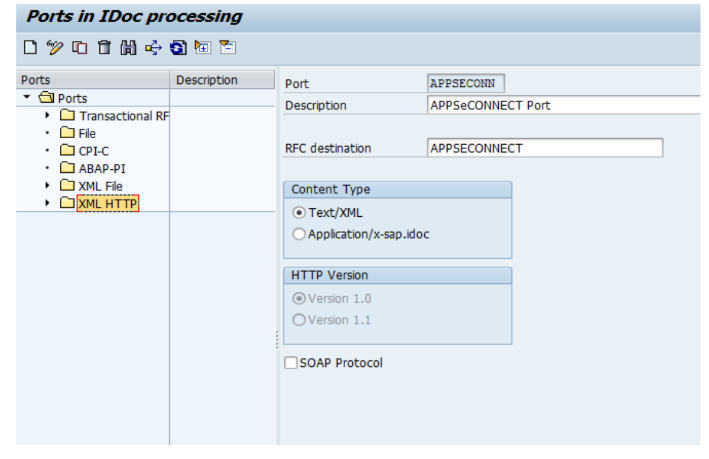
Navigate to WE21. Enter transaction WE21 in the command field and hit Enter. The following screen will appear.
-
Place your cursor on XML HTTP Port and click on ‘Create’. Enter Port, Description, RFC Destination and Content Type. Please note that RFC is a dropdown which needs to be selected (we created it in the above step).
Defining Agent as a logical system in SAP
-
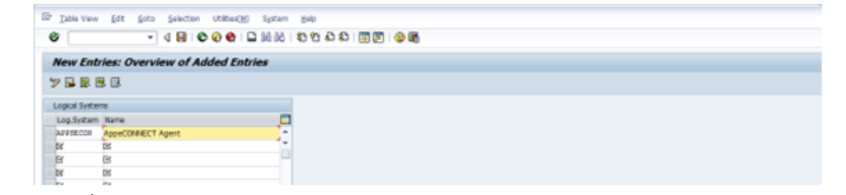
Navigate to BD54. Enter transaction BD54 in the command field and hit Enter. This will create workbench transport.
-
Click on ‘New Entries’, provide the details and save the entry.
Maintain/Create Partner Profiles for the outbound IDOCs
-
Navigate to WE20. Enter transaction WE20 in the command field and hit Enter. You will be able to view a
Partner profilessection. SelectPartner Type LSfrom left hand side panel and you will get a panel on the right side of the page to providePartner NoandPartner Typeas well as showing youOutBound ParametersandIncoming Parameters. -
Select Partner No as
APPSECONNand Partner Type asLogical system. Click on Save. After saving the Partner No and Partner Type, the partner will be visible in the left side panel along with the createOutBound Parametersbutton getting enabled. -
Click on
OutBound Parameters. Fill up the detailsPartner Number,Partner Type,Partner Role,Message Type,Receiver Port,Output Mode,IDoc Typeand tick the check-boxCancel Processing After Syntax Error. -
Click on
Savebutton. Going back toPartner ProfileHome page, the createdOutBound Parameterswill be availbale for editing.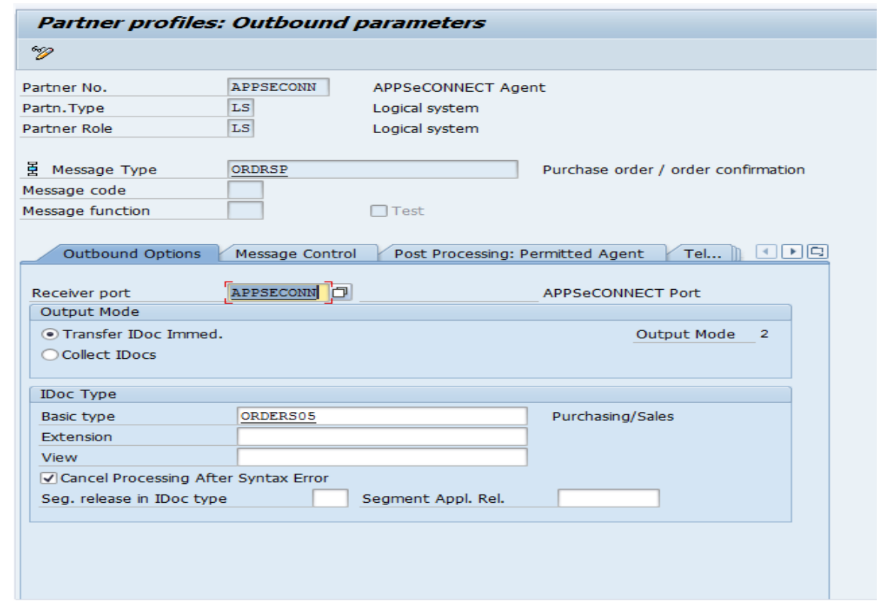
Follow the below list for creating or editing the partner profiles
| Item Name | Receiver Port | Message Type | Basic Type |
|---|---|---|---|
| Order | APPSECONN | ORDRSP | ORDRSP05 |
| Invoice | APPSECONN | INVOIC | INVOIC02 |
| Shipment | APPSECONN | DESADV | DESADV01 |
| Product | APPSECONN | PCITEMS,MATMAS | PCITEM01,MATMAS05 |
| Customer | APPSECONN | DEBMAS | DEBMAS07 |
| Image | APPSECONN | DOCMAS | DOCMAS02 |
| Catalog | APPSECONN | PCHEAD | PCHEAD01 |
| Attribute Set/Class | APPSECONN | CLSMAS | CLSMAS04 |
| Attribute | APPSECONN | CHRMAS | CHRMAS04 |
| Product Attribute | APPSECONN | ARTMAS | ARTMAS09 |
Output Types
Using SAP script, you can configure different output types like a printed form that you need for internal use or an email message sent via email. You can also get output types in PDF format or any other required format. You can use different output types like printing a form, where you select output type Print Out, the document is printed. All the output types are stored in NAST table. To see the configured output type, you can use Transaction code – NACE.
You need to follow the below steps to create or edit the output types.
-
Navigate to V/40. Enter transaction V/40 in the command field and hit Enter. A
Output Controlwindow will appears. In theOutput Controlwindow, you have to select Application type as V1 for SALES, V3 for BILLING, E1 for Inbound Delivery, etc. Here, we have selectedV3as the application type. After selecting the application type, click onOutput Typesbutton available in the menu panel of theOutput Controlwindow. A window will display differentOutput Typesunder this application.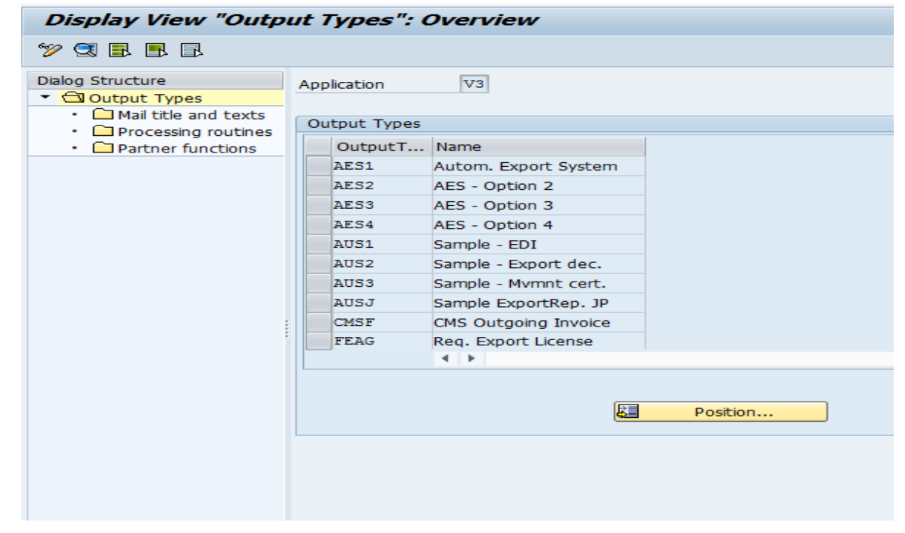
-
Select
Output TypesasZRD1from the above window. Enter theAccess Sequence.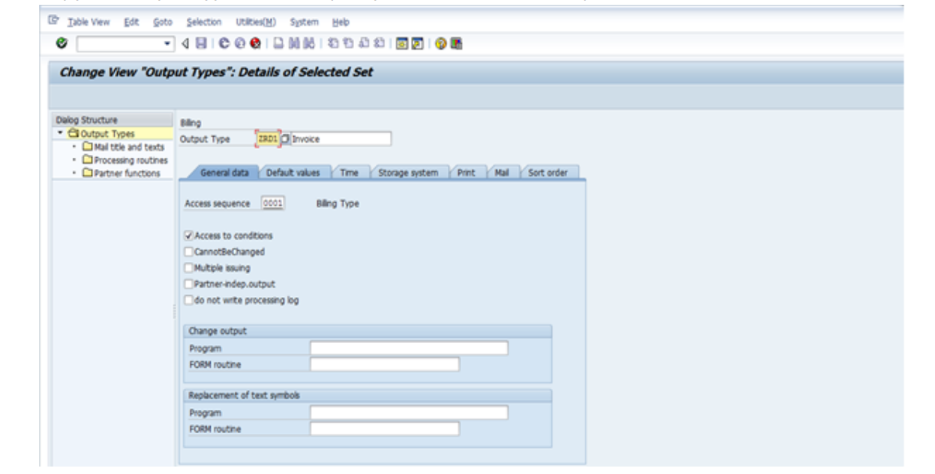
-
Save the output type and it may prompt you save multiple the changes in a customizing transport.
Note : Simply design the processflow, configure the agent and deploy the same to perform required integration.

