
Walmart
Updated:
Walmart is an American multinational retail corporation that operates a chain of hypermarkets, discount department stores, and grocery stores.
Walmart offers a variety of features to serve the needs of our connected customers. They provide items at the lowest price in a most convenient way, no matter how you shop.
Here are just a few ways by which they help customers save time and money :
- Walmart App – From Walmart Pay to Mobile Express Returns, prescription refills and grocery orders with same-day pickup, they help you get more done with just the touch of a button.
- Mobile Scan & Go – Shop and checkout with your phone in-store.
- Curbside Pickup – Order online, pickup in store.
- NextDay Delivery – In many markets, customers can enjoy fast, free shipping on eligible orders over a certain limit.
- Walmart GoLocal – Walmart’s delivery as a service business that provides delivery to customers from businesses of all sizes.
- Built for Better – An online shopping destination that makes it easy for customers to identify and shop for products that are built better for them.
Application configuration is an integral activity prior to the process of integration. If your chosen application is Walmart, credentials need to be provided for validating the agent. Here you will find the detailed description on how to configure the agents for the application Walmart, Troubleshooting issues, the attributes and its action.
Pre-requisites for Walmart Configuration
- Create an account in Walmart Marketplace and complete the registration process.
- Client ID and Client Secret of the application.
- Authorization and Authentication of the application.
How to get Client ID and Client Secret?
-
Click
My Accountto log into the Developer Portal.
-
Click
Add New Key For A Solution Providerto set permissions for the provider to generate aClient IDandClient Secret.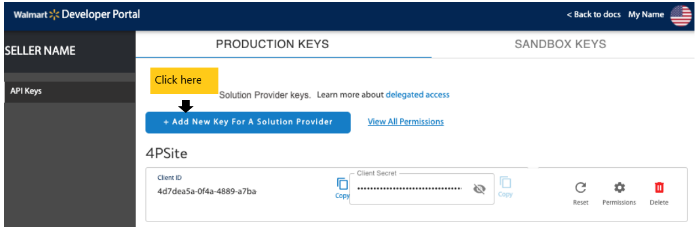
-
Specify specific permissions, or to take the defaults, click Submit. The Client ID and Client Secret will be generated.
-
Copy the Client ID and Client Secret to use them in the agent configuration.
How to get the Access Token Url?
- Navigate to Walmart API documentation.
- Expand the
Token API, theProduction URLwill be used as theAccess Token Url.
On-Premise Agent Configuration
Installation of On-Premise Agent
You need to install the agent on your local server. To Know about On-Premise Agent Configuration, Click here.
Configuring Walmart Application in OP Agent
-
Create a processflow with
Walmartas source or destination application, and deploy the processflow in On-Premise agent. - Open the agent and click the checkbox in Settings Panel.
- Move into the App Configurational Panel of the agent and configure the details of the respective application.
Steps to Configure Walmart Credential in OP Agent
- In the App Configuration panel of the agent, click on the + button, beside the app Walmart.
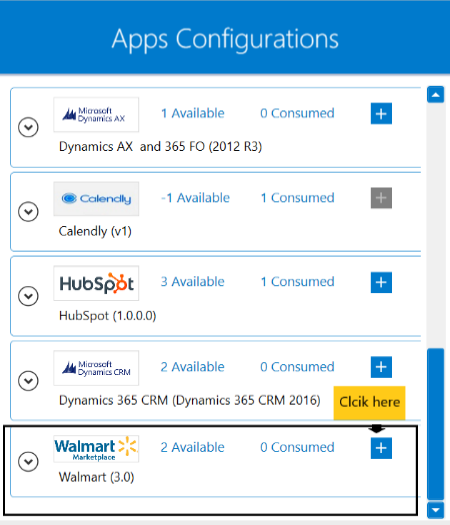
- On clicking the + button, the credential panel opens for the application Walmart.
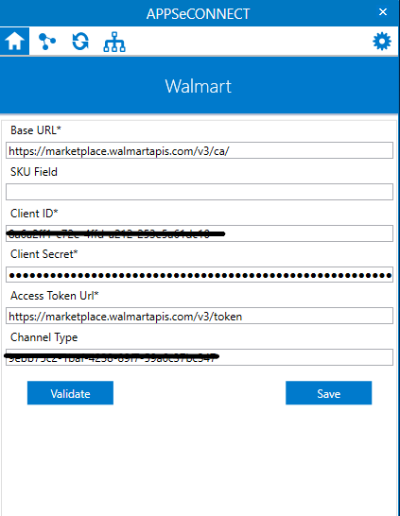
- Provide
Base URL,Client ID,Client Secret,Access Token UrlandChannel Typein the agent.ChannelTypewill be provided byWalmartwhile registering with the application. Usehttps://marketplace.walmartapis.com/v3/ca/as Base Url andhttps://marketplace.walmartapis.com/v3/tokenas Access Token Url. The base url will change depending on the country you choose for walmart marketplace. - After providing the credentials, click on
Validatebutton. After the validating the credentials successfully, a message will be displayed confirming the same. Click onSAVEto save the credentials finally.
Following this process, the Walmart application can be configured in the OP agent.
Troubleshooting
-
Agent validation may fail due to invalid
Client IDandClient Secret. Check the credentials with the application. -
Some of the basic troubleshooting issues happens due to improper validations or even if it is accurately validated, and if processflow don’t sync properly. This basic issue resolves after removing the Temp and Cache files from the portal and from your system. Therefore after clearing all this, you need to deploy and excute the processflow again to perform the required business integration in a smooth and free-flowing way. For E.g. If the
Source Application not Foundin the log file appears, the probable cause is due to the presence of the Temp and Cache Files.
Attributes and Actions
While defining a connection to a particular API endpoint in Walmart, you require clear understanding about the data requirements and endpoint configurations. You can refer to this document to find all the endpoint details of your Walmart application. To define the endpoint in APPSeCONNECT you need to define Actions and Entities. Actions are specifically targetted for a particular endpoint while schema is the data needed to execute the API. Here are the list of some of the prepackaged API actions defined for you which you can easily plug and play while doing your integrations.
| Endpoint | Action | Action Type | Schema | UI Help | API Help |
|---|---|---|---|---|---|
| items | items | GET | items | Displays a list of all items by using either nextCursor or offset and limit query parameters. | Items |
| orders | orders | GET | orders | Retrieves the details of all the orders for specified search criteria. | Order |
| price | price | PUT | price | Updates the regular price for a given item. | Price |
| inventory | inventory | GET | inventory | You can use this API to get the inventory for a given item. | Inventory |
Action Filter implementation
Data is fetched from source application using APIs, and as you are aware of, API provides filters
which will allow you to specify a subset of data from the whole bunch of data created in the server,
the same can be specified through Actions and Action filters. The Action generally defines the
endpoint of the application which is being fetched, while the filters define the search criteria
of the data. You can add these parameters in the action filter to define the search criteria.
- General filters : It represents the overall filter criteria of the API. To define such filters, you do not need to specify anything special, just putting the field name and the value with the condition type is fine.
Let us consider any API of Walmart such as order, the request structure will look like :
{
          "purchaseOrderId": "1796277083022",
          "customerOrderId": "5281956426648",
          "customerEmailId": "3A31739D8B0A45A1B23F7F8C81C8747F@relay.walmart.com",
          "orderType": "REPLACEMENT",
          "originalCustomerOrderID": "1234567891234",
          "orderDate": 1568466571000,
          "shippingInfo": {
            "phone": "3155598681",
            "estimatedDeliveryDate": 1569438000000,
            "estimatedShipDate": 1568700000000,
            "methodCode": "Value",
            "postalAddress": {
              "name": "Kathryn Cole",
              "address1": "3258BWarners rd",
              "address2": "Garage",
              "city": "Warners",
              "state": "NY",
              "postalCode": "13164",
              "country": "USA",
              "addressType": "RESIDENTIAL"
            }
          },
          "orderLines": {
            "orderLine": [
              {
                "lineNumber": "4",
                "item": {
                  "productName": "Beba Bean Pee-pee Teepee Airplane - Blue - Laundry Bag",
                  "sku": "test1"
                },
                "charges": {
                  "charge": [
                    {
                      "chargeType": "PRODUCT",
                      "chargeName": "ItemPrice",
                      "chargeAmount": {
                        "currency": "USD",
                        "amount": 10
                      },
                      "tax": {
                        "taxName": "Tax1",
                        "taxAmount": {
                          "currency": "USD",
                          "amount": 0.8
                        }
                      }
                    }
                  ]
                },
                "orderLineQuantity": {
                  "unitOfMeasurement": "EACH",
                  "amount": "1"
                },
                "statusDate": 1568466647000,
                "orderLineStatuses": {
                  "orderLineStatus": [
                    {
                      "status": "Created",
                      "statusQuantity": {
                        "unitOfMeasurement": "EACH",
                        "amount": "1"
                      }
                    }
                  ]
                },
                "fulfillment": {
                  "fulfillmentOption": "S2H",
                  "shipMethod": "VALUE",
                  "pickUpDateTime": 1568919600000
                }
              }
            ]
          }
        }
Suppose you need to fetch 10 orders at a time from Walmart, you need to use limit as the key and
in the value field provide any number. With this filtering condition, you can add more filtering condition using the and
clause. In this scenerio, use createdStartDate and ~{CreatedDate('yyyy-MM-dd'T'HH:mm:ssZ',' -6')}~ as key value pair.
~{CreatedDate('yyyy-MM-dd'T'HH:mm:ssZ',' -6')}~ filters data on the basis of the date on which the order is created.

