
Dynamics AX
Updated:
Dynamics AX is a powerful enterprise resource planning(ERP) software package for finance and operations. It helps global enterprises organise, automate, and optimise their processes on-premises, in the cloud, or through hybrid deployment. It’s part of the Microsoft Dynamics suite of intelligent business applications.
As APPSeCONNECT is a Business Process Automation tool, this will allow you to develop and configure seamless integration between business applications.
Therefore, application configuration is a fundamental activity prior to the process of integration. If your chosen application is
Dynamics AX, credentials need to be provided for validating the agent in case of OP agent. Here you will find the detailed description on
how to configure the agents for the application Dynamics AX, troubleshooting issues, action and its filters.
Pre-requisites for Dynamic AX Configuration
- The server where
Dynamics AXandAPPSeCONNECTagent is installed should be available along withCompany NameandUser Accountcreated in the application. - You need to create a
Inbound Portfor the services you need to access from the application. Navigate toDynamics AX-> Select any company ->System Administration->Inbound ports. Click onNew, a window will appear where you need to providePort NameandDescription. SelectHTTPas Adapter and click onConfigure. FromService Contract Customizationswindow, select the services that you need to add in the current port. -
Server Namealong with itsusernameandpasswordshould be available. -
Company Name,AX InstanceNameandNetwork Domainshould be provided to you while handing you the server. - You need to provide a customer id obtained from the application in
Account No for Validation. Open dynamics AX in your local server. Select the company that has been provided to you, click onAccount Receivable->All Customers. A list of customers will appear along with their customer id. Choose a customer id and put it in theOPagent. - In
Service Name, you need to provide the port name that you have used will creating theinbound port.
On-Premise Agent Configuration
Installation of On-Premise Agent
You need to install the agent on your local server. To Know about On-Premise Agent Configuration, Click here.
Configure the Dynamic AX Application in the Agent
- Create a processflow with Dynamic AX as source or destination application, and deploy the processflow in On-Premise agent.
- Open the agent and click the checkbox in Settings Panel.
- Move into the App Configurational Panel of the agent and configure the details of the respective application.
Steps to Configure the credentials in the Agent
1) Open APPSeCONNECT Agent by providing correct credentials.
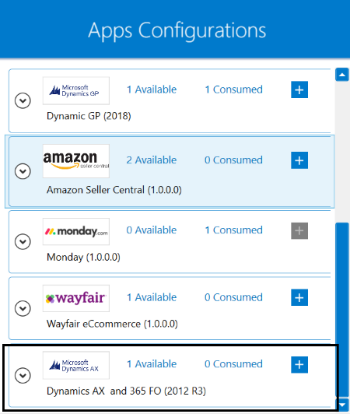
2) In the Apps Configurational panel of the agent, you will be able to view the Dynamic AX application. Click on the + icon to add the credential.
3) Provide the Server Name, Network User, AX Instance Name, Network Password, Service Name, Network Domain, Company Name and Account No for Validation.
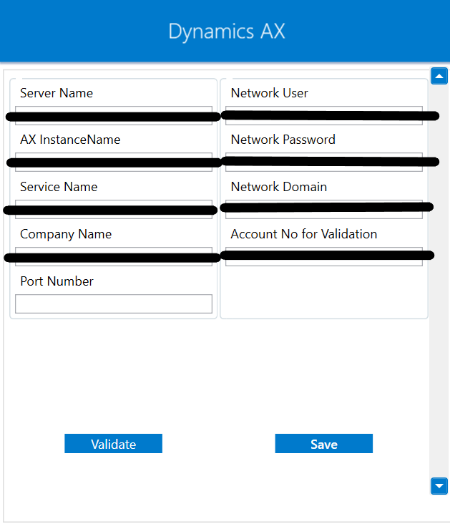
4) Click on the “Validate” button, to validate the connection. A message “Test Connection Successful” will appear if all the credentials provided by you for Dynamic AX is valid. In this way, you can configure the credentials of Dynamic AX.
5) After providing and validating all the credentials. Click “Save” button. A message “Connection Data Saved” will appear if all the credentials provided by you for Dynamic AX is valid.
Troubleshooting
Issue 1
Agent validation fails due to improper Server Name, Network User and Network Password.
You need to check these credentials once again, if validation fails whether they are matching as provided to you while handing you the server.
Issue 2
You need to check the Company Name which you are going to use in agent validation. Check the Company Name matches exactly,
with the one that has been provided to you while the server has been provided to you. Unless you provide correct Company Name,
the customer id that you use in Account No for Validation will not function properly.
Issue 3
Agent validation may fail due to improper Service Name provided in the OP agent. Navigate to Dynamics AX
and check the port name that you have created under the Inbound Port.
Actions and its Filter Implementation
While defining a connection to an API in dynamics AX, you require clear understanding about the data requirements and endpoint configurations.
To define the endpoint in APPSeCONNECT, you need to define Schemas and Actions. Actions are specifically targeted for an endpoint while schema is the data needed to execute the API.
Data is fetched from source application using APIs, and as you are aware of, API provides filters
which will allow you to specify a subset of data from the whole bunch of data created in the server,
the same can be specified through Actions and Action filters.
The Action generally defines the endpoint of the application which is being fetched,
while the filters define the search criteria
of the data. You can add any parameters in the action filter to define the search criteria.
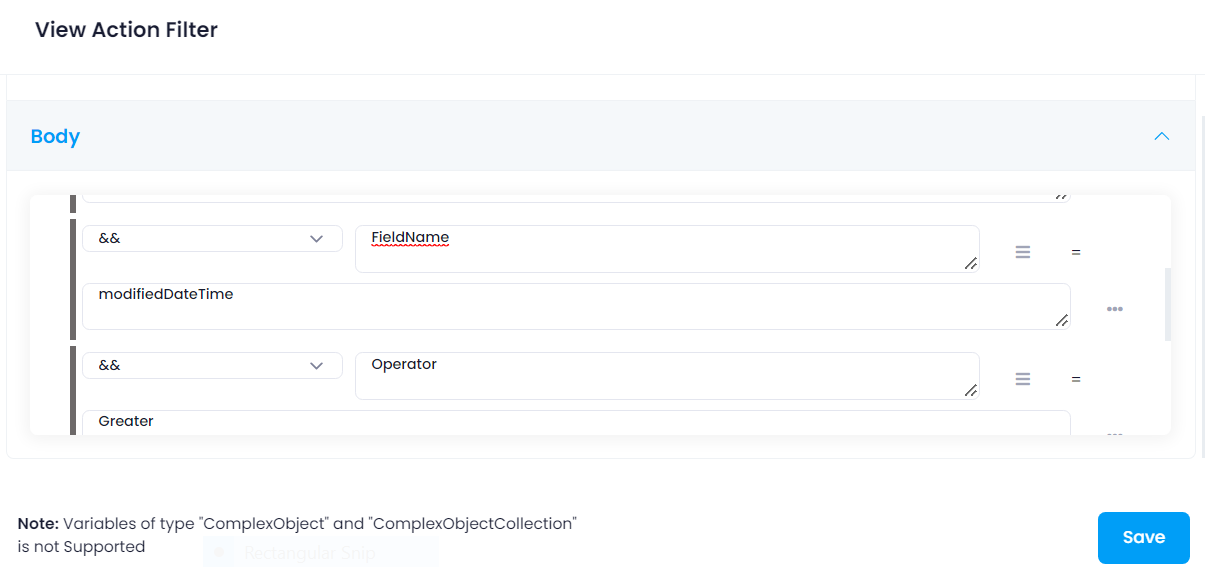
The parameters can be added in the body section of the action filter while defining the filtering condition to fetch the data.
Let us consider a scenerio, where you need to fetch products from Dynamics AX. While fetching the data,
you need to mention CriteriaElement as the key in body of the action filter. The value field will remain blank in this case
as CriteriaElement is used as the parent. Under CriteriaElement, you need to specify your filtering condition as key-value pair.
You need to provide the schema name in DataSourceName field, the field name in FieldName by which the data will be fetched,
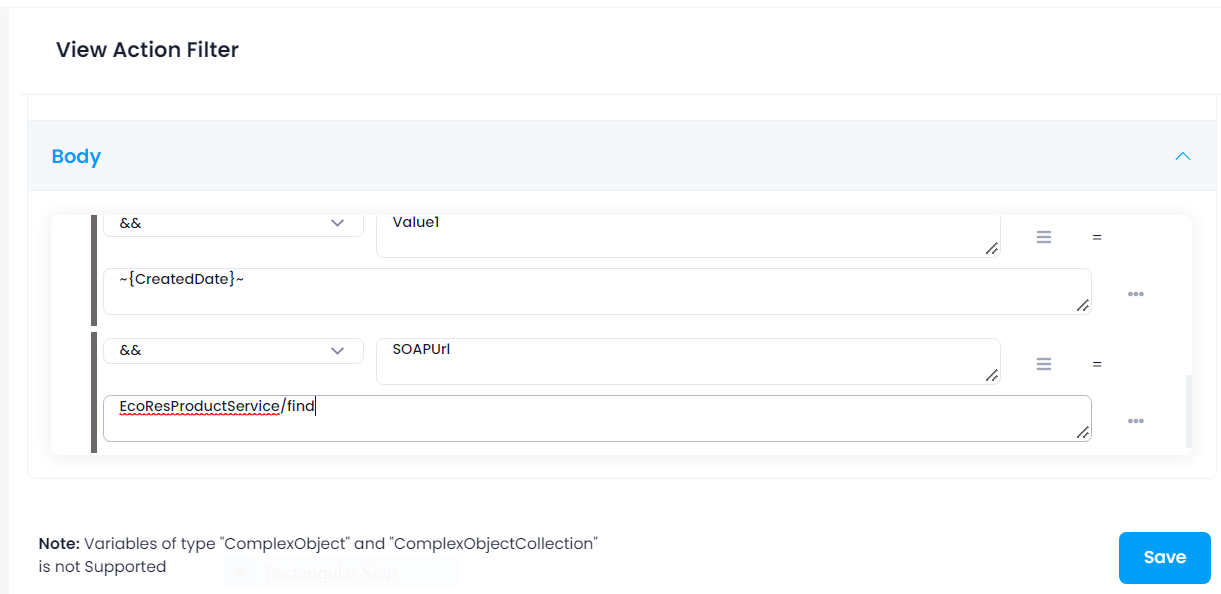
the operator you want to use in Operator field and the value for which the data will be fetched in Value1 field.
SOAPUrl is the used to specify the condition whether you want to fetch, update or post data to Dynamics AX.

For example, to fetch products from Dynamics AX with respect to current date, use the following as key-value pair.
| Key | Value |
|---|---|
| DataSourceName | Product |
| FieldName | modifiedDateTime |
| Operator | Greater |
| Value1 | ~{CreatedDate}~ |
| SOAPUrl | EcoResProductService/find |

