
Amazon Vendor Central
Updated:
Amazon Vendor Central is the web interface used by manufacturers and distributors. If you sell your products
via Vendor Central, you’re called a first-party seller. You’re acting as a supplier, selling in bulk to Amazon,
who then resells your products to consumers. Registration on Vendor Central is by invitation only.
Benefits of Amazon Vendor Central
- Open to anyone
- Control of the seller account
- Sell directly to Amazon’s customers
- Flexible logistical options
- Quick payment terms
- Platform’s large customer base
As APPSeCONNECT is a Business Process Automation tool, this will allow you to develop and configure seamless integration between business applications.
Therefore, application configuration is a fundamental activity prior to the process of integration. If your chosen application is
Amazon Vendor Central, credentials need to be provided for validating the agent OP. Here you will find the detailed description on
how to configure the agents for the application Amazon Vendor Central, troubleshooting issues and Action filter.
Pre-requisites for Amazon Vendor Central Configuration
1) Create an account in Amazon with necessary credentials. Email Id and Password are the manadatory details for logging in to the application.
2) Marketplace Website Url, Auth Url, Access Token Url and Aws Region to configure the application in the agent.
3) You need to know the Aws Region and APIs of the application.
On-Premise Agent Configuration
Installation of On-Premise Agent
You need to install the agent on your local server. To Know about On-Premise Agent Configuration, Click here.
Configure the Amazon Vendor Central Application in OP Agent
1) Create a processflow with Amazon Vendor Central as source or destination application, and deploy the processflow in On-Premise agent.
2) Open the agent and click the checkbox in Settings Panel.
3) Move into the App Configurational Panel of the agent and configure the details of the respective application.
Steps to Configure the credentials in OP Agent
1) Open the OP Agent by providing correct credentials.
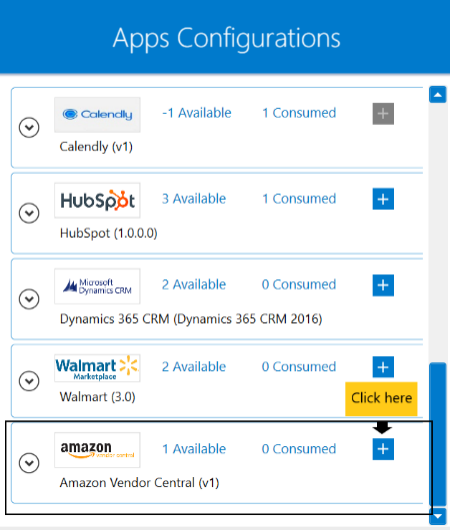
2) In the Apps Configurations panel of the agent, click on the + button, beside the application amazon vendor central.
The credential panel opens for the application amazon vendor central.
3) Enter Marketplace Website Url, Auth Url, Access Token Url, Aws Region and Aws MerchantId at the required place.
Here we are going to use
Marketplace Website Url - https://sellingpartnerapi-na.amazon.com/
Auth Url - https://vendorcentral.amazon.com/apps/authorize/consent
Access Token Url - https://api.amazon.com/auth/o2/token
Aws Region - In this situation, us-east-1 has been used as aws region. Click here to get the details regarding the codes of other regions.
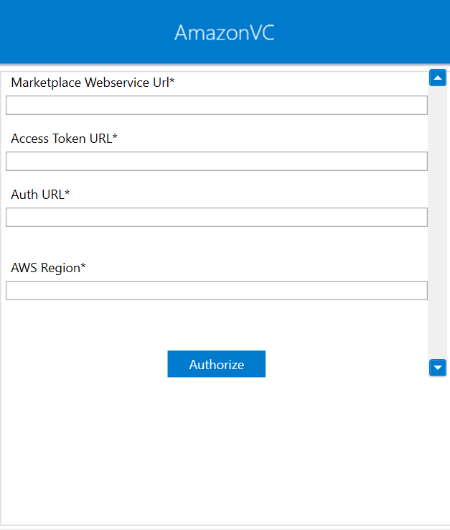
4) After providing the required details in all the fields, you need to click on Authorize,
a web popup will open and you need to login with your Amazon Vendor Central credentials.
After successfully logging in, do not close the window. If all the process is successfully completed,
the credentials will be saved automatically. However, if any error occurrs then you need to check the credentials
that you have used in the OP agent and you need to Authorize again.
Following the above processes, you can configure the amazon vendor central application in the OP agent.
Troubleshooting
ISSUE 1 : Agent Validation failed due to improper credential provided in the agent
While validating the credentials in the agent, sometimes the validation fails due to improper
Marketplace Website Url, Auth Url, Access Token Url or Aws Region.
Check the credentials once again and re-Authorize the credentials.
ISSUE 2 : Agent Validation failed due to improper credential provided in the Sign-Up process in Amazon Vendor Central
After putting the correct credentials in the agent, it may happen that you have entered wrong email-id and/or password in the sign-up process in amazon vendor central application. Check the email-id and password and carry the validation process again.
Attributes and Actions
While defining a connection to an API in amazon vendor central, you require clear understanding about the data requirements and endpoint configurations. You can refer to this document to find all the endpoint details of your amazon vendor central application. To define the endpoint in APPSeCONNECT, you need to define Schemas and Actions. Actions are specifically targeted for an endpoint while schema is the data needed to execute the API. Here is the list of some of the pre-packaged API actions defined for you which you can easily plug and play while doing your integration.
You can refer to Amazon Vendor Central to know the authuorization and APIs in details.
| Endpoint | Action | Action Type | Schema | UI Help | API Path |
|---|---|---|---|---|---|
| Orders | /vendor/orders/v1/purchaseOrders | GET | /vendor/orders/v1/purchaseOrders | Returns a list of purchase orders created during the time frame that you specify. | This will retrieve orders |
| Transaction | /vendor/transactions/v1/transactions/{transactionId} | GET | /vendor/transactions/v1/transactions/{transactionId} | Returns the status of the transaction indicated by the specified transactionId. | Fetching transaction details. |
Action Filter Implementation
Data is fetched from source application using APIs, and as you are aware of, API provides filters
which will allow you to specify a subset of data from the whole bunch of data created in the server,
the same can be specified through Actions and Action filters. The Action generally defines the
endpoint of the application which is being fetched, while the filters define the search criteria
of the data. You can add any parameters in the action filter to define the search criteria.
The parameters can be added in the body and/or in the header section of the action filter. We shall be
looking in both the scenerios of action filters.
Let us consider that any you create several orders in amazon vendor central application.
You can retrieve these orders from the corrosponding API using the following filters under action in the body. In this scenerio, let us assume that you are going to fetch several orders from amazon vendor central. In the body of action filter,
we will be using createdAfter as the key and the ${maxDate} in the value field to determine specific customers from the platform.
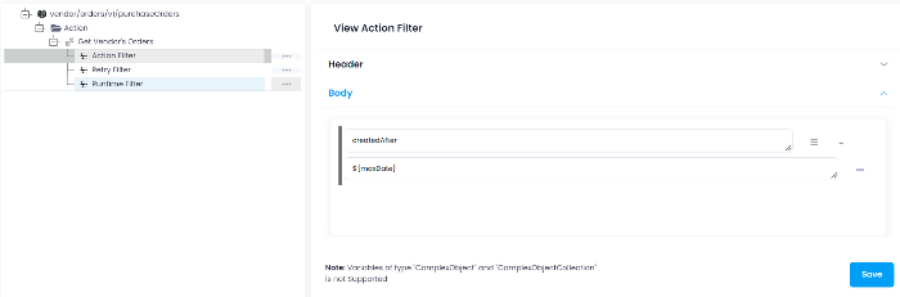 However, prior to creating the action filter,
 ${maxDate} has been created in the GET node. This will store the
order that has been last fetched such that for every execution the unfetched gets retrieved.


