
Using Lookups Mapping for Value Interchange
Updated:
Use Case Name
Using Lookups Mapping for Value Interchange
Brief Description
Lookups Mapping is a feature in APPSeCONNECT which enables the user or implementer to provide a specific value to the application environment, such that when the source and destination application is integrated, the value in source application can easily be integrated with its value in destination application, corresponding to its field.
For Instance: Order placed in Magento2 has the currency value$ but SAP B1 supports the value USD for the field CURRENCY. Though the meaning would be same, but applications will not support such instances.
Therefore in these cases Lookups mapping needs to be implemented where the both values of the field can be integrated error free.
Lookup Mapping is an integral part of data synchronization between two independent applications.
-
APPSeCONNECT offers you the flexibility to do the mapping of attribute values such that value from one application can be easily converted to the other one.
-
Lookup will ensure that you can configure each and every discrete value of one application to pass appropriately to another.
-
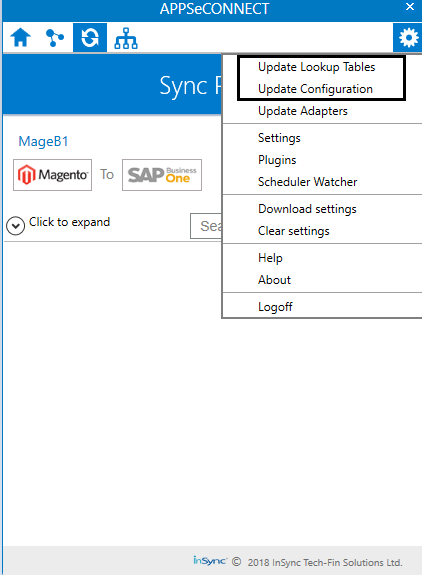
Any Lookup done in APPSeCONNECT Cloud will get automatically gets replaced by our On-Premise Agent during actual synchronization.
-
The Update Lookup tables option of Agent will enable you to update the mapping database cache.
APPSeCONNECT also provides a default alert feature to remind you of doing mandatory Lookup Mappings in our Cloud portal to prevent you missing a mandatory Lookup Mapping required as per our rule-book.
Actors
Implementers, Developers, Partners.
Preconditions
- Organisation Creation & Connection Creation.
- The user needs to know the value of the field in their corresponding application for implementing the mapping.
Basic Flow
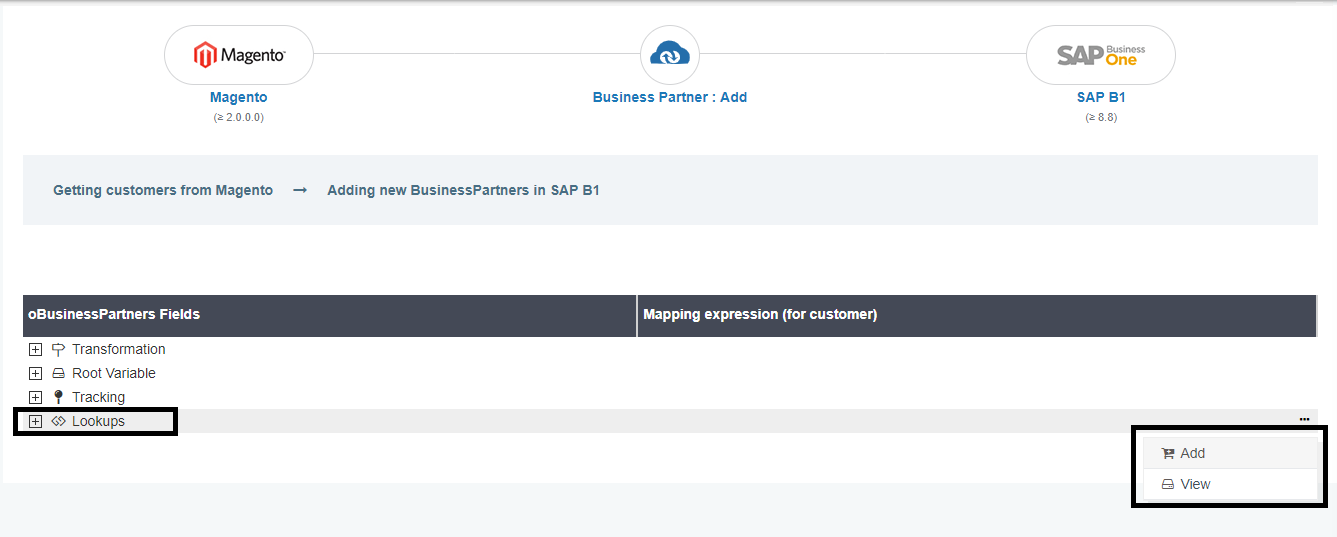
Lookups Mapping can be done either from the touchpoint level or connection level. The UI remains the same for both the options.
The Lookups feature consist of multiple fields like Lookup Type, Used For, Source Value & Destination Value.
- Lookup Type: This element contains the field for which the mapping is to be done. The fields can be selected from the drop-down option.
- Used For: This field is a description for the mapping. The input can be anything related to the field that is being used.
- Source Value: This field will have the source value which is application specific.
- Destination Value: This field will have the destination value which is also application specific.
The screen for the Lookup is provided below:

(a) Add New - This button enables to add new lookuptype and value to a connection. (b) Save All - This button enables to save all the defined lookup/lookups. (c) Delete - This button enables to delete selected lookup/lookups. This also gives the option to purge lookups. (d) Import Lookup - (e) Export Lookup -
Note: Users can also add the Lookups by importing the files. Click on the Horizontal dots and select the option Import. Similarly by Clicking on Export, users can download the created list of the lookups.
Steps to Implement Lookups:
- Navigate to the touchpoint after login for which the Lookup Mapping is to be done.
Note: The user can even implement the Lookup Mapping in the List of Touchpoints Page - Click on the Transform button on the touchpoint you have selected. The user will now be able to view the Transform screen of that touchpoint.
- Click on Lookups and you can view two options. Click on the ADD option to add new Lookup values.
VIEW option will display the lookups provided for that touchpoint or the connection.
Note: Lookups can also be added if clicked on the VIEW button
- The Lookup Box opens when clicked on the ADD button. The user can view all the fields that are required to map the Lookup Types.
- Select the Lookup types from the drop-down for which the Mapping is to be done. Currently there are numerous types
that can be availed for value map.
Note: The typeCurrencyis selected for the demonstration. - Provide the input for field
Used Forwhich should be related to the lookup type. - Input the Source and Destination Value for which the Mapping is to be done. The user can view the screen below.
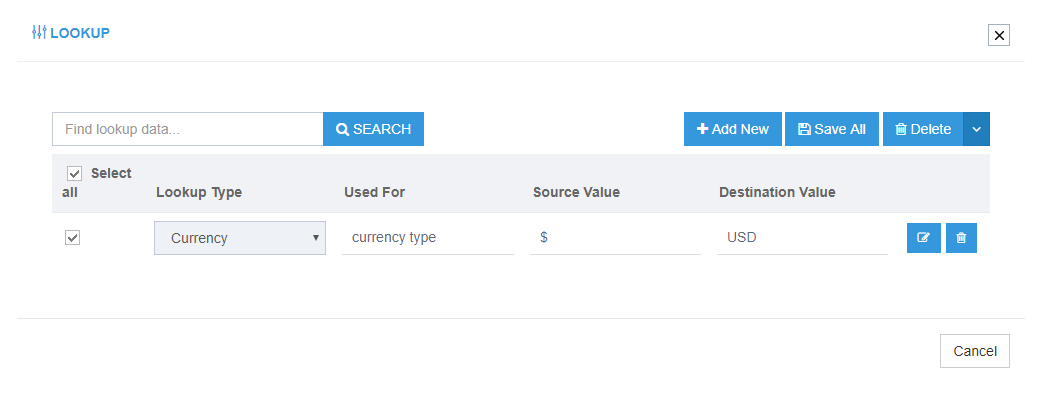
- The user can add multiple Lookup types for its mapping. Click on the Enable checkbox once the values are provided.
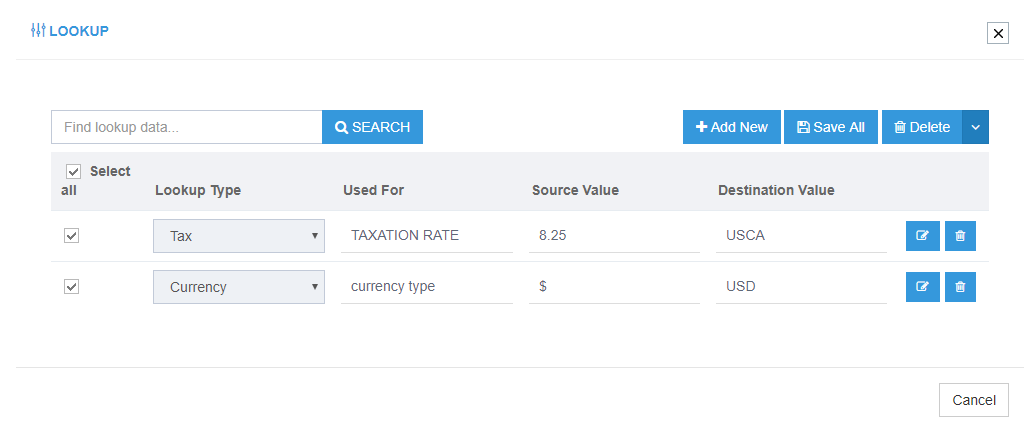
Note: The Destination Value USCA is a value in the Tax Codes of SAP B1 for which the rate is provided. By default, the USCA is not present in the SAP B1, it needs to be created for enabling this mapping. - Once the values are provided click on the SAVE icon beside the lookup or click on the SAVE ALL option.
Note: After Providing and Saving the Values, click on the option Reset Cache and Reset Publish in the touchpoint and
Click on Update Lookup Tables and then Update Configuration in the agent for enabling the mapping.
Post-Conditions
The user can view the successful sync of the touchpoints for the connection Magento2 and SAP Business One.
Exception Courses
The user can view the error logs in the RESYNC Bucket of the agent (Cloud and OP) if the touchpoint fails to sync for any LookUp Mapping cases. Click here for lookup related troubleshooting.
Frequency of Use
The user can implement lookup mapping when required for any connection/touchpoint.
Assumptions
Not Applicable

