
Settings of APPSeCONNECT Agent
Updated:
Settings panel of AEC Agent enables to change the default settings after the initial setup and installation of the agent. Although an advanced user can use different settings options that is provided inbuilt with the AEC Agent to perform the customized tasks. Here you will get detailed description on the use of settings panel to edit some of the default behavior of APPSeCONNECT Agent.
- To access the Agent
Settinglogin to the APPSeCONNECT Agent. - Now Click settings icon on top and select “Settings” from the menu.
- The Setting Screen will appear. Here you can make all the settings related changes and the options are given below.
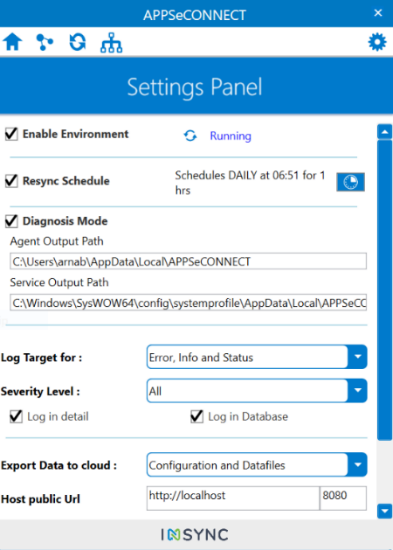
The Agent Setting Panel is divided into four components - Enable Environment, Resync Schedule, Diagnosis Mode, Log Target For, Severity level,
Export Data to Cloud, Host public Url.
Enable Environment
Enabling the checkbox for Enable Environment enables to activate the background service installed on-premise.
The APPSeCONNECT agent installs a separate service to do the actual sync. The process is installed on your system to ensure that the sync remains active even though you log in or accidentally close our agent application. Settings have an option to “Activate / Deactivate” the environment service. When the checkbox “Enable Environment” is unchecked, the respective service will be turned off. We also give you an option to kill the service from UI if the service cannot be stopped normally.
Enable Environment defines the interval between two processes.
Note : Deactivating the checkbox will, disconnect the Agent from the Portal. You cannot deploy any changes from Process Flow if your Enable Environment checbox is disabled.
Protip: It is highly recommended not to stop a service by any means unless you want to restart your server. The Autosync service is capable of restarting itself if it crashes by any means.
Resync Schedule
APPSeCONNECT uses Resync Bucket to keep track of all the items that are getting synced. Due to continuous huge data operations on APPSeCONNECT Agent, it is very important to keep track of all data that is being transferred from one application to another. You do the same using your Resync bucket, but if your transaction is not within the limit of human activity, it will be hard to track all the failed or skipped items as well.
There are mainly four states that an item can go through from Resync Bucket. This is meant for on-premise Agent.
-
Unprocessed : This state is when the item is not synced and also the Transformation is not performed correctly.
-
Success : These items went through the entire process and succeeded through the push operations.
-
Skipped : These items are forcefully skipped by the adapter, hence our agent will not allow you to sync them again.
-
Failed : These items are failed at the point of an instant when it wanted to sync. These items will be again resynced from the resync bucket.
Now based on the volume of sync, sometimes data in resync bucket can also grow considerably.
As we wanted to enable automatic synchronization of data without manual intervention, we also support our customers to configure autosync for failed items. To enable auto-sync for resync bucket, you can open Agent and go to settings.
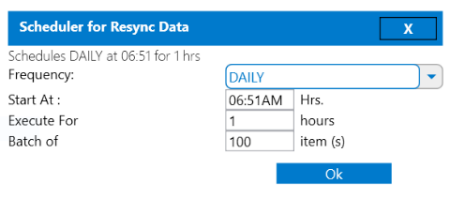
In the above panel, the resync is scheduled at 12:00 AM Hrs. night and will execute for 1 hrs from that time with 100 items taken in batch. Once Resync Schedule is activated the schedule will be taken care of.
NOTE :
1) Resync bucket is used only from AutoSync service and will only pick up those which are configured in automatic mode.
2) Resync for each individual entry will try for 3 times (1 for the sync + 3 retries), so when Tries = 4, you can expect that entry will not be picked up again.
3) During Auto - Resync, our normal sync process will be on pause and will resume when the resync operation is complete.
4) Resync will terminate automatically when all tries have already been performed and no data available for resync.
5) After termination, the normal autosync process will resume.
Diagnosis Mode
This section enables to do the diagnostic mode checking of the output files ( both manual & autosync) where the user gets the option to check the in memory data file dump for all the input, transformed and output data.
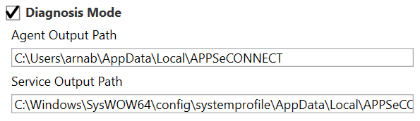
Agent Output Path - Manual File Path
Service Output Path - Autosync File Path
Enhanced Logging settings option
AEC platform gives you the option to customize the type of logging APPSeCONNECT writes on your system. There are three options that you can set for logging and based on the selection our Agent as well as the background service logs.
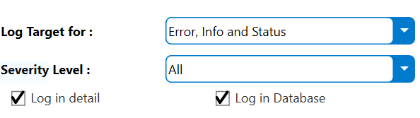
Log Target - The log target will give you option on what type of logs you want our agent to write. Generally, it is recommended to have only Error logs in production.
Severity Level - Severity will give you the option to set how much critical logs will it write. Generally, it is recommended to have Critical and high logs.
Log in Database - APPSeCONNECT by default logs in the database, but if you choose not to log there, you can uncheck the checkbox, and it will log the same in a text file for each process. Remember, when you opt out for log in a database, you can also turn off “Log in detail” checkbox so that APPSeCONNECT does not write technical details of every log.
Protip: It is highly recommended not to turn on all settings in the production environment. Writing logs have a considerable amount of CPU utilization and hence turning on all logs might cause high I/O and CPU utilization and can degrade the sync performance.
Securing data in cloud and Sending Email notification
This section will enable the user to set options on how the security measures would our Agent take when there is a problem with the system.
The Export data to the cloud will give you the option to store data as well as configurations to the cloud on your own separate vault.
Once the data is uploaded, it can again be refreshed or downloaded from the cloud when required.
The second option will allow you to put any email id and send the daily report of sync status immediately.
Host Public URL
This is a public URL of the organization, required for Real time Touchpoint Execution.

