
SelfLoop Node
Updated:
What is Loop node
In APPSeCONNECT Processflow using a Self-loop, we can repeatedly execute an individual node without affecting the other nodes that are linked with it. Lets take an example - If we draw a self-loop in GET node in Processflow it will ask for the no. of times it will be executed. Lets take a scenario where the source application associated can fetch 10 records at a time but the user wants to fetch a minimum of 50 unsynced data at a time if it is available. Here user can implement a self-loop with 5 occurrences. Self loop enables the user to iterate a node execution as per the configuration.
Self-loop is an interesting functionality as it can be used in a node to iterate as per configuration. Presently three option is available to configure self-loop :
- Until data available : This option allows a self loop execution over a Node where self-loop will continue to execute until data available in the source app or node.
- Number of occurrences : This option allows Number of iterations on node over which self-loop implemented will execute.
User can set Maximum 999, to iterate the occurrence - For Time Out : This option allows you to specify the time interval for which the self loop will be executed.
You can execute a Self loop by choosing any one of the three given options. Although the availability of data is always the prime criteria for executing the self-loop.
Note: You can anytime update the self loop configuration, by clicking on the DOT over the self loop link. You need to SAVE the processflow after the saving the updated node configuration of the self loop. Redeploy the processflow to get the data as per the updated configuration after execution._
Working Principle

Self Loop Execution on the nodes :
| Node | Requirements |
|---|---|
| Get Node | Fetching Large Number of data in smaller batches, self-loop configuration over get node will iterate for the option chosen in the configuration |
| Merger Node | Scenarios where splitter node is the predecessor node of Mapper node, self-loop over Mapper will iterate until splitter output available |
| Post Node | Scenarios where splitter or Merger node is the predecessor node of POST node, self-loop over post node will iterate until splitter or Merger output available |
A. Choosing Self Loop Configuration - Until data available
- Link up the self-loop in the node where you need the loop to perform. The node configuration page opens.
- Select the radio button against the option Until Data Available. You will not have to provide any additional details as in Self-Loop for Time Span & Self-Loop for Number of Occurrence.
- On selecting this option, Self-Loop will execute its execution until all the Data are received for that single instance.
- Self-Loop: Until Data Available will display only one iteration when checked for the Snapshot.
- Self-Loop:Until Data Availble will stop its execution when there is no further data availble send from its predecessor node or from the data Source.
- Self-loop over GET node will not be executed during the
RETRYprocess if the GET node is connected to the START node as its predecessor node.
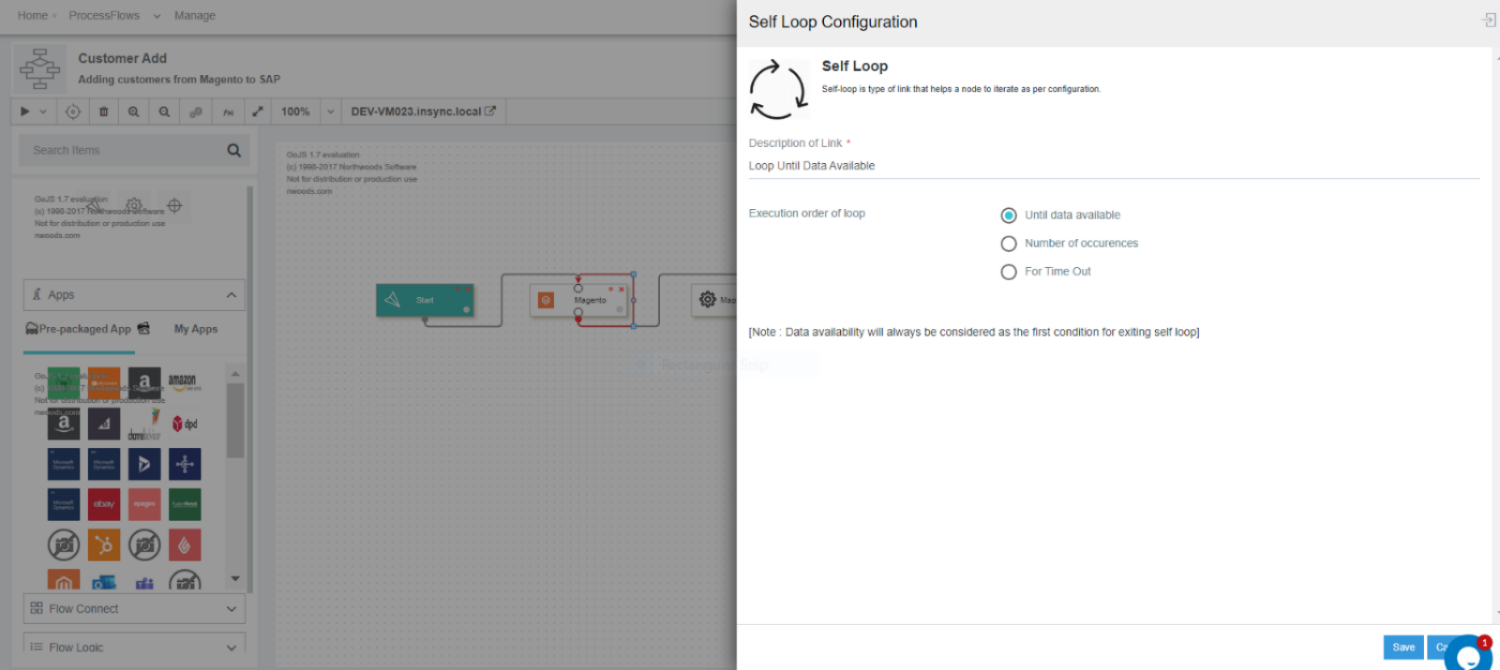
- Enter the Description of the self-loop in the node configuration window.
- Self loop over these nodes GET/MAPPER/POST will be executed until all the data are fetched from the predecessor node.
B. Choosing Self Loop Configuration - Number of Occurences
-
In the self loop node, select and choose the option
Number of Occurenceradio button. The following screen appears.
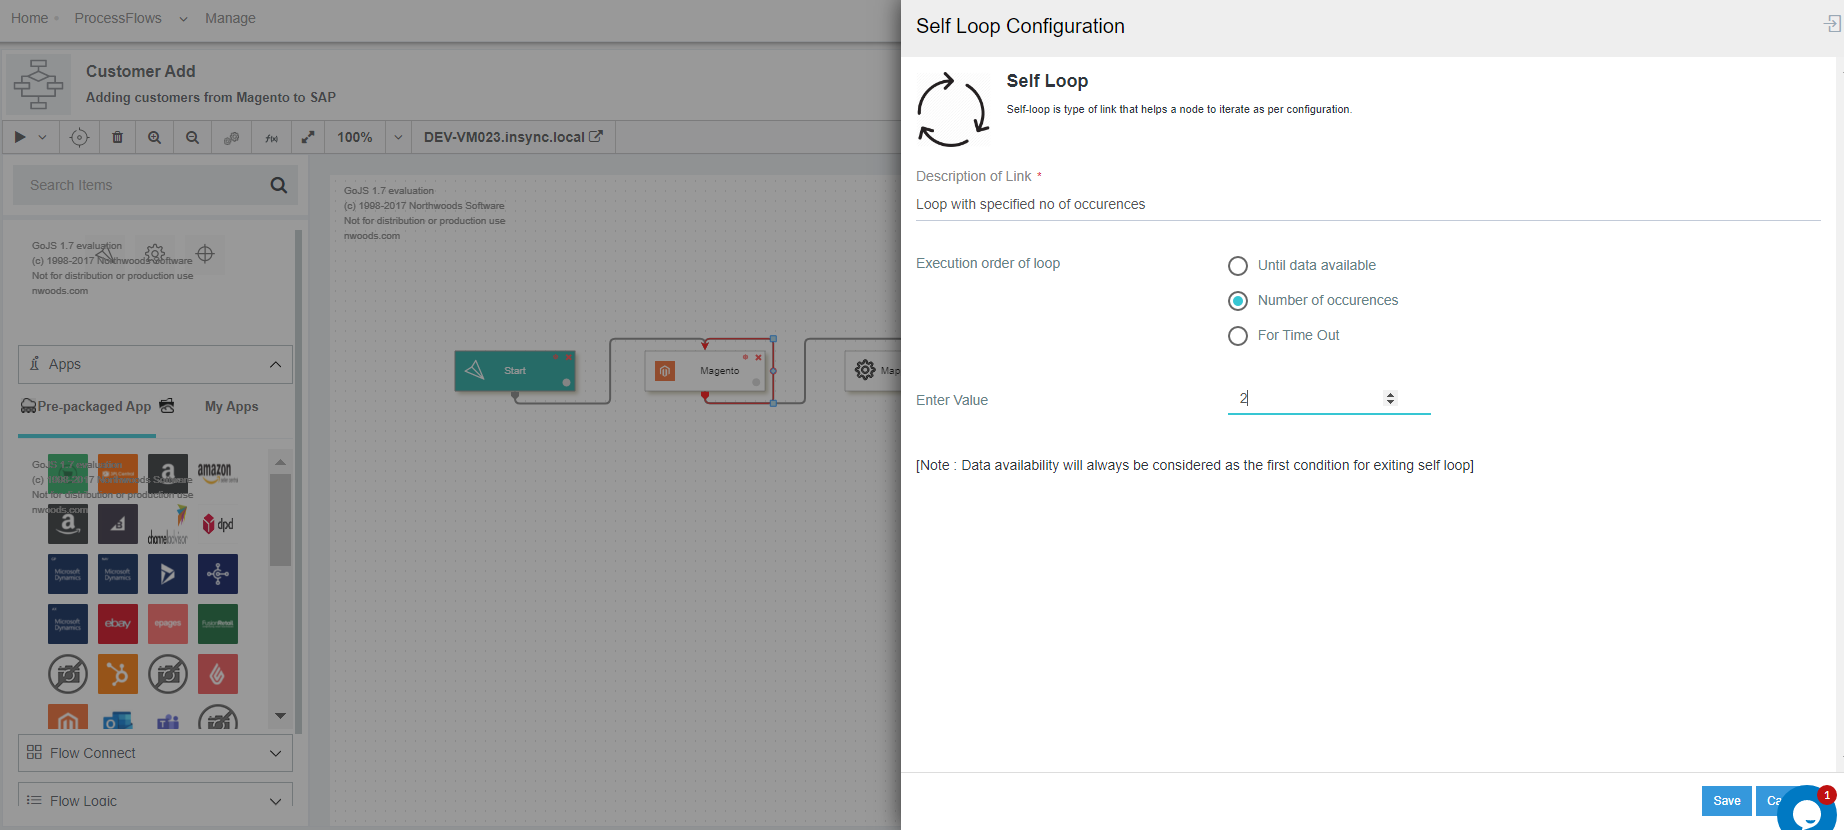
- Here you have to provide the value for the no. of times the Self Loop will be executed over the node.
(a) The input value of no. of times/occurence should be an integer number.
(b) The value range is between 1 to 999 (min to max value). - Now provide the Description of the Self-loop configuration in the Description field which is mandatory.
- Self-loop execution over the GET/MAPPER/POST node will be executed as per the number of occurence defined by you or until data availability.
C. Choosing Self Loop Configuration - For Time Out
1) In the self loop node, Select and choose the option For Time Out radio button. The following
screen appears.
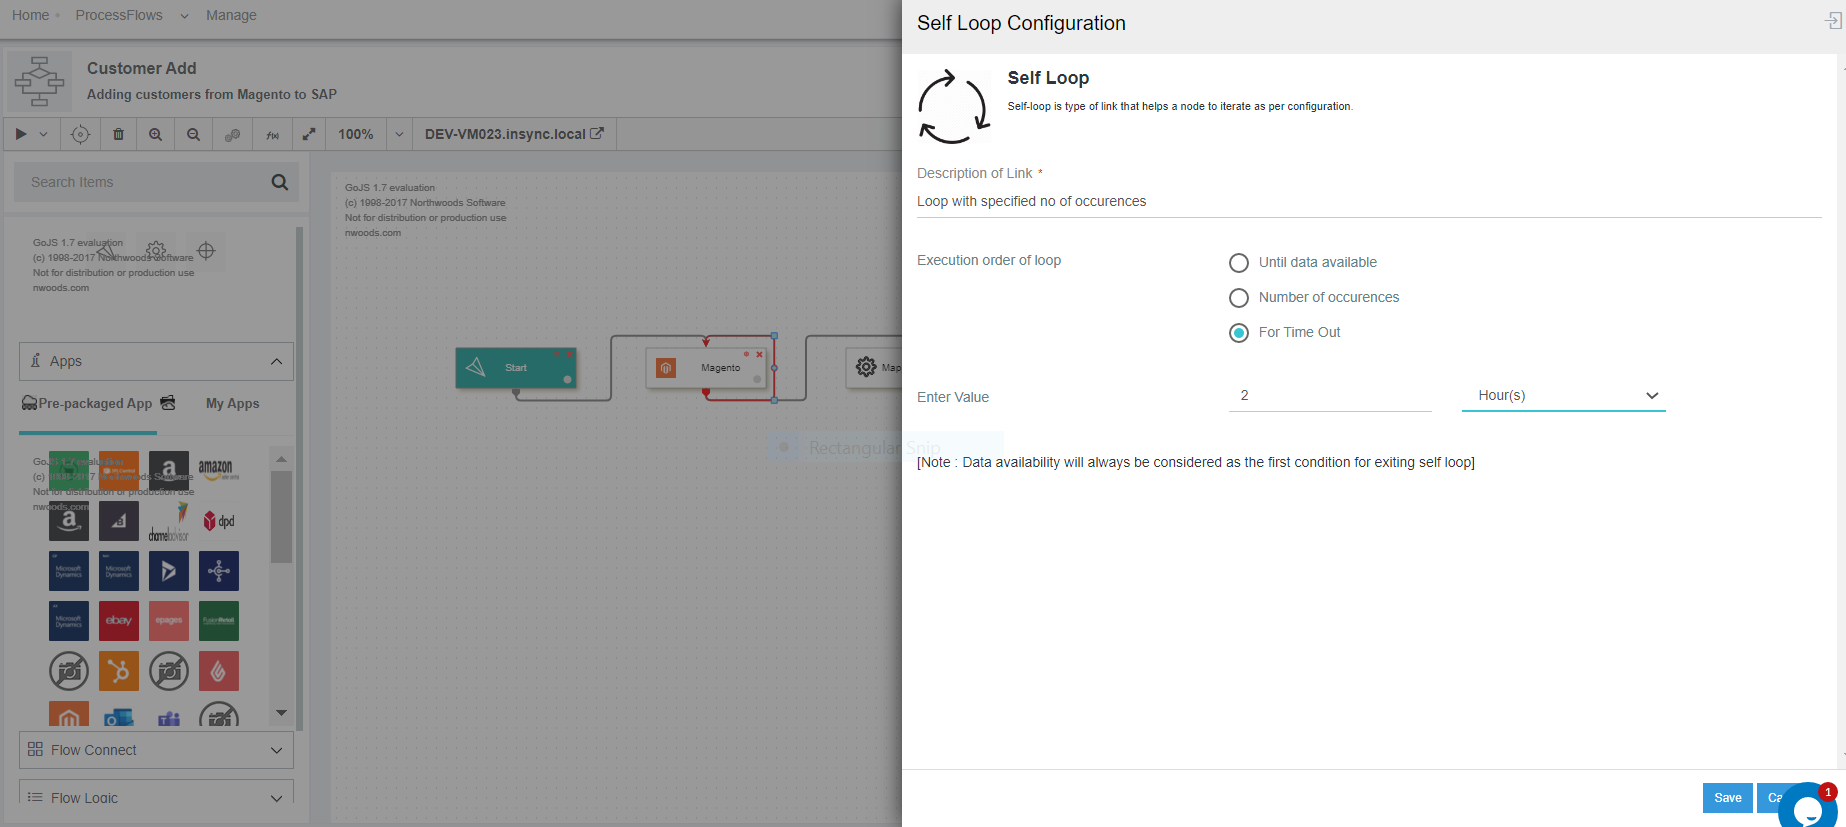
2) Here you have to provide the value for the Time Out. Select the timespan of the loop from the drop. You will get these options : Hours , Minutes & Seconds. By default, you will be selected with HOURS.
3) Self-loop execution over the GET/MAPPER/POST node will be executed as per the TIME OUT time provided.
Note
(a)Maximum no. of characters allowed in the Description Field will be Max.
(b)Self-loop over the GET/MAPPER/POST node will be iterated for the duration as defined by the user or until data availability.
(c)Data availability is the first condition for execution of the self-loop, irrespective of the options choosen for execution.
Execution flow for Self loop
-
Design the processflow and self link the node where you want to implement the Self-loop.In this case, self-loop is applied on Mapper node.

-
On linking the Mapper node with self loop, the self loop configuration window opens. Select the execution order of the Self-Loop as
Number of Occurences.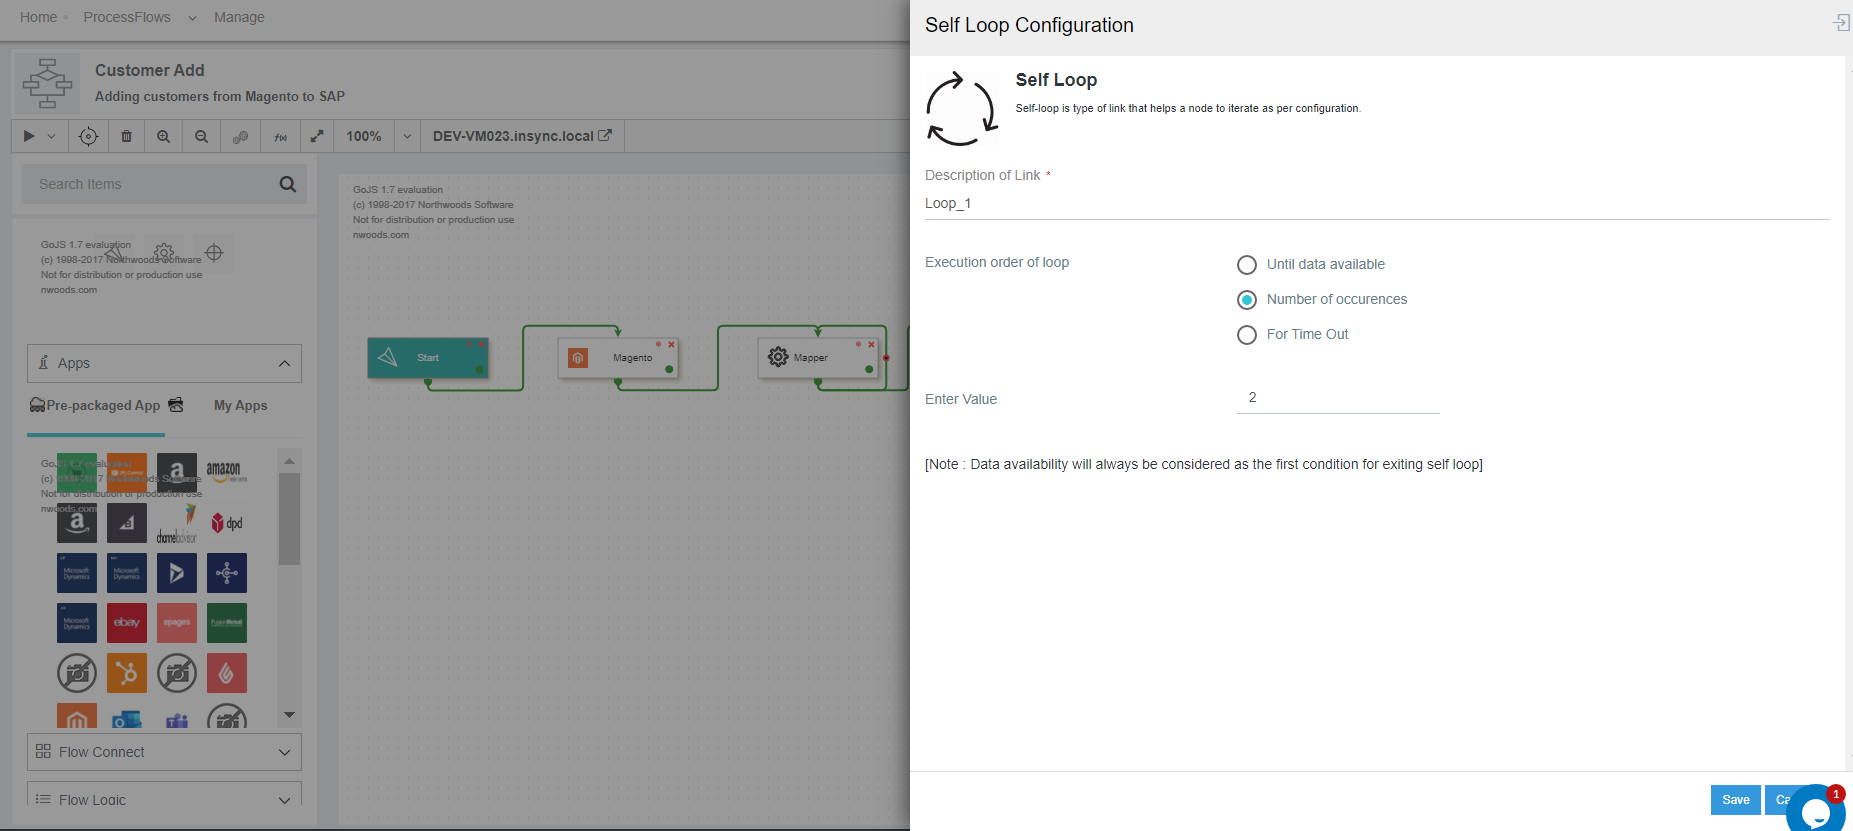
- Save and Deploy the processflow to deploy all the configurations to the environment.
- You need to execute the processflow after the deployment process. Your processflow will automatically be executed if your sync type is set to Auto mode.
- Navigate to
Manage > Environment. Click on the processflow tab for the environment where you have deployed the processflow and check for the processflow Snapshot.
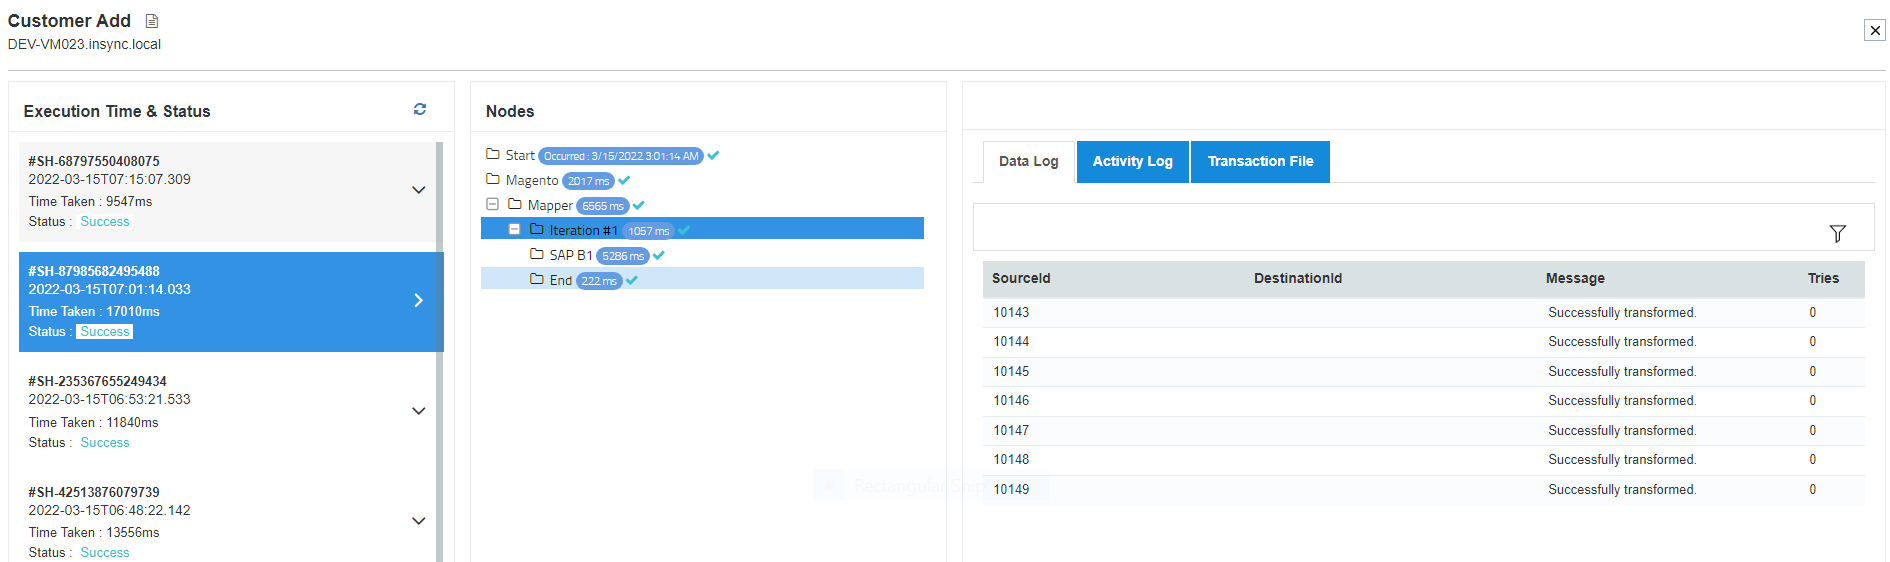
Following the process you can successfully execute a processflow with Self-Loop.
**NOTE:
(a) Until data available - Extra iteration will be displayed
(b) Number of occurrence * batch size <= number of data available in source - Extra iteration will not be displayed
(c) Number of occurrence * batch size > number of data available in source - Extra iteration will be displayed
Business Scenarios for Self loop Usabilty
(A) Using self loop in the source application - Leverage Application Capabilities to accept multiple records in a single request/execution.
Here to repeat actions until a condition gets met, you can create a Self-loop. Here you have to apply Self loop
in the Source application. This will first run all the actions inside the loop, and then checks the condition or state.
If the condition is met, the loop stops. Otherwise, the loop repeats to extract the bulk data’s (unsynced) till all are
fetched. Thus with the aid of Self loop user can fetch bulk data (with the defined configuration in the self loop)
and execute a sync operation successfully to the destination application.
Example for Execution : Start node-> Get Node(SELF LOOP)-> Mapper -> Post
(B) Using self loop in the source application & destination application - When both the Source Application & destination application
is unable to sync bulk records at a single execution.
One of the key elements for integration is processing and exchange of large amounts of data.
To ensure that these scenarios are executed without any issues, especially related to memory,
you can use the Self-Loop option in Processflow Integration in APPSeCONNECT. You can easily use this
Self loop in both the source and destination application in the Integration Process and invoke
that processflow is executed and bulk data is synced using a Self Loop. This Process incorporates splitter node
for splitting bulk data into chunks of data for reducing data load in destination application.
Example for Execution : Start node-> Get Node(SELF LOOP)-> Mapper -> Split-> Post (SELF LOOP)
(C)Using self loop during data transformation - Data Loss Prevention For Processing number of input packets from Source Application to Destination Application
Data loss Prevention for multiple input packets received during tansformation can be achieved by applying Self Loop on the mapper node thus enabling to post all the data packets received during transformation.
Example for Execution: Start node-> Get Node-> Split-> Mapper (SELF LOOP)-> Post

