Dynamics 365 CRM
Updated:
Dynamics 365 is the next generation of intelligent business applications that enable your organization to grow,
evolve and transform. Dynamics 365 applications unify CRM and ERP capabilities into purpose-built applications
that work together seamlessly.
As APPSeCONNECT is a Business Process Automation tool, this will allow you to develop and configure seamless integration between business applications.
Therefore, application configuration is a fundamental activity prior to the process of integration. If your chosen application is
Dynamics 365, credentials need to be provided for validating the agent both in case of OP and Cloud. Here you will find the detailed description on
how to configure the agents for the application Dynamics 365, troubleshooting issues and APIs.
Pre-requisites for Dynamics 365 Configuration
1) Register an App in Azure Active Directory.
2) Create an account in Dynamics 365 CRM using necessary credentials.
3) You need to know the authentication mechanism and different APIs of the application along with their structures.
How to register an App in Azure Active Directory?
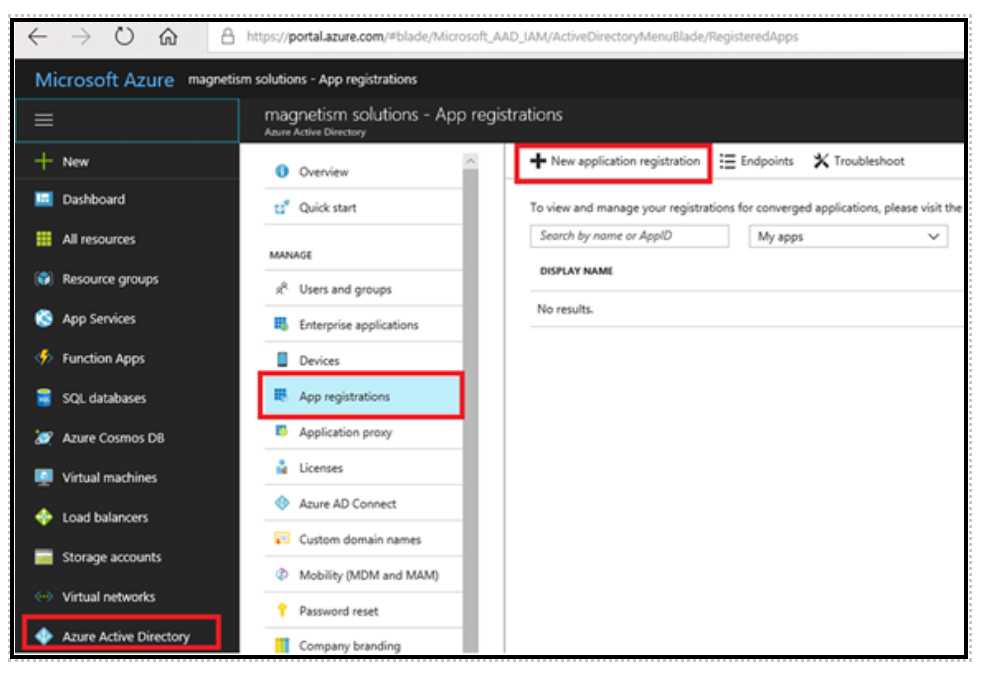
1) Login to Azure Active Directory. Navigate to Azure Active Directory » App registrations. Click on New application registration.
2) Provide the necessary details in the Azure blade and click on the Create button.
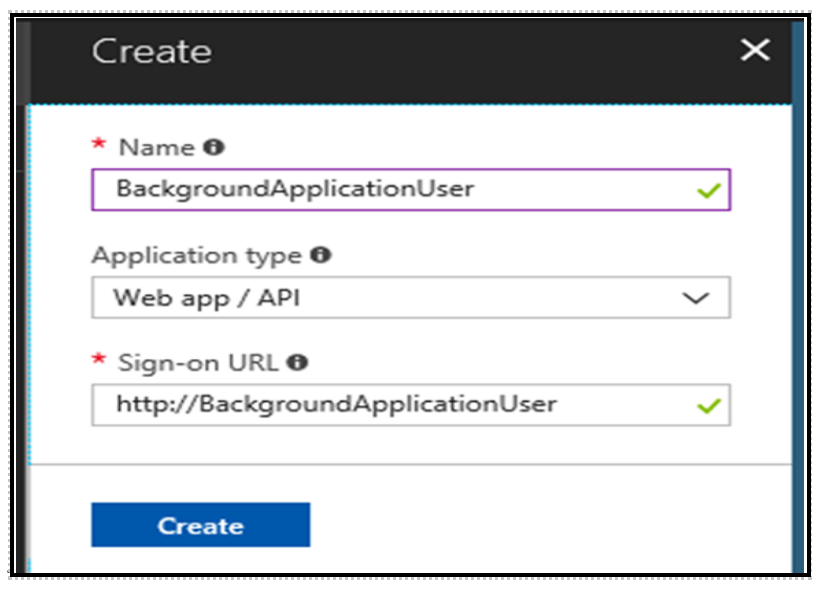
The Application Type should be selected as Web app/API.
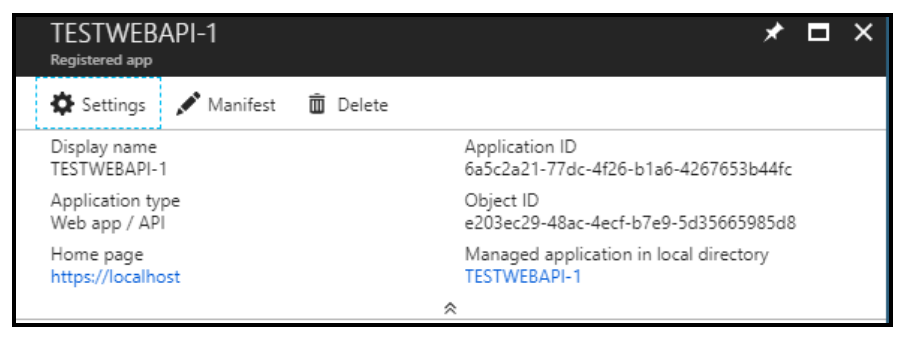
3) After registering the app with Azure Active Directory, a message box will appear confirming the same along with displaying
Application ID and Object ID.
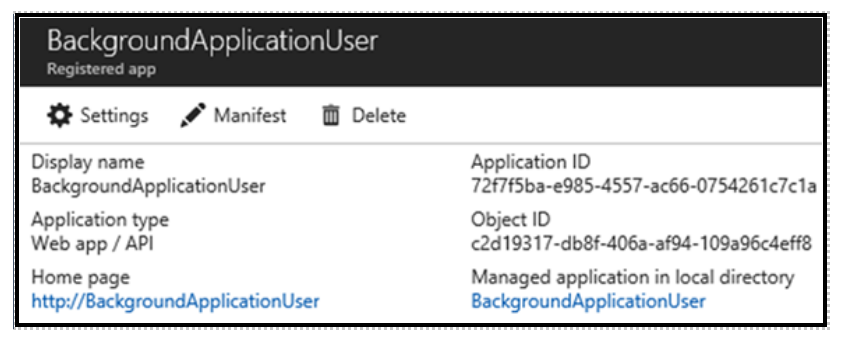
Keep a note of the Application ID and the Object ID for further reference.
4) To Grant permissions to Dynamics 365 CRM, navigate to Settings -> Required permissions.
Click on Add button and then select Dynamics CRM Online.
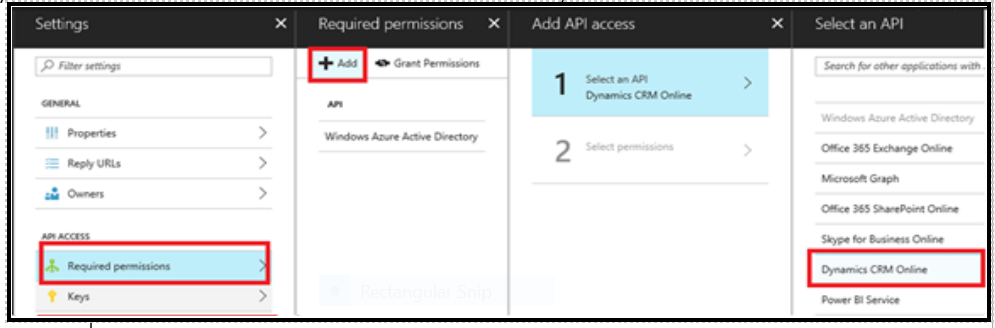
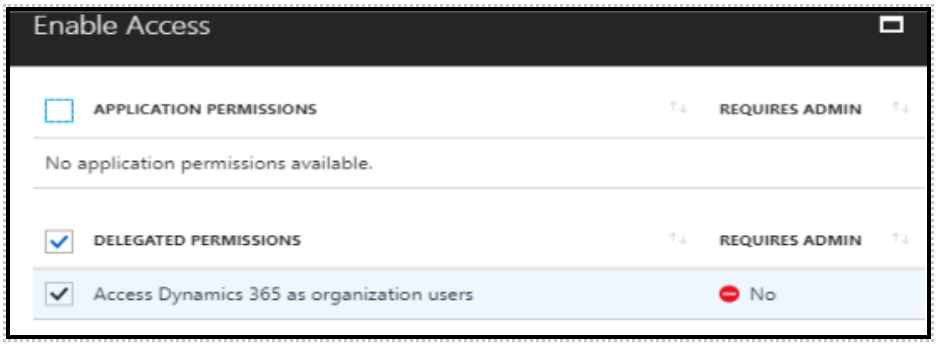
5) Under the Select permissions section provide the Application Permissions and Delegated permissions.
6) Navigate to Settings > Keys to create Client Secret Key. Click on New Key, provide the Description and
set the duration to Never Expires. On clicking the Save button, the credentials will be saved along with a Key Value
will be generated.
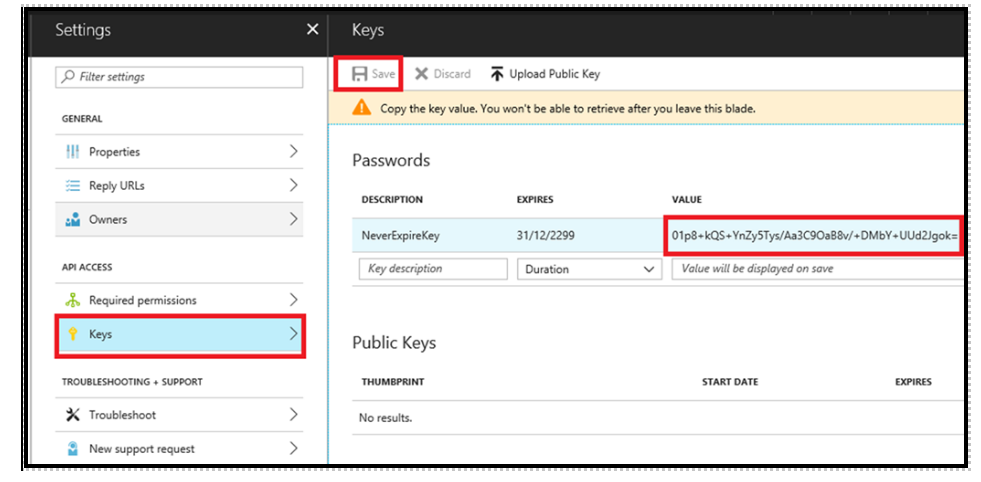
Take note of the generated key value for further reference.
7) Navigate to Settings > Properties > Apps. You will find the summary of the created app.
User configuration in Dynamics CRM
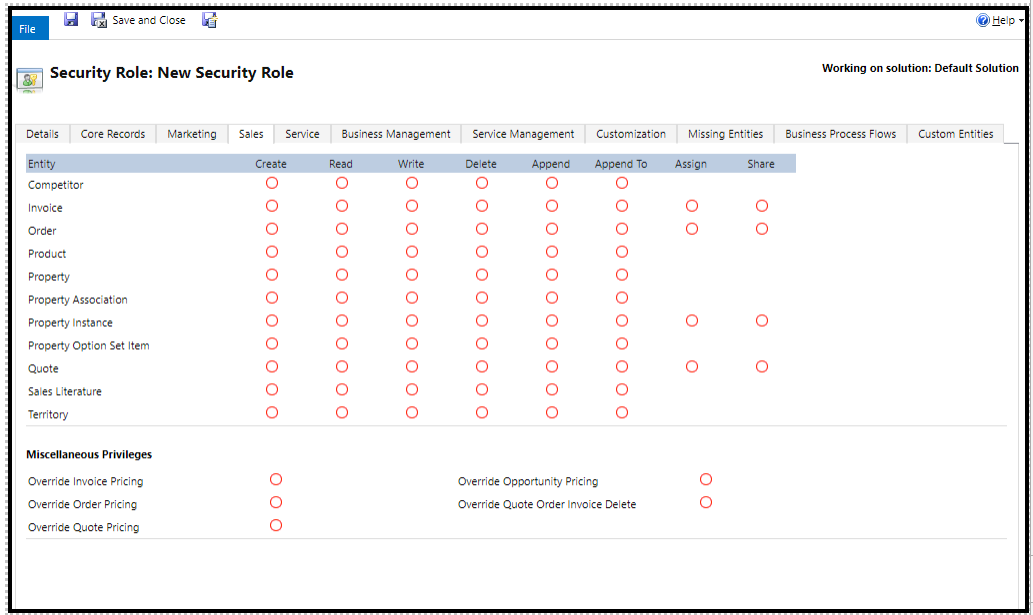
1) Login to Dynamics 365 CRM. Navigate to Settings > System > Security.
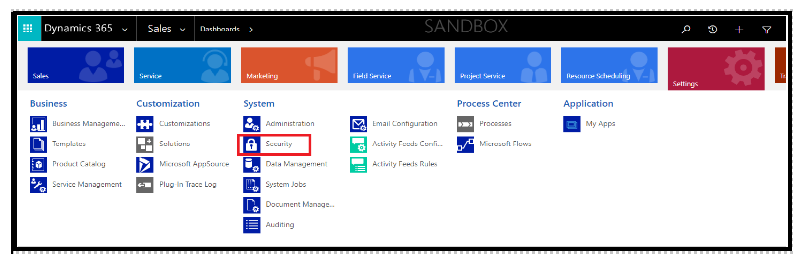
2) On clicking Security, you will be navigated to
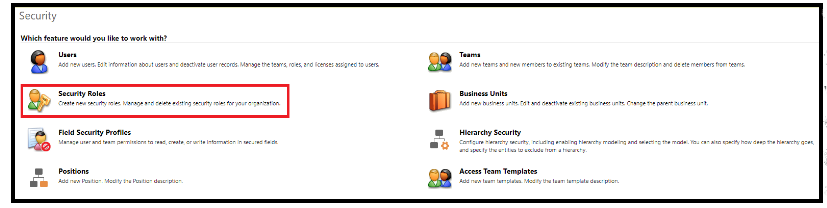
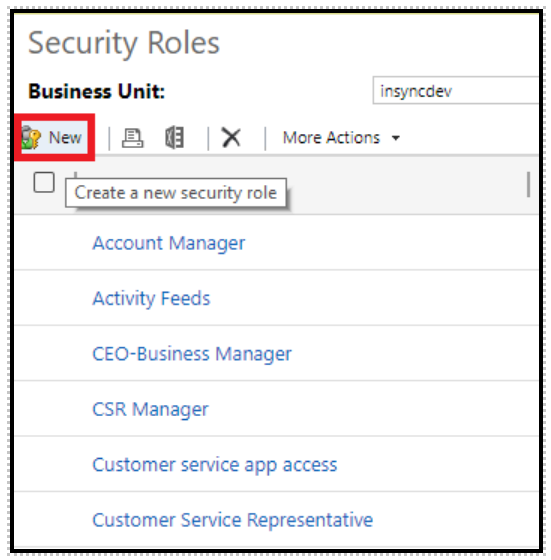
Click on Security Roles, a window will where you need to create a new security role of the user. Click on New.
Provide the necessary details to complete the security role creation steps.
3) Provide the required access to the role by selecting the respective radio buttons against the APIs.
4) Navigate back to Security page and choose Users > Manage Roles > External group and create a new Application User
by providing the necessary credentials. After executing the above steps, new Application User will be successfully configured.
Assignment of the Security Role to the new Application User
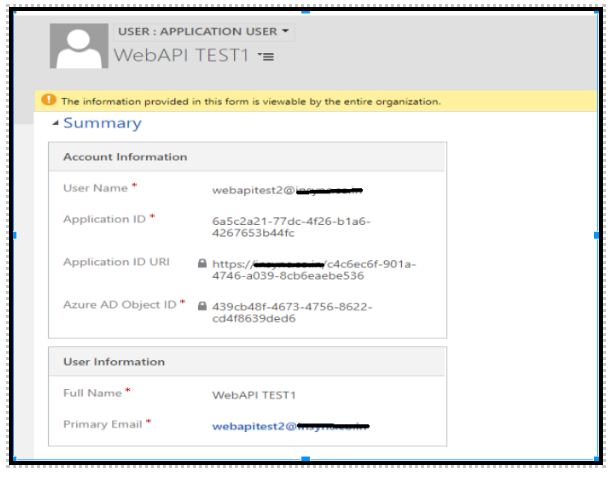
1) Login to Dynamics 365 CRM, navigate to Settings > Security > User.
Click on New. Enter the Application ID and Username which you got from Azure app registration.
2) Provide the firstname, lastname and primary email details in the respective field and submit the details.
Executing all the above steps, Dynamics 365 CRM will be successfully configured with the client credentials.
On-Premise Agent Configuration
Installation of On-Premise Agent
You need to install the agent on your local server. To Know about On-Premise Agent Configuration, Click here.
Configure the Dynamics 365 CRM Application in OP Agent
1) Create a processflow with Dynamics 365 CRM as source application, and deploy the processflow in On-Premise agent.
2) Open the agent and click the checkbox in Settings Panel.
3) Move into the App Configurational Panel of the agent and configure the details of the respective application.
Steps to Configure the credentials in OP Agent
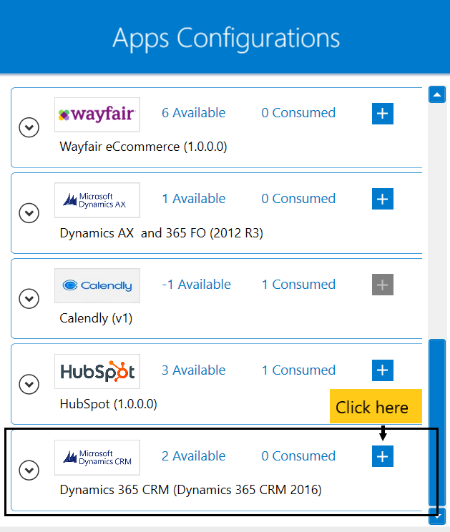
1) Open the OP Agent by providing correct credentials.
2) In the App Configurations panel of the agent, click on the + button, beside the application calendly.
The credential panel opens for the application Dynamics 365 CRM.
3) Enter Company Url, Client Id and Client Secret at the required place.
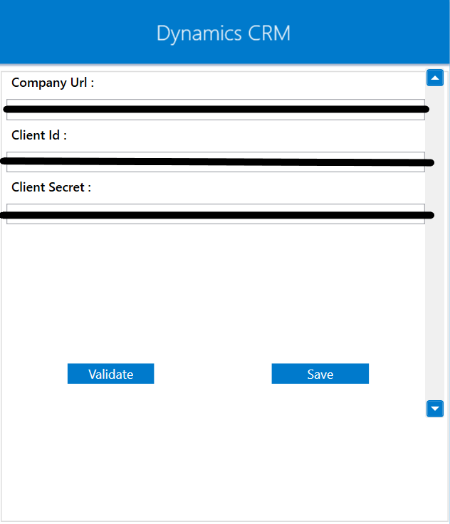
4) Click on the “Validate” button, to validate the connection. A message will appear confirming the same
if all the credentials provided by you for Dynamics 365 CRM is valid. Click “Save” button.
A message “Connection Saved Successfully!” will appear if all the credentials provided by you for Dynamics 365 CRM is valid.
Following the above processes, you can configure the Dynamics 365 application in the OP agent.
Cloud Agent Configuration
Configure the Dynamics 365 CRM Application in Cloud Agent
1) Login to APPSeCONNECT portal with valid credentials.
2) Navigate to Manage > App. Expand Dynamics 365 application and click on Credential.
3) Expand the REST node, click on Add New Credential.
4) Provide the necessary information Credential Name, Company Url, Client Id and Client Secret.
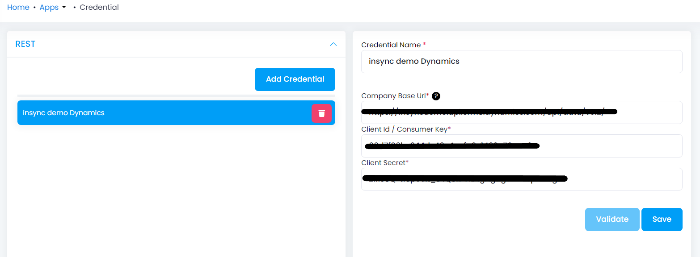
5) Click on Save and a toaster message will be displayed confirming the same.
Troubleshooting
ISSUE 1
Agent validation may fail due to improper Personal Access Token both in OP and Cloud agent.
Check the Personal Access Token once and re-validate the credentials in the agent.
ISSUE 2
Check whether you have created triggered processflow while fetching data from Calendly.
No need to configure the action filter in case of triggered processflow. However, you need to configure the webhook
by creating a processflow.
Troubleshooting
ISSUE 1
Agent validation may fail due to improper Comapny Url, Client Id and Client Secret both in OP and Cloud agent.
Check the credentials for the above ones and re-validate the credentials in the agent.
ISSUE 2
Some of the basic troubleshooting issues happens due to improper validations or even if it is accurately validated, the processflow do not sync data properly. This basic issue resolves after removing the Temp and Cache files from the portal and from your system. Therefore after clearing all this, you need to deploy and excute the processflow again to perform the required business integration in a smooth and free-flowing way. For E.g. If the Source Application not Found , remove the Temp and Cache Files. Again re-deploy and execute the processflow.
Attributes and Actions
While defining a connection to an API in Dynamics 365 CRM, you require clear understanding about the data requirements and endpoint configurations.
You can refer to this document to find all the endpoint details of Dynamics 365 CRM application. To define the endpoint in APPSeCONNECT, you need
to define Schemas and Actions. Actions are specifically targeted for an endpoint while schema is the data needed to execute the API. Here is the
list of some of the pre-packaged API actions defined for you which you can easily plug and play while doing your integration.
| Endpoint | Action | Action Type | Schema | UI Help | API Path |
|---|---|---|---|---|---|
| accounts | accounts | GET | accounts | Represents a customer or potential customer. | - |
| contacts | contacts | GET | contacts | Represents person with whom a business unit has a relationship. | - |
Actions Filter Implementation
Data is fetched from source application using APIs, and as you are aware of, API provides filters
which will allow you to specify a subset of data from the whole bunch of data created in the application,
the same can be specified through Actions and Action filters. The Action generally defines the
endpoint of the application which is being fetched, while the filters define the search criteria
of the data. You can add parameters in the action filter to define the search criteria.
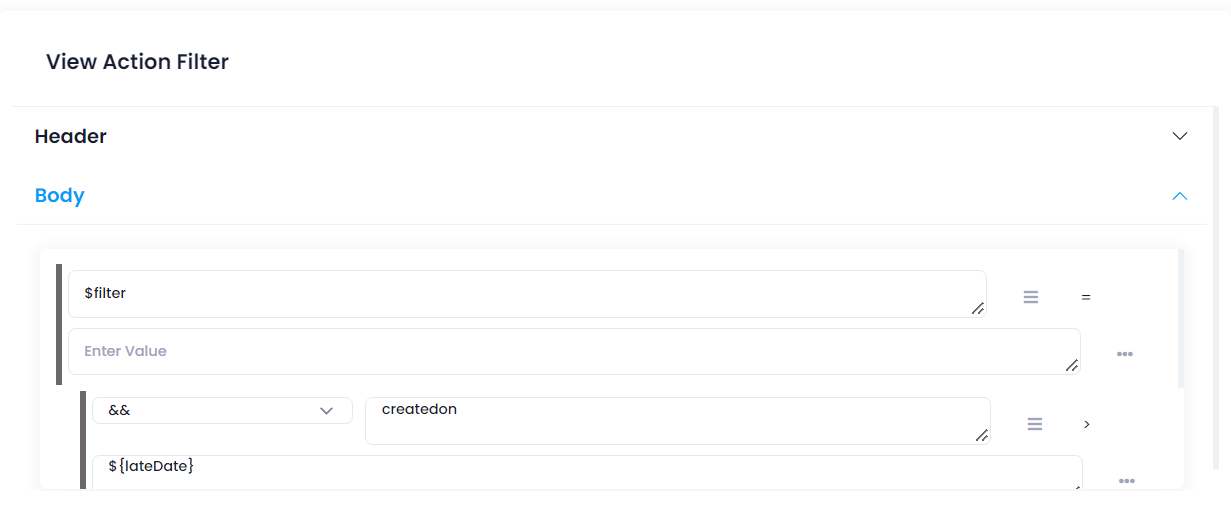
- General filters : It represents the overall filter criteria of the API. To define such filters, you do not need to specify anything special, just putting the field name and the value with the condition type is fine.
Suppose you need to fetch leads from Dynamics 365 CRM. While fetching data from Dynamics 365 CRM, you need to mention
$filter as the key and value field should be blank. Under $filter, mention the field name from the json structure,
as the filtering condition. In this scenerio, createdon as the key and ${lateDate} as the value have been used.
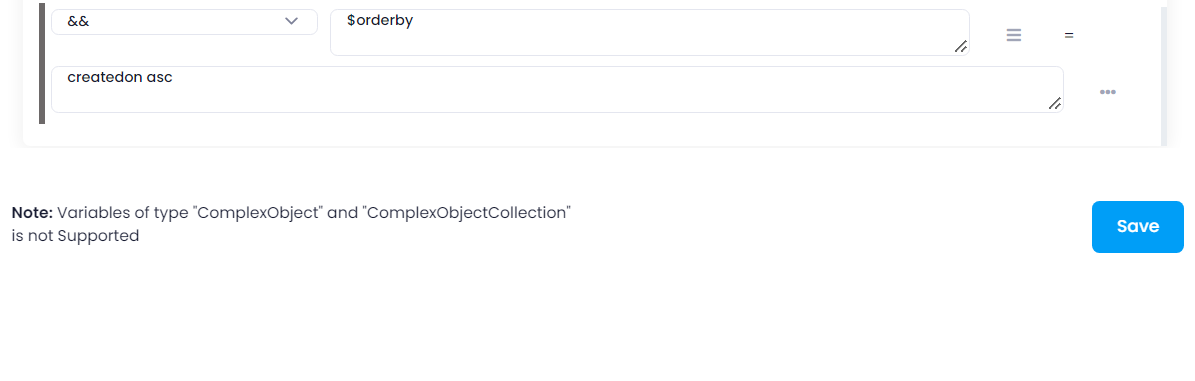
To provide the sorting type, specify orderby as the key and createdon asc as the value.