
APP Node
Updated:
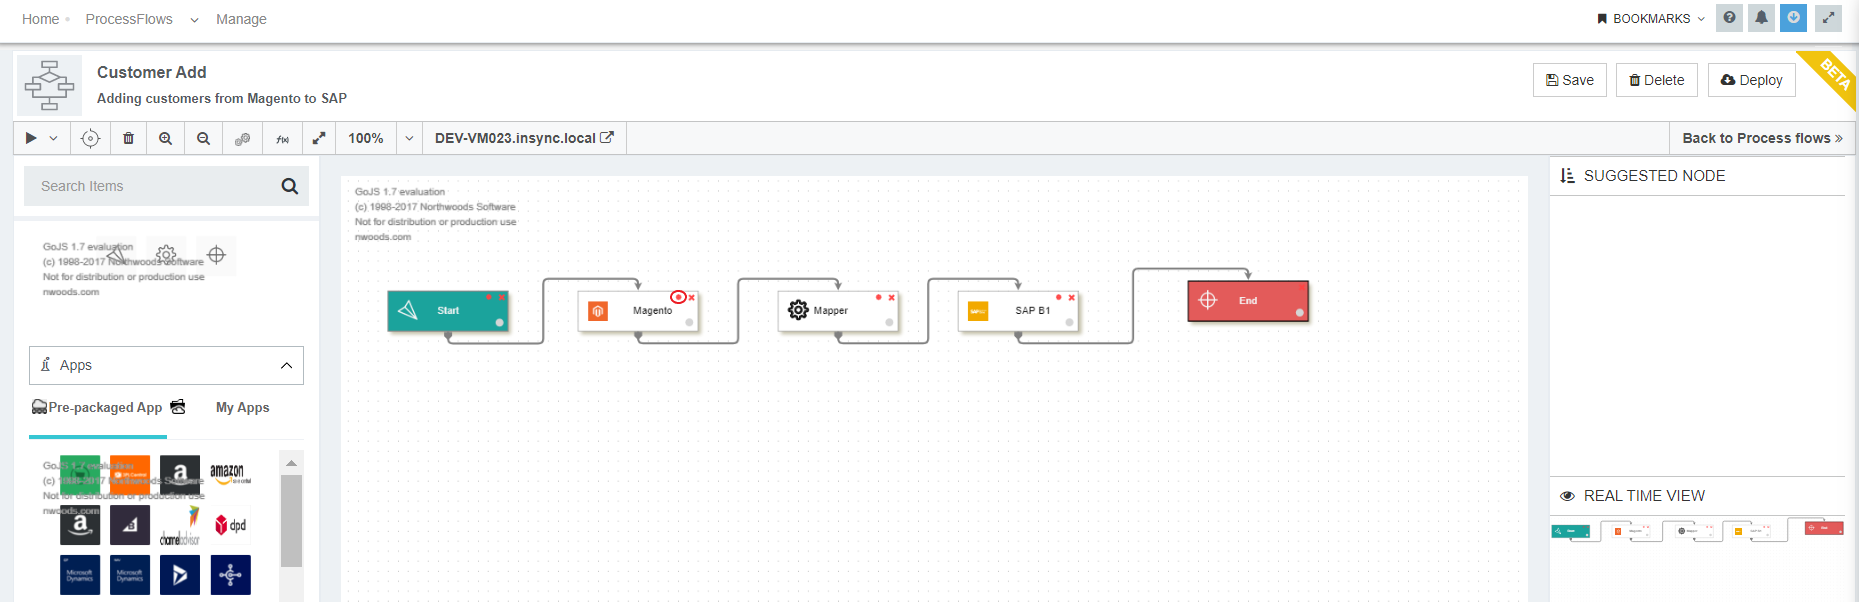
A node is a small execution unit that provides a way to specify the configuration for the respective application along with its execution logic. For transforming data from one application to another you need to drag Application nodes to the designer panel for operating as source application and destination application. Every Application node has node configuration window where you can define the type of node for the application : GET or POST.
What is GET/POST Node?
GET node is used for fetching data from an application by using their API Endpoints provided by the application where as POST node is used for pushing transformed data to the destination application by
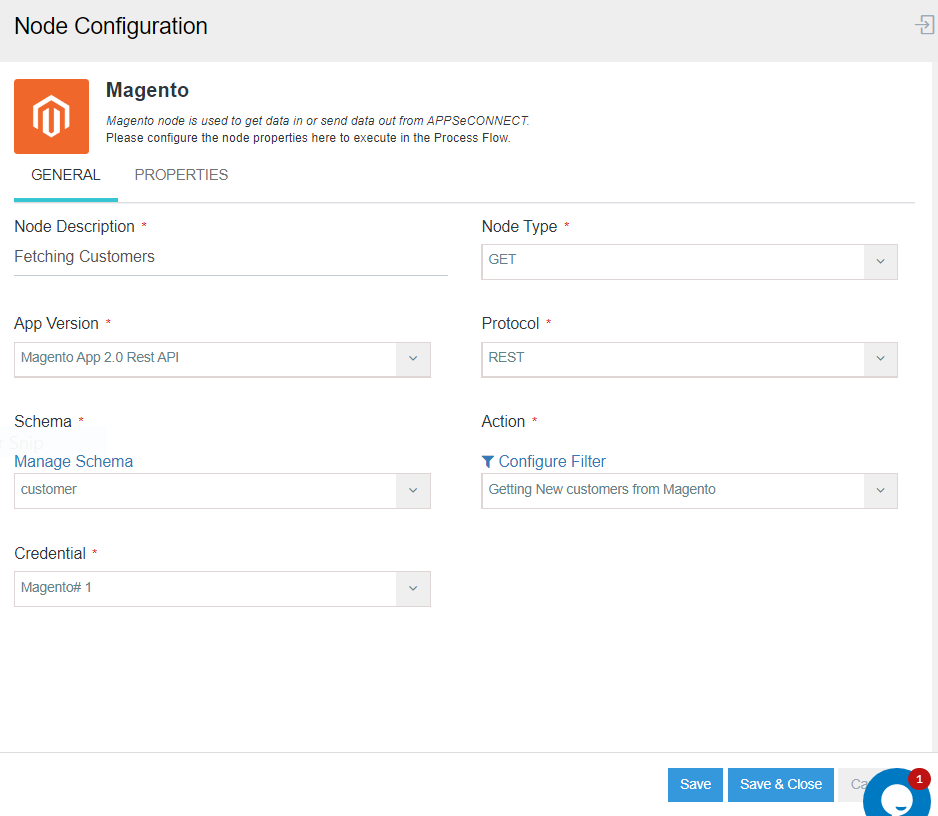
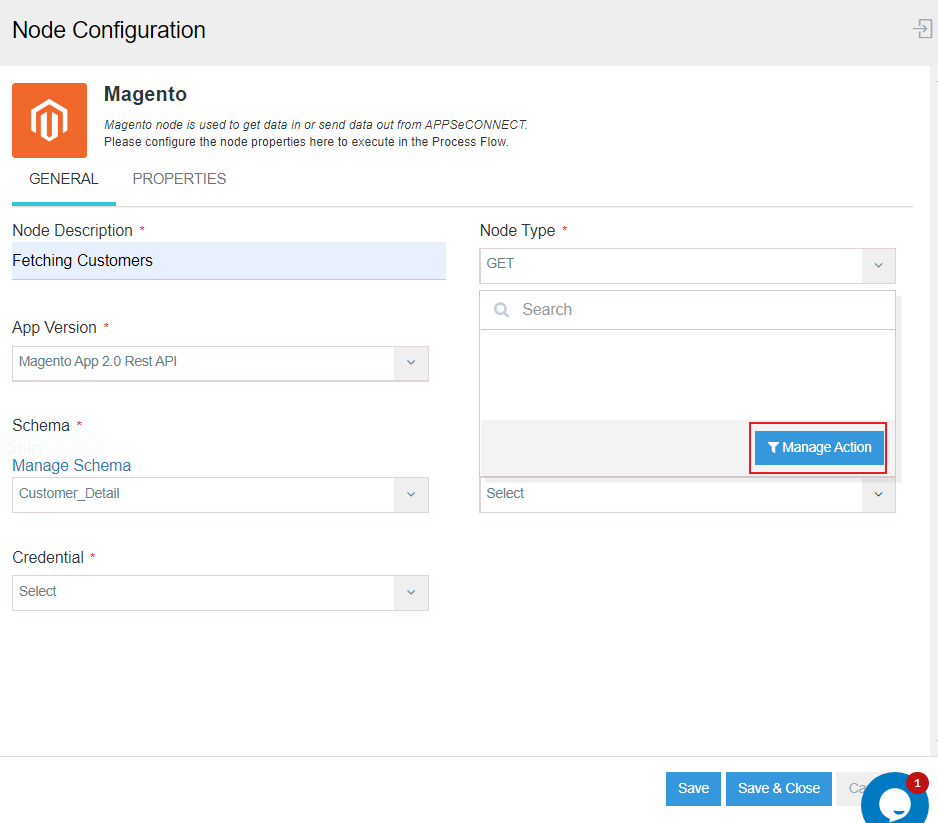
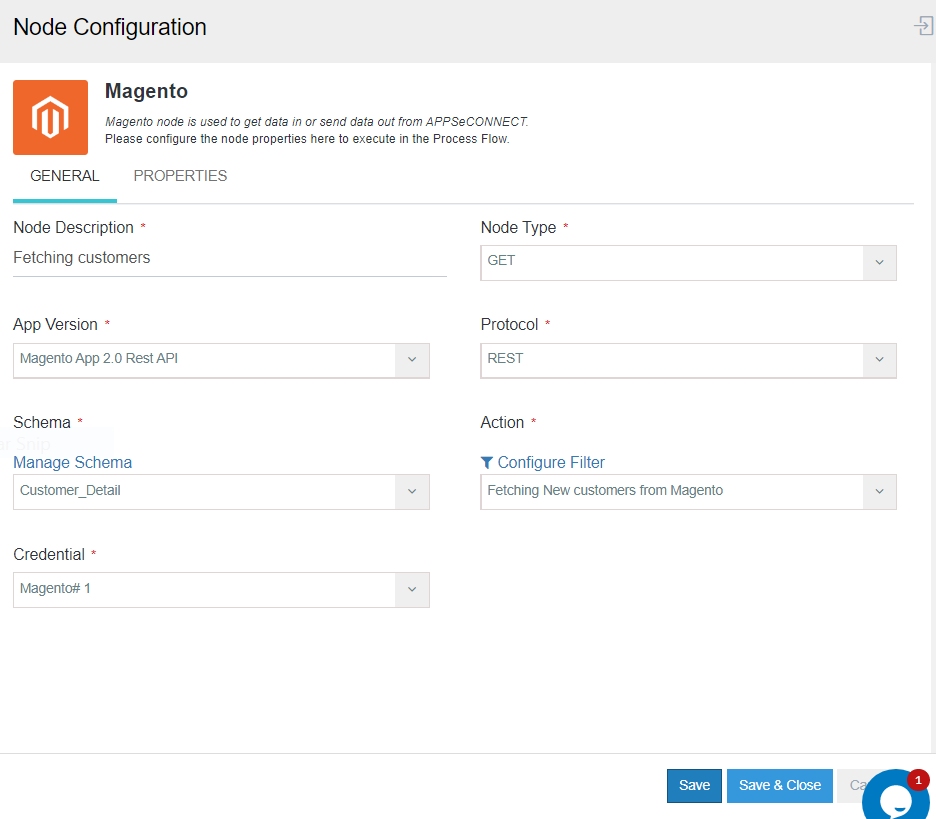
using API Endpoints provided by the application. When you drag an application node in the processflow Designer Panel, the node configuration window opens. You specify the following details and click on the Save or Save & Close button.
- Node Description : This denotes the description of the node.
- Node Type : This denotes the type of action that the node needs to perform GET or POST.
- App Version : This denotes the version of the Application. You need to select the version of the application which is needed for the integration.
- Protocol : The protocols would be listed for the application that is selected.
- Schema : The schemas for the selected application and protocol would be listed in the drop-down.
- Action : All the action based on the selected schema would be available. You can also modify Action filters by clicking on the Configure Action Filter button. Click here to know more about working with Action Filter.
- Credential : You need to click the button Add, beside Credential to add token in the list. Select the Credential Token added for storing the credential provided for the application in the OP Agent.
You need to select the Node Type as GET to make the application node execute GET operation or as POST to make the node perform pushing operation to your respective business application.
Working Principle for GET/POST node
-
GET node in APPSeCONNECT processflow is linked with the Start node such that when the processflow execution is triggered, the GET node is executed first which fetches data from the source application for the transformation process. On the other hand, POST node in APPSeCONNECT processflow is linked with the Mapper node such that when the POST node is executed, the transformed data are pushed to the destination application.
-
Click on the Node Configuration icon to open the Node configuration window for the selected application node.
-
Select the node type as GET in the Node Configuration window and click the save button.
Note : Select Node Type as POST in the node configuration window for pushing data to your business applications.
Managing Schema & Attributes
The user can view the schemas present in an app and can also add schema and import schemas and attributes for application node used in processflow. This section enables the user to view, add the Schema, Attributes of an application in the processflow and manage the same within a processflow for easy execution. The added schema and its component from the application node will be visible from the APP Section of the portal as well.
Listing of Schemas and Attributes
Processflow allows a defined tree view listing structure for managing and viewing defined Schema, Attributes and Actions associated with it. To view the listing of Schemas and Attributes, navigate to the following section :
(a) Go to Portal and Navigate to Designer > ProcessFlow module.
(b) Go to desiger section and drag the required App node.
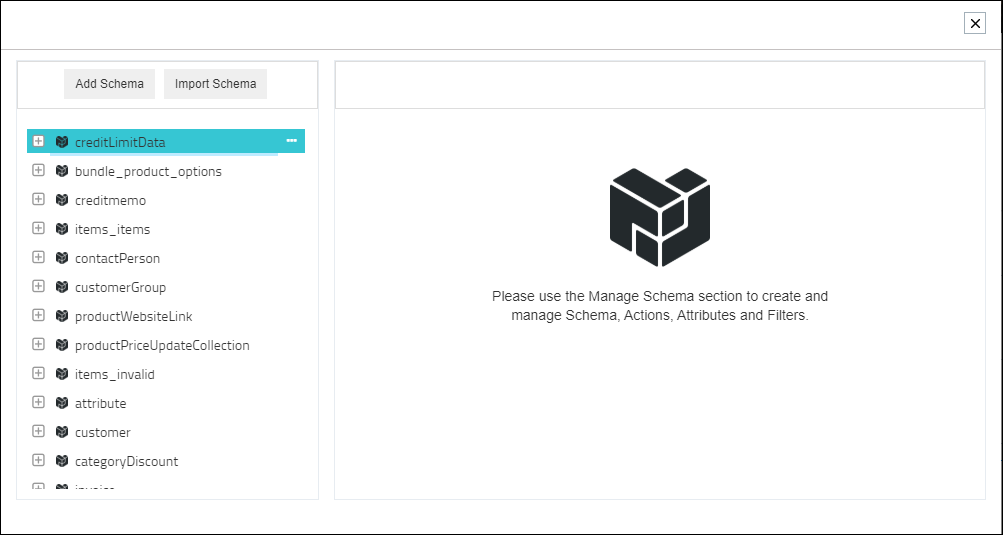
(c) The Node Configuration window opens. Go to General tab and Click Manage Schema.
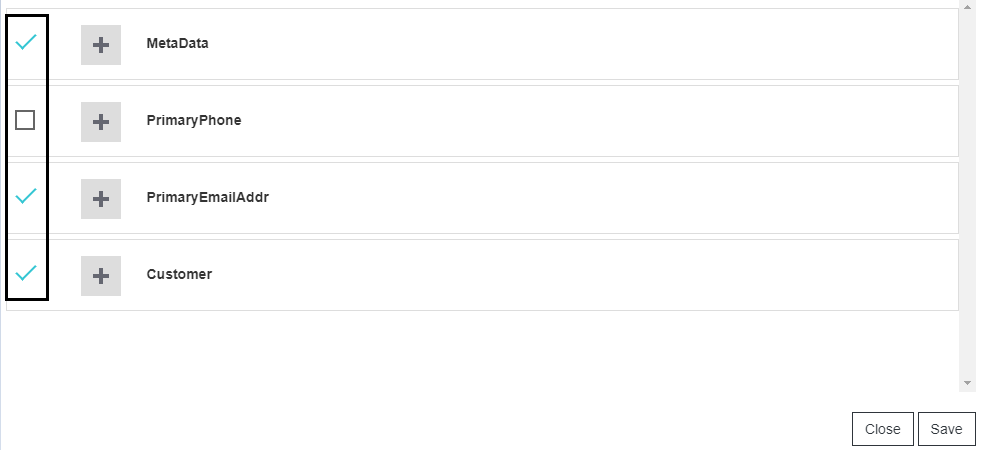
(d) A window opens up and here you can view the listing of all the Schema and Attribute(s) of the Application will be displayed in the Tree view on the left panel.
-
The Schemas are arranged in same level hierarchy whereas the attributes and actions associated with the schema is arranged in the second level hierarchy.
-
Newly created attribute is arranged under Attribute node.
-
The Action Filters and Retry Filters associated with an action are arranged in the third level hieararchy under attributes.
Note : Any Changes done to the Schema and Attributes from the Portal-» App module will be displayed in this section.
Thus listing view gives a clear synopisis to the user regarding the Schema access and Management from the processflow node configuration level.
Adding Schemas in an Application node
1) Go to designer section and create a process flow.
2) Drag the application node and the Node Configuration window appears. Provide the required details in the fields available in the Node Configuration window.
3) In the node configuration window, go to the Schema field. If the list of Schema is available select from
the list of schema. And if No schema is available for the given application node, click Manage Schema option.
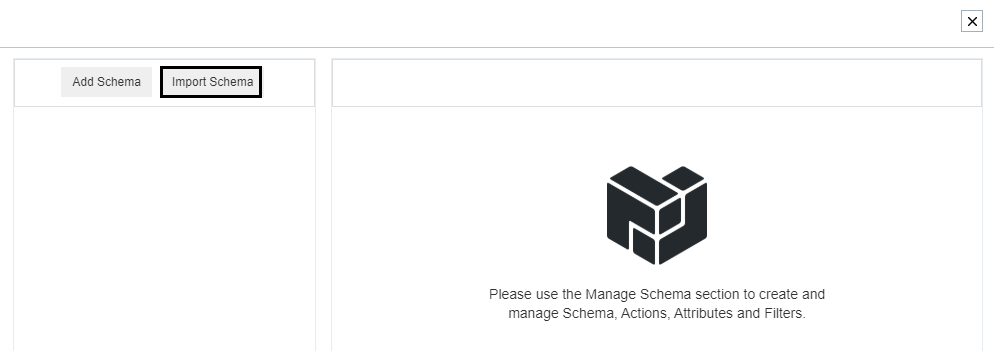
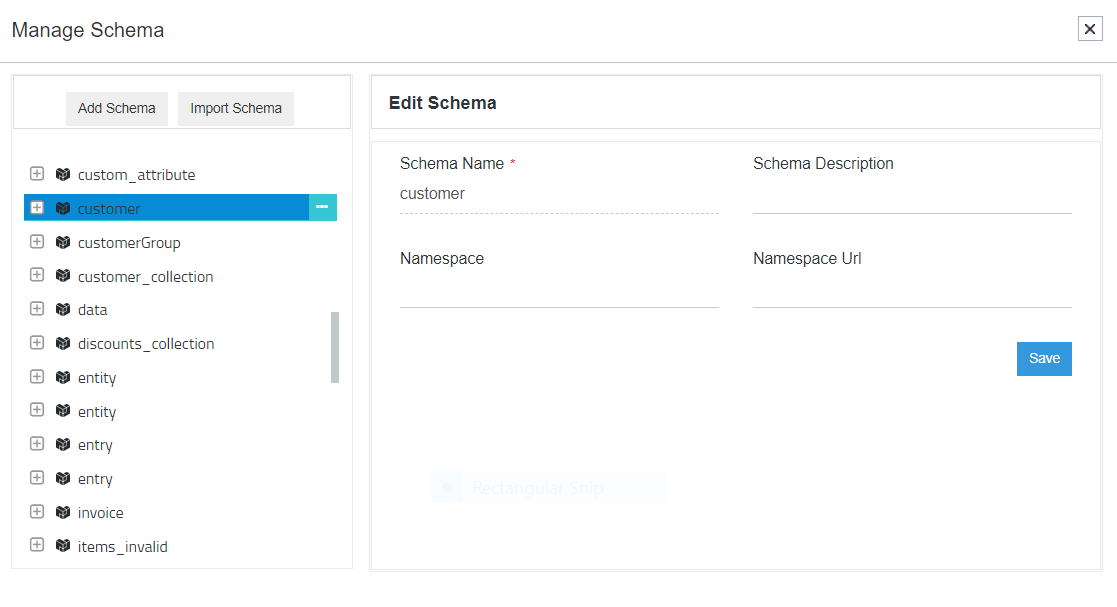
4) The following window appears with message on display for the user to Add Schema & Import Schema. Click on the option Add Schema and the add schema window opens. Enter the details of adding Schema and Click Save button.
- Schema Name : This is a mandatory field and it needs to be provided with the schema name.
- Schema Description : The description for the schema is needed to be given here.
- Schema Namespace : Differentiates between two similar schemas.
- Schema Namespace URL : Differentiates between two similar schemas using URL.
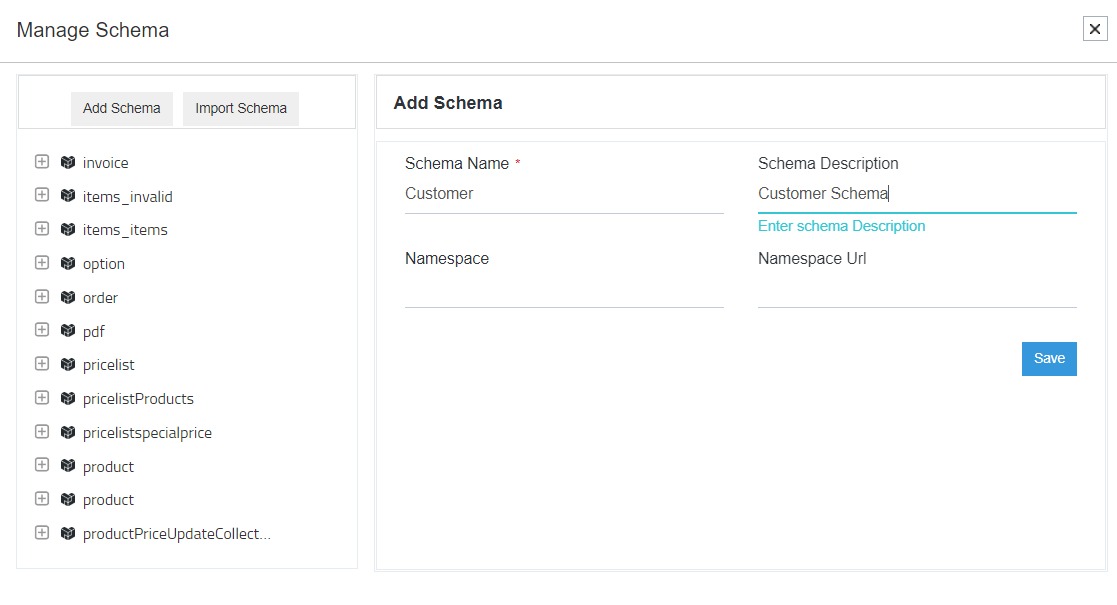
5) The newly created Schema is added and gets listed in the left side panel. Thus, following the above process you can successfully add schemas for your application.
Importing Schemas & Attributes
Processflow allows you to import schemas that helps to create schemas and attributes instantly. You can upload the schema files of your application based on the formats listed below :
- XML - The functionality traverses and renders through the file when uploaded in the XML format.
- Json - The functionality traverses and renders through the file when uploaded in Json format.
- WSDL (Web Services Description Language) - The functionality traverses and renders through the web file provided as an URL.
Steps to import schemas and attributes
1) Navigate to processflows in portal and open the processflow where you want to import the schema. If you are required to create a new processflow, Click Here.
2) Open the Node configuration window for the application whose schema you need to import. Click on the Manage Schema Button.
3) The Listing window of the Schemas section opens. Click on the Import button.
4) You will be able to view the Three Radio buttons that specifies the type of file you need to upload for importing.
- Selecting XML - On selecting the import type as XML, you will be able to view the following fields.
- Choose File : You will be able to select the XML files from your local system for importing the schemas.
- Element Name: You need to provide the parent Element name through which the XML file shall be traversed. Your file will not be traversed if you provide a wrong element name.
- Render : Clicking on the Render button, the functionality would traverse your entire XML file as per the Element Name provided and will list you all the Schema complex Objects and Complex Object Collections based upon the file.

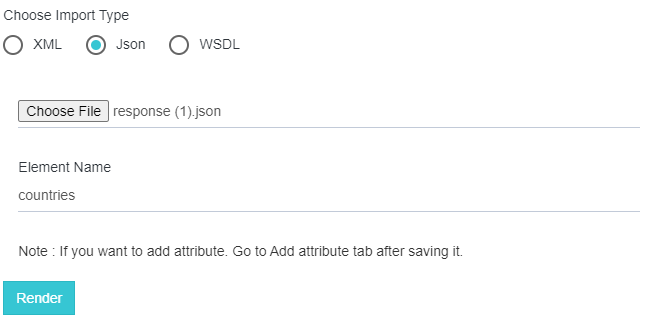
- Selecting Json - On selecting the import type as Json, you will be able to view the following fields.
- Choose File : You will be able to select the Json files from your local system for importing the schemas.
- Element Name : You need to provide the parent Element name through which the JSON file shall be traversed. Your file will not be traversed if you provide a wrong element name.
- Render : Clicking on the Render button, the functionality would traverse your entire JSON file as per the Element Name provided and will list you all the Schema complex Objects and Complex Object Collections based upon the file.
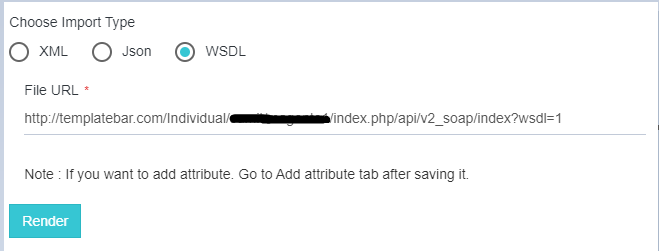
- Selecting WSDL - WSDL is the Web Services Description language. On selecting the Radio button for WSDL, you will be able to view the following fields.
- File URL : You will be able to provide the URL for importing the schemas for your application.
- Render : Clicking on the Render button, the functionality would traverse your entire WSDL file and will list you all the Schema Complex Objects and Complex Object Collections based upon the file.
5) Select the import type as per your requirement, upload the document as per the selected format and click on the Render Button. (Here, we have selected the XML type)
6) You can view all the Complex Objects and Complex Object Collections along with their attributes as schemas of your application. On expanding each of the rendered schema, you can view all its attributes. You can alter these fields of attributes as per your requirement : Datatype and Reference Entity.
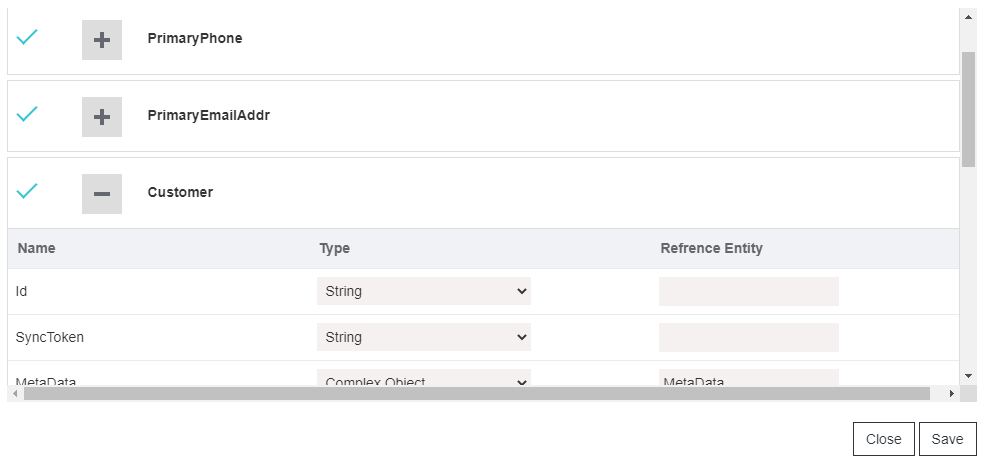
7) By Default all the rendered schemas will be displayed. You can uncheck any of the schema if not required.
8) On clicking the SAVE button, all the rendered schemas will be displayed on the Schema listing page of your app. Whenever you drag or reuse the app for a different processflow, you can view all the saved schemas, in the Schema listing page.
Note :
-
You cannot upload a JSON file for an XML import type and vice versa.
-
The element name should be provided same as provided in both XML & JSON files.
-
Any Complex Objects or Complex Object Collections, if related as a reference Entity and the same is unchecked while saving the imported file, the saving process will be blocked. You need to check the unchecked Complex Objects or Complex Object Collections before proceeding with the saving process.
Thus, following the above process you can successfully add schemas, by importing the complex objects and complex object collections as schemas for your application.
Editing & Deleting Schemas in an Application node
To Edit Schema, you need to perform the following steps :
1) Go to Processflow designer section and drag the app node for which you want to edit schema.
2) Follow the path - Node Configuration window -> General Tab -> Schema-> Manage Schema.
3) You will be redirected to the Manage Schema and Action pop-up.
4) In the Manage Schema and Action window, you will be able to edit any existing Schema by clicking on the Schema
context menu and do the changes.
5) The Schema Name is uneditable, rest other fields are editable like Schema Description, Namespace &
Namespace URL.
NOTE : (a) Once a processflow has been saved in an Environment you will be
unable to Rename the Schema, Delete the Schema.
(b) You will be able to add/edit the Namespace, and Namespace URL values provided in the Schema.
(c) You will be able to edit the Description, via Edit Schema option.
Adding Attribute to a Schema
1) The Schema context menu has the option to ADD Attribute to the schema.
2) Click Add Attribute to add attribute to the schema. The Add Attribute window opens up.
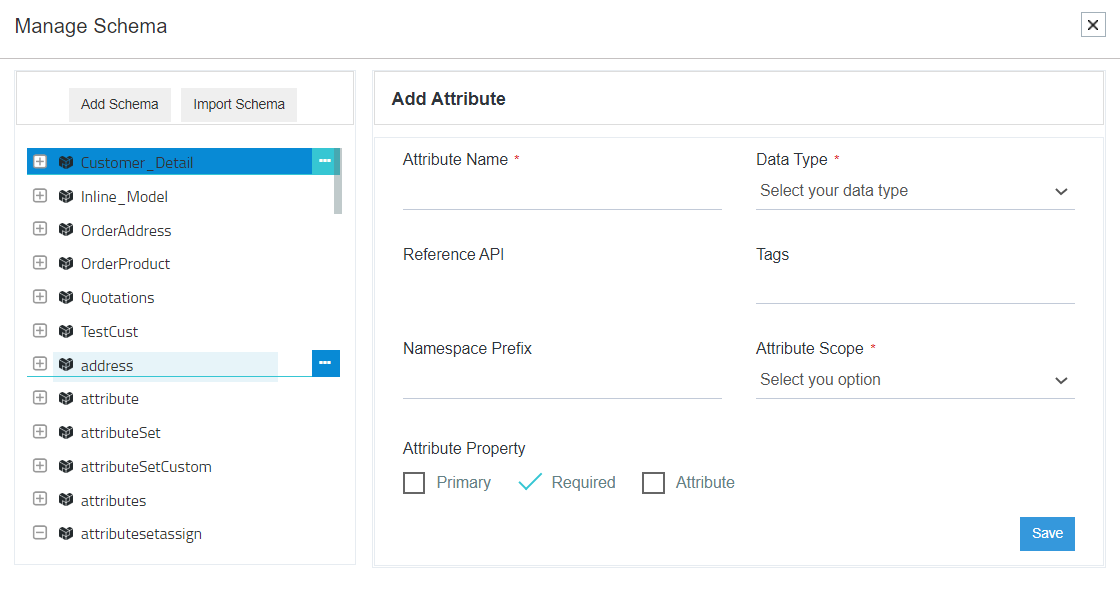
The fields in the Attriburte Property Window are :
a. Attribute Name : It is a mandatory field, used for providing name to the attribute.
- The Attribute Name field will allow a
maximum of 100 characters. - In the Attribute Name field space and special characters will not be allowed.
b. Data Type : Select the datatype from the drop-down as per the requirement. This is also a mandatory field. - String
- Boolean
- DateTime
- Number
- ComplexObject
- ComplexObjectCollection
- Double
c. Reference API : If any schema needs to be referred for the transformation, that can be referred by selecting the Schema Name from the drop-down as a reference Entity. The Reference API field will be displayed if the Attribute Data Type isComplexObjectorComplexObjectCollection.
d. Tags : Used providing specific tags to the attribute.
e. Namespace Prefix : Prefix could be added for this attribute while working with namespaces.
f. Attribute Scope : Select the Scope - Organization Level or ProcessFlow Level. This is a mandatory field select as per your business requirement. Attributes with scopeOrganizationwill be added at the Organization level whereas Attributes with scopeLocalwill be added at the processflow level.
g. Attribute Property : This section has 3 checkboxes - Primary, Required, Attribute. - Primary : For allotting this attribute as the Primary Key.
- Required : For making this attribute mandatory for the mapping purpose.
- Attribute : To add attribute in the XSLT
Only one Attribute can be set asPrimary Attributewithin a Schema.
3) Click SAVE button, after all the details has been made. A confirmation message of attribute creation
appears on the window stating the attribute is created successfully.
4) The newly created attribute gets added just below the Schema on the left side panel.
5) Click on the created attribute in the node structure, for Renaming and Deleting the attribute.
Note : For adding Reference API, the created attribute must have the datatype Complex Object or Complex Object Collection.
Editing, Deleting & Renaming Attribute in an Application node
(a) Editing Attribute within a processflow Scope (local attribute)
1) Any editing/changes done to an existing Attribute will not change the Attribute defined under the Organization Scope (global). You can check the same by navigating to the App section of the portal, where the Schema Attribute(s) under Organization scope (global) will remain unchanged.
2) Changes done to an existing Attribute will be reflected within that specific processflow only.
3) Changes done to an existing Attribute will not affect other processflows using the same Schema and Attribute.
4) Users will be able to Edit, Rename, or Delete the existing Attributes by clicking on the corresponding options.
5) Primary set Attributes (local attributes)cannot be deleted.
(b) Editing Attribute within Organization Scope (global attribute)
On deleting an Attribute from the Manage Schema section, it will not be visible in new processflow.
To Delete Schema, do the following steps :
1) Go to Processflow designer section and drag the app node for which you want to deleted schema.
2) Now click on the app node, and under schema field click Manage Schema.
3) You will be redirected to the Manage Schema and Action pop-up.
4) In the Manage Schema and Action window, you will be able to delete any existing Schema by click on the Schema
context menu and clicking on Delete Schema Option.
Deleting Attribute
If you have saved the processflow (both for Organization and processflow Scope) you will be able to delete the Attribute(s) used in Mapping.
Note : For saved processflow for both organization and PF scope, Data Type of the Attribute(s) cannot be changed used in Mapping. Reference API of an Attribute cannot be changed . Primary property of Attribute(s) can be changed/updated.
Managing - Action & Different Filters
Actions are certain tasks like getting data from an application or sending data to an application based on specific API filter conditions known as Action Filters.
Every Schema is an entity that requires multiple actions to perform multiple operations as per the transaction happening. For Eg : GET, POST, PUT, DELETE etc.
This section of the document will enable the user to create actions, action filter and error filters under a created schema, when working with processflow.
Prerequisites
- The User should have a valid APPSeCONNECT account.
- APPSeCONNECT should be up and running.
- An application node is needed for defining the Actions.
- The app node needs to be dragged in the designer section to define the actions under manage schema.
- The Schemas should be created under which the Actions are to be defined.
- For defining Action & Retry Filters, you need to have the ACTIONS created for the chosen application on your organisations.
- You need to have an action filter/retry filter created, to create it as a template.
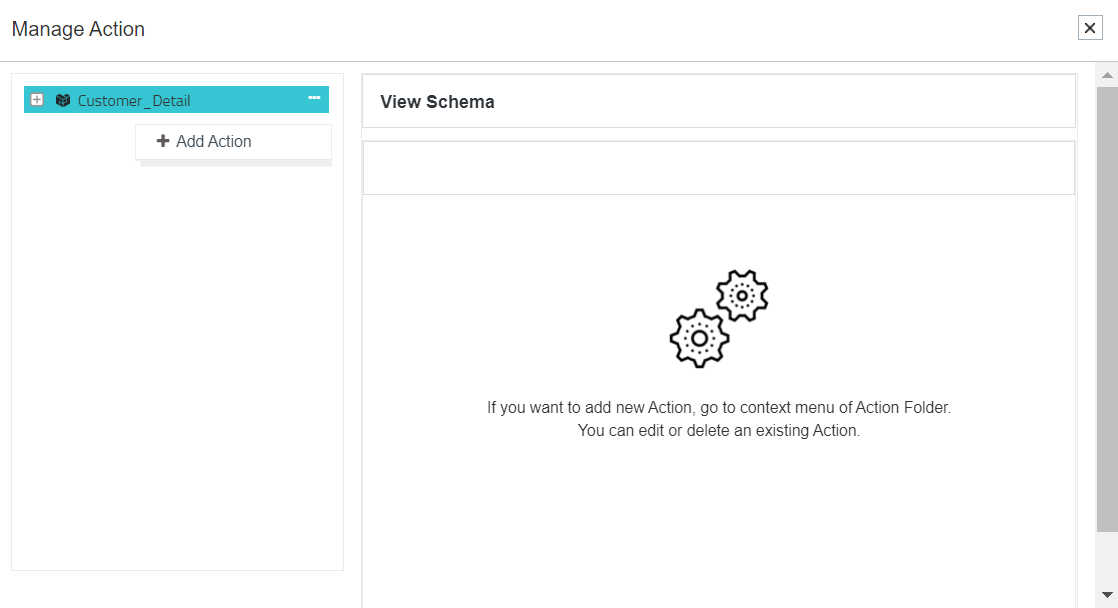
Adding a New Action
1) Navigate to the processflow and the drag the application node for which the actions are to be made. Enter all the mandatory fields in the Node configuration window of the app node that opens up.
2) If you donot get to find the needed action in the actions menu, click on the Manage Action button for defining Actions.
3) The Manage Action window opens. You will be able to view the schema, selected in the node configuration window. Click on the Ellipsis icon (three horizontal dots) beside the schema to view the Add Action option in the contextual menu and click it.
4) You will be provided with two mandatory fields for creating the ACTION under the schema. Below are the mentioned fields.
- Action Name : This is the name of the action that would signify the operation it would be doing. For Example : POST Customers, getting Customer from WooCommerce etc.
- Action Description : The description of the actions briefs the operation, the action would be performing. For Example : Adding customes to Shopify, Fetching Orders from Magento etc.
Click on the SAVE button.
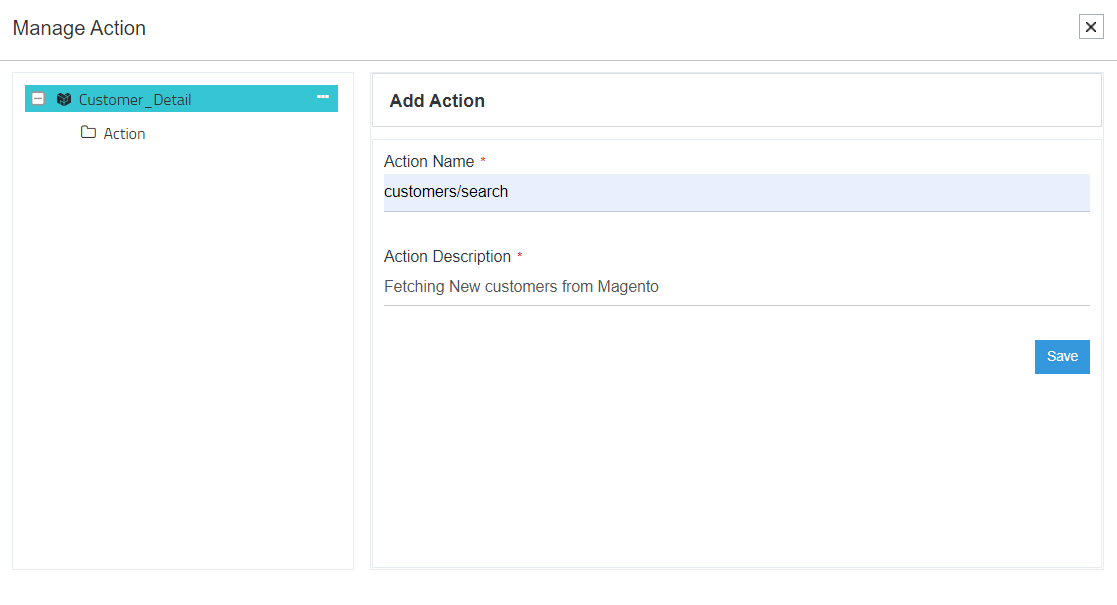
Following the above steps , you can successfully create a new Action to a schema.
Note :
- The newly created action will be created in the organisation level.
- The field Action Name will allow a maximum 100 characters.
- You can create multiple ACTIONS under a schema.
Edit, Delete & Rename an existing action
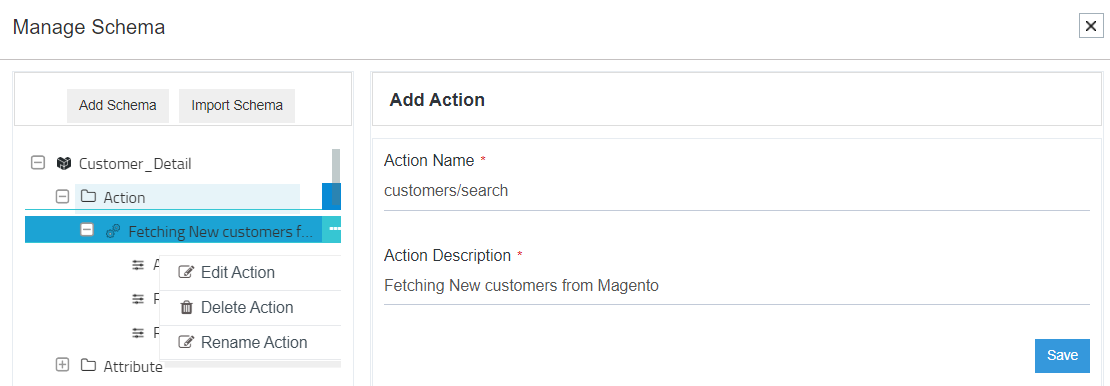
1) Navigate to Manage Schema in the node configuration window of the selected application. You will be able to view all the schemas present in the selected application. Expand the Schema node > Action Node to view the selected action. Click on the Contextual menu to view the following option.
- Edit Action
- You can view two fields Action Name & Action Description in the edit window.
- Modify the changes required and click on the SAVE button.
- Delete Action
- Clicking on the delete action button, you get a confirmation message for deletion process.
- Clicking on the
YESbutton will delete the action from your organisation for the selected application.
- Rename Action
- Clicking on the RENAME button, you get the edit action window.
- You can successfully rename both the mandatory fields : Action Name & Action Description.
- Click on the SAVE button to apply the changes on your organisation.
Following the above process, you can successfully Edit, Delete & Rename an existing action.
Note :
- You cannot delete an action that is already in use and deployed.
- You can also perform the DELETE and the EDIT operation of the schema for the APP > Select your App > Schema.
Adding Action Filters
Action filter for an integration represents the same as API filters. In APPSeCONNECT, Action filter lets you define a filter criteria for an action which filters out the data from the API. You can think this as an where clause of a select statement or even a search criteria in Windows file system. You should always define an action filter by learning the API structure, such that you dont call the same data again and again. Here in the steps we are going to cover the ways how we can define action filters in ProcessFlow.
1) Select the Action from the contextual menu of the node configuration window of the dragged application. Click on the Configure Filter button after selecting the action from the contextual menu.
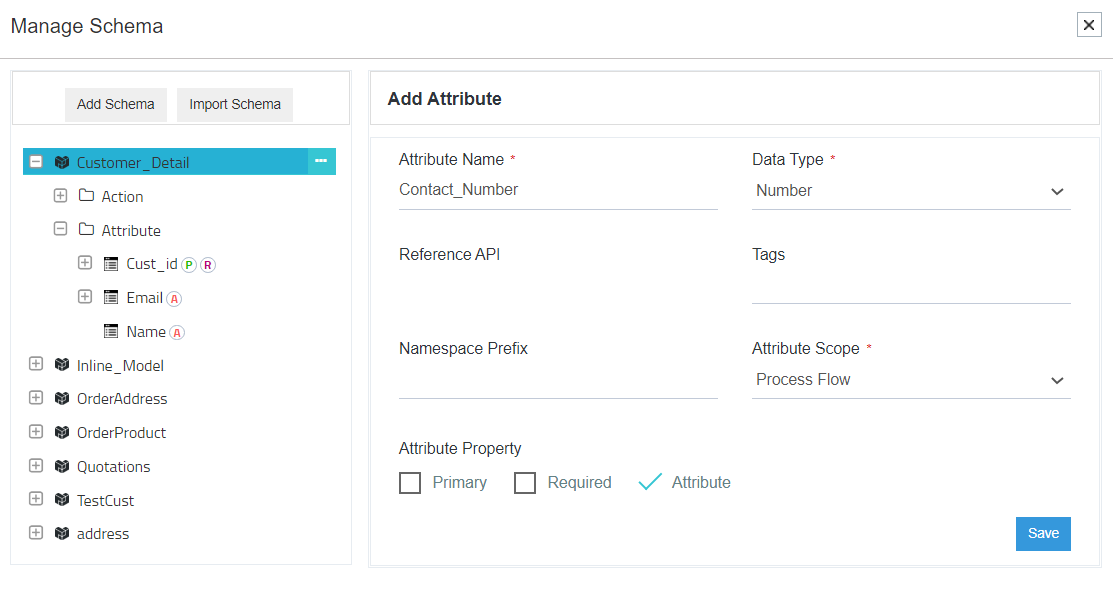
2) The Configure filter window opens. You can view the selected schema listed on the window. Expand the nodes Customer_Detail > Action > Select Action to view the Action Filter, Retry Filter and the Runtime Filter.
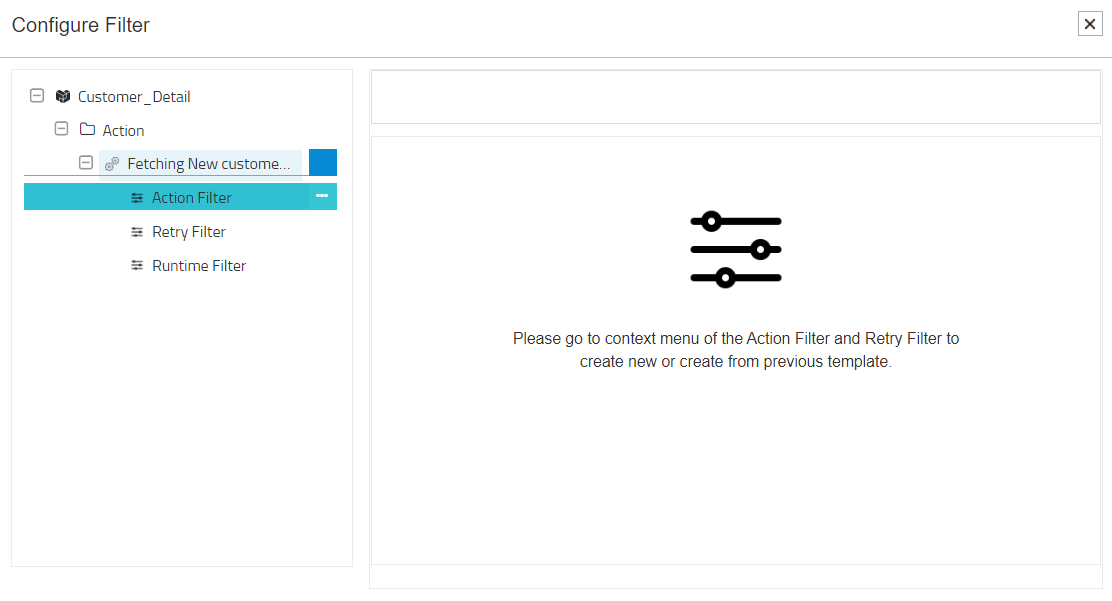
3) Click on the ellipses beside the Action Filter to view the CREATE Button. Clicking on the create button, the action filter creation window opens.
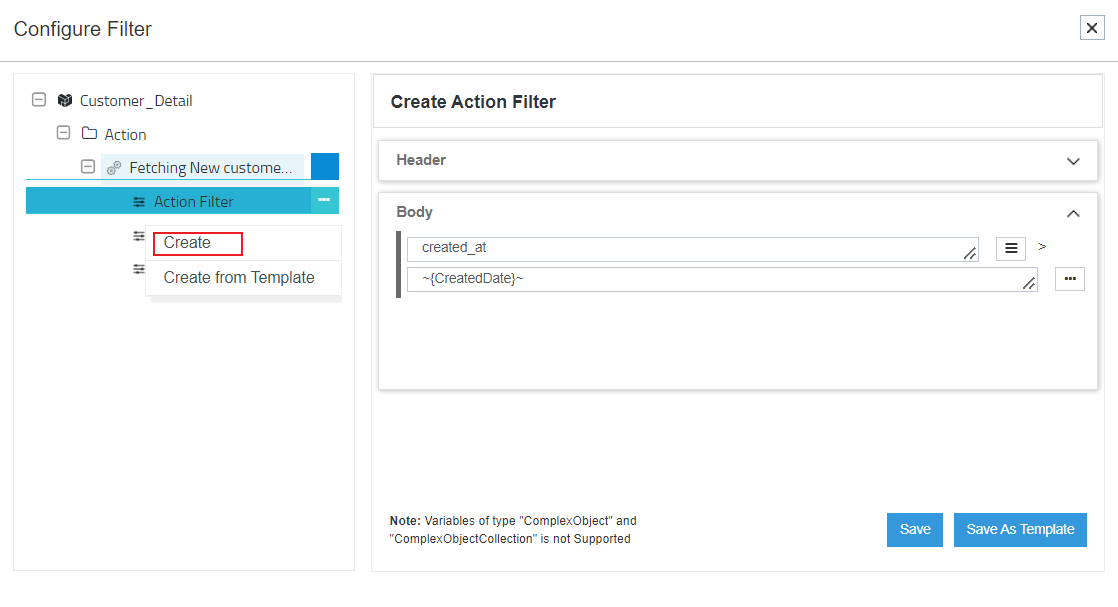
4) You get the option to provide your filter for two sections. Either on HEADER and BODY. As per you application API, you can provide the following details to configure the action filter.
- Key : The key defines the field on which you want to apply the filter on. For example, let us suppose you want to filter by date, then key will have created_at in it.
- Operator : It represents the operator between the two operands. The operator is not mandatory. For instance, in case of REST based APIs, the Operator does not generally makes sense, as the filter goes into the query string which contains only a combination of key-value pair.
- Value : You need to provide the value to the filter. This represents the data. For example, if you want to filter out the customers greater than a particular date, you can specify the date in the value field.
Click on the SAVE icon below the window to save the entire filter.
5) You can add as many filters as you want by clicking on the Add Child Clause button. An optional conjunction is needed for some integrations which you can provide to join two queries. To add a conjuction on a level below, click on the ellipses button beside the parent sibling.
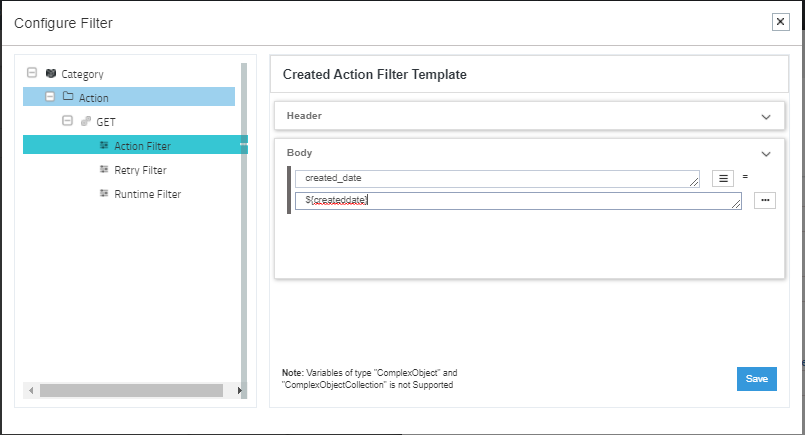
6) You can also save the filter as a template by clicking on SAVE AS TEMPLATE for reusing it on a different processflow. For more details on TEMPLATE, Click Here.
Adding Retry Filters
The retry filter allows the integration to rerun an erronous data to fix it. The Retry filter allows the user to create a filter that downloads an item based on a particular id.
1) Select the Action from the contextual menu of the node configuration window of the dragged application. Click on the Configure Filter button after selecting the action from the contextual menu.
2) The Configure filter window opens. You can view the selected schema listed on the window. Expand the nodes Customer_Detail > Action > Select Action to view the Retry Filter.
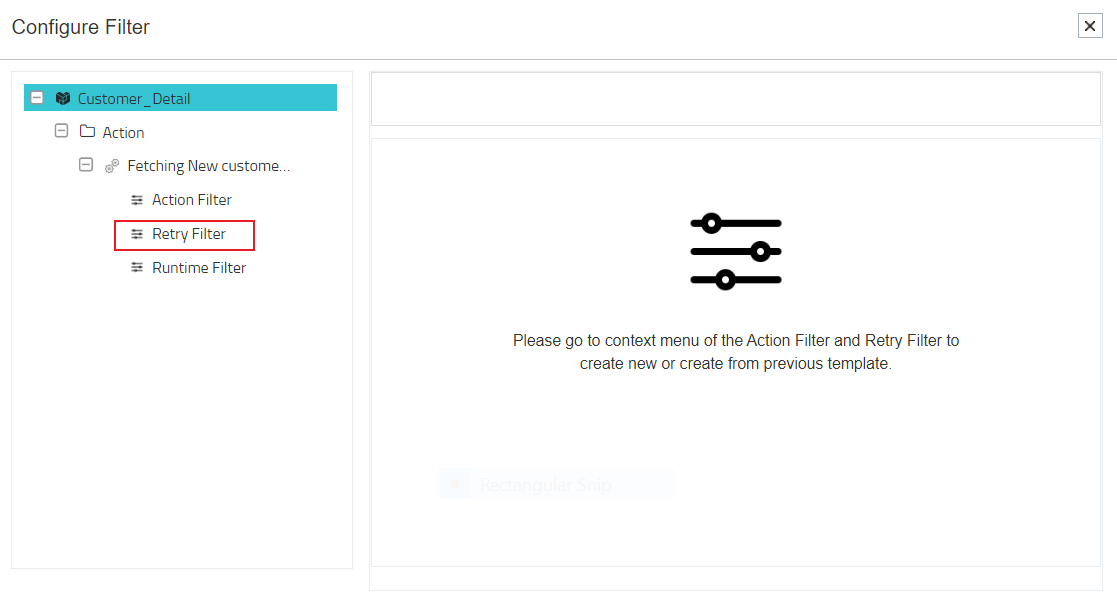
3) Click on the ellipses beside the Error Filter to view the CREATE Button. Clicking on the create button, the error filter creation window opens.
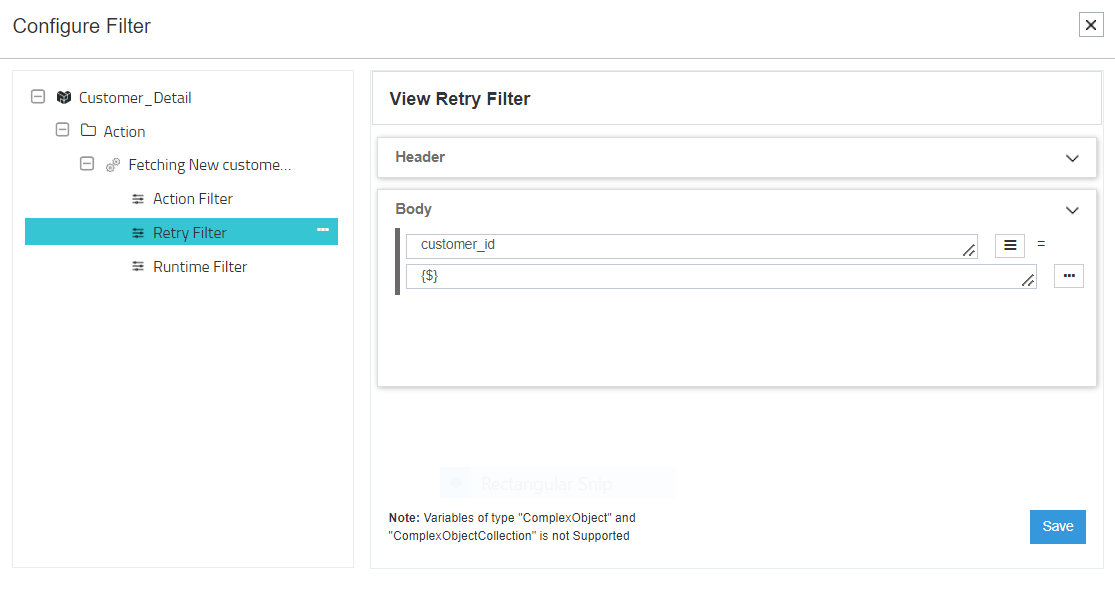
4) You get the option to provide your retry filter for TWO sections. Either on HEADER and BODY. As per you application API, you can provide the following details to configure the retry filter. Provide the following details to configure the retry filter.
- Key: The key defines the field on which you want to apply the filter on. For example, let us suppose you want to filter by customer_id, then key will have customer_id in it.
- Operator: It represents the operator between the two operands. The operator is not mandatory. For instance, in case of REST based APIs, the Operator does not generally makes sense, as the filter goes into the query string which contains only a combination of key-value pair.
- Value: You need to provide the value to the filter. This represents the data. For example, if you want to filter out the customers for a perticular date, you can specify the id in the value field. Generally for most of the application we use {$} which will be replaced during retry execution.
Click on the SAVE button on the window to save the current filter. To add a conjuction on a level below or at same level, click on the ellipses button beside the parent sibling. Following the above process, you can successfully implement Retry filter for an action.
Saving and creating from a Template Filter
1) Drag the application node for whose Action filter/Retry filter you need to create as a template. Navigate to Node Configuration window > Select Action > Configure filter.
2) The Configure Filter opens. Expand the nodes until Action filter & Retry Filter appears.
3) Click on the CREATE button as per the options selected, either ACTION FILTER or RETRY FILTER. The create window opens as per the selected choice (The window remains same for both Action Filter and Retry Filter). Here we have chosen ACTION FILTER.
4) Provide the details in the fields and click on the SAVE icon beside the filter column. After saving the column, you get the option of SAVE AS TEMPLATE.
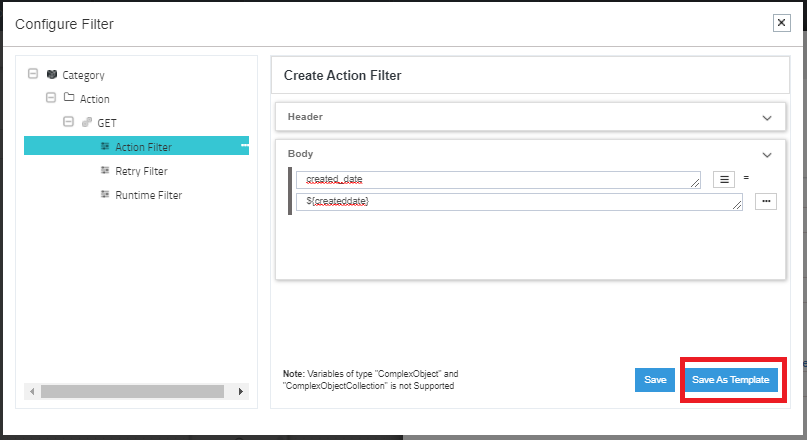
6) Click on the Save as Template button to save the provided Action Filter as a template. You can reuse this saved template on any other nodes of any processflow in your organisation, provided the application node , Schema & the Action remains the same.
7) You can view the saved for the schema and action by navigating to Manage Schema > Your selected Schema Entity > The Action in which you have created the Template > Click on the Action filter. You will be able to view the saved template for that schema and the action. The template will not be editable in the Manage schema window.
8) To create filter from a saved template, navigate to Node Config window -> Select Schema -> Select Action -> Configure filter. Expand the Schema node until Action Filter, Retry Filter appears.
9) Click on the Ellipses beside your chosen option (Action Filter, Retry Filter) and select the option Create from template from the context menu.
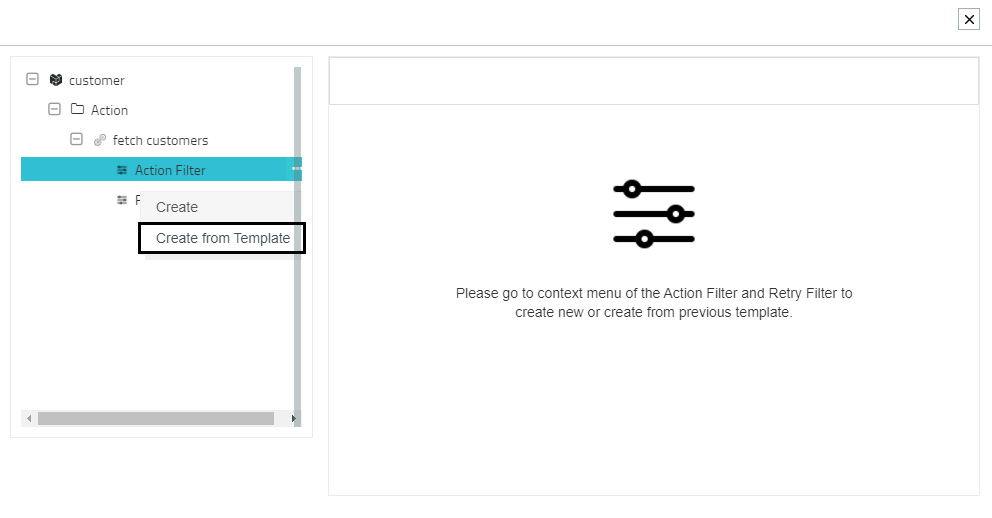
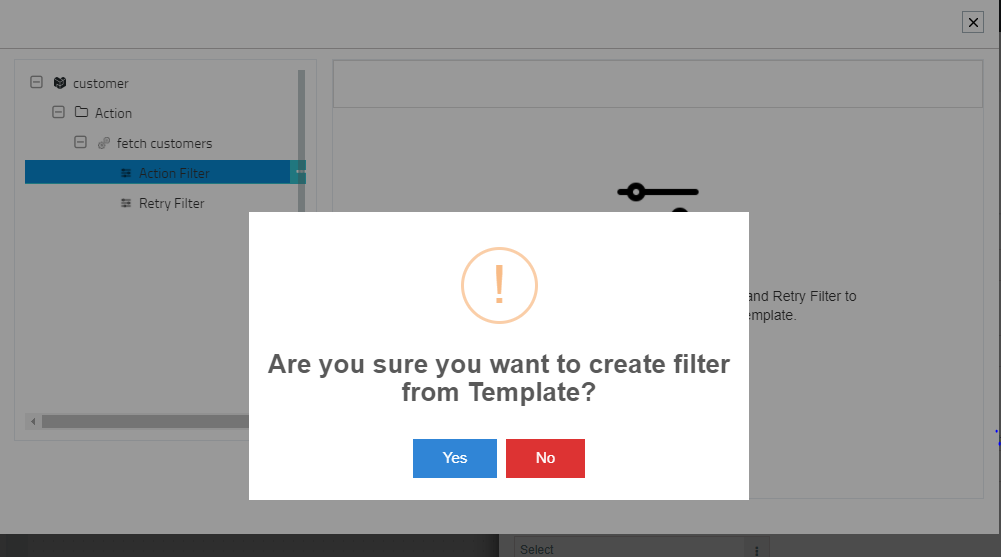
10) On clicking Create from template you get a confirmation message. Click on the YES button.
11) The saved template opens. You can anytime edit the action filter placed in the template as per your requirement. The updates made will not change in the template that is saved.
Following the above process you can successfully SAVE and create filter from template.
Working with Runtime Filter
You can create the Dynamic Runtime Filter for performing specific integration operations. However, you cannot execute from this section. The Runtime Filter functionality on this area will only allow you to Create, View and Delete. The filters created can be also be viewed in the Execute with Runtime filter area. For more Details, Click Here.
1)Drag the application node in the designer panel.Fill the manadatory details and then click on Configure Filter.
2)The Configure Filter configuration windows opens up.Click on the ellipses beside Runtime Filter.You will be able to view two buttons
- Create - You create a new runtime filter from here by providing the details as key-value pair.
- Edit - You can make changes to an existing runtime filter from here.
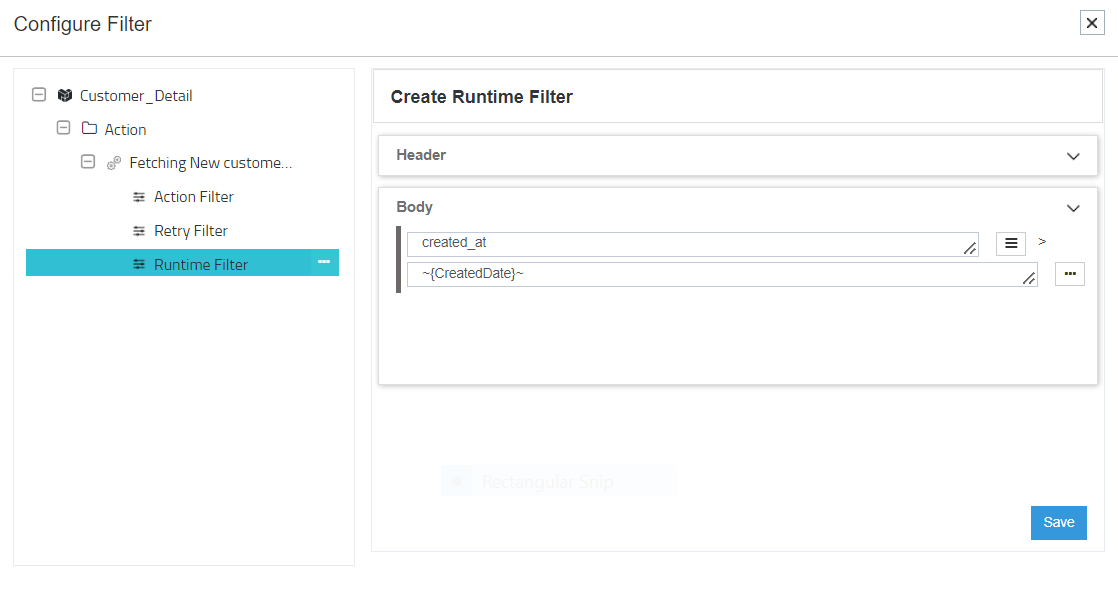
3)Click on create or edit as per your requirement and finally click on save button.
Following the above process, you can successfully Create, View and Delete Dynamic Custom Filters.
Note:
- Each action of a schema can have only one created template.
- You cannot modify the template when viewed from the Manage Schema section.
- You can also view , edit and delete the saved template from the APPS section.
Protocol Implementation for Applications
Applications are built with protocols for making them communicate with network resources and other applications. Application like SAP Business One is a SOAP based but follows multiple sub protocols for communicating with other applications with respect to data transfer. Irrespective of data, SAP Business One follows these sub protocols. For Example :
- For creating master data in SAP Business One, you need work with the protocol DI Server Service.
- For creating general transactional data like Business Partner, Products etc. you need to work with the protocol DI Server Object.
SAP Business One follows two more protocols DI API & FTP for other purposes as well with respect to data. As an user, for integrating data you need to understand the protocol structure of the application you are working with, before implementing protocols in APPSeCONNECT processflow.
Note: You can anytime view the differences of these protocols in XSLT preview of Mapper Node.
Prerequisites for Protocol Implementation in processflow
-
You need to have basic knowledge of the protocol used by the application selected by you.
-
You need to design a processflow before implementing Protocol. Click Here for the steps to design a processflow.
-
Protocol implementation is done only for the application in POST operation. Therefore you need to design the processflow with you application in destination.
Steps to setup Protocol in processflow
Note: _Here we will demonstrate you with the steps to implement and setup Protocol keeping SAP business One in Destination. The flow remains the same if you are working with other application as well apart of SAP Business One.
-
Login to the Portal and Navigate to the processflow section. Click on the new button to create a new processflow.
-
Design the processflow keeping the selected application in Destination (In this case SAP Business One).
-
On dragging the destination application (SAP Business One in this case), the Node Configuration Window opens. You need to select the Protocols from the drop-down. The protocols would be displayed as per the App version selected. For SAP Business One (version >= 8.8), you will get the following protocols.
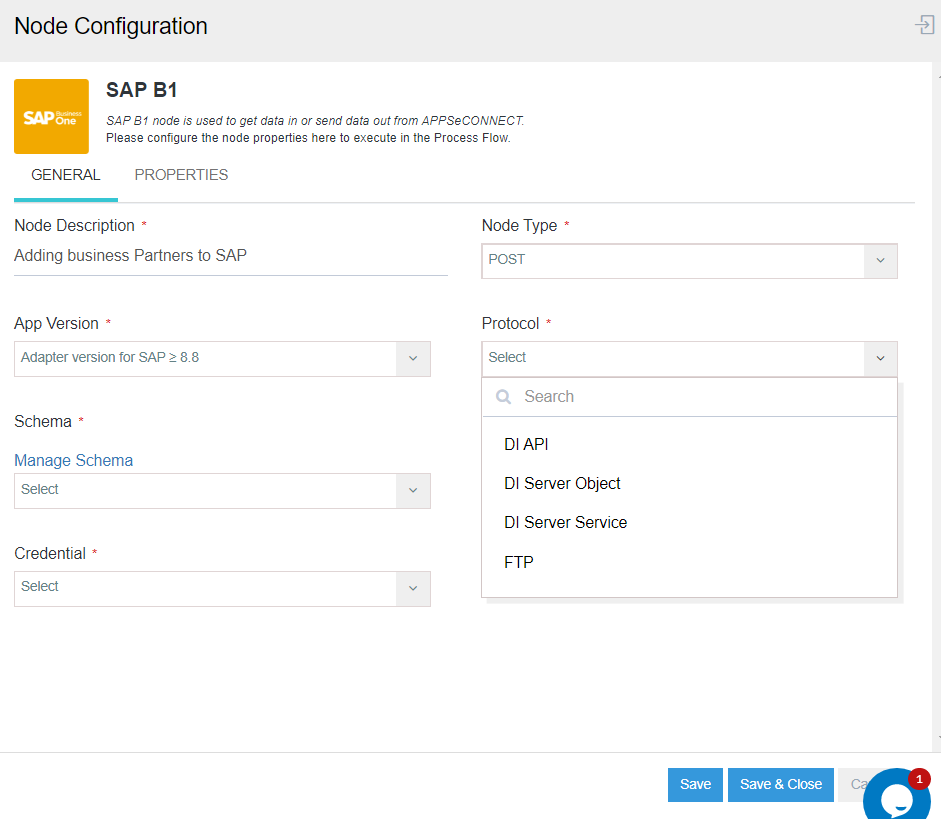
- DI API: Used for operating any type of data using SAP Business One API.
- DI Server Object: Used for operating general transactional data like Business Partner, Products etc.
- DI Server Service: Used for creating master data in SAP Business One, you need work with the protocol DI Server Service.
-
FTP: Used for operating any type of data using File System.
- Click on the Save button after all the mandatory fields are filled up. Link up the Nodes and Save the processflow. Click on the Node configuration Button of the Mapper Node. The Mapper Window opens.
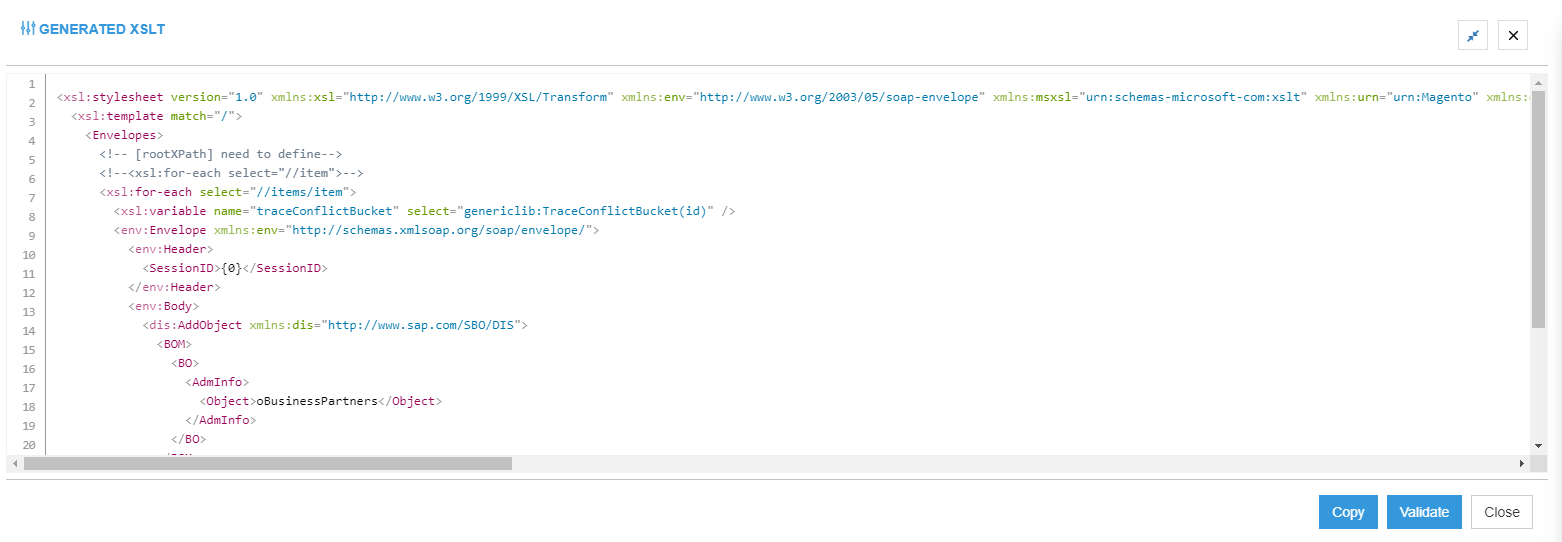
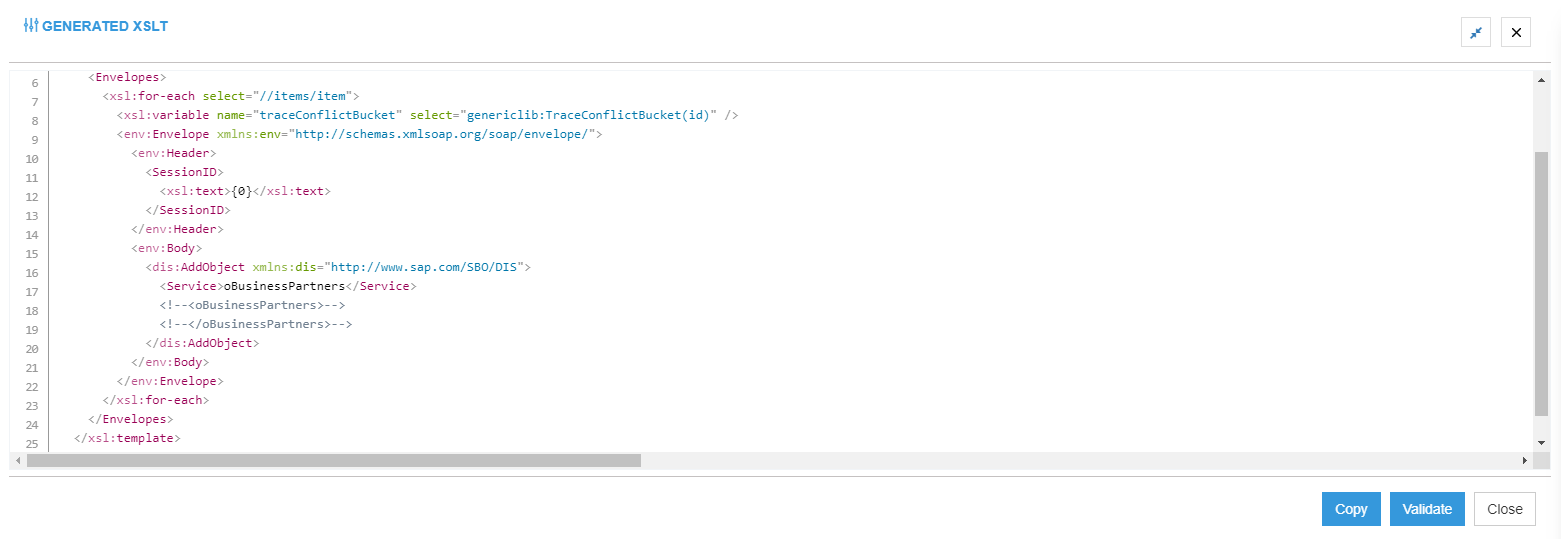
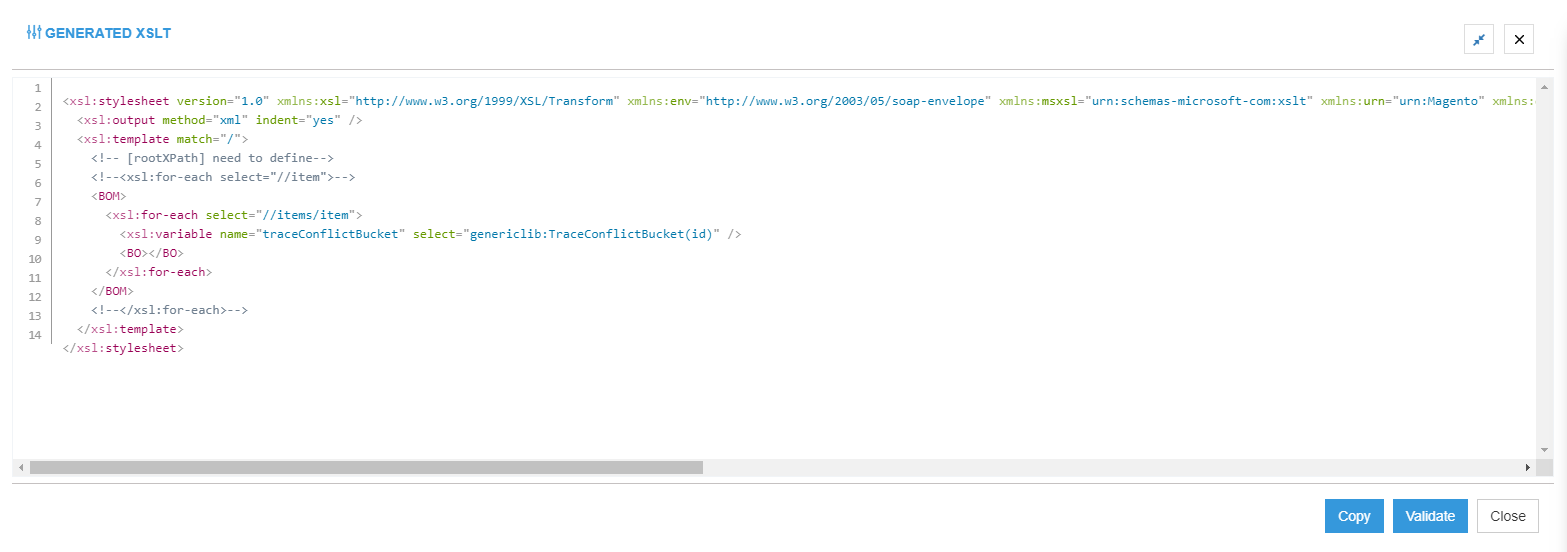
- Click on the Preview button to view the generated XSLT with respect to the choosen protocol.
a. When the Protocol is selected as DI API you get the following XSLT Preview.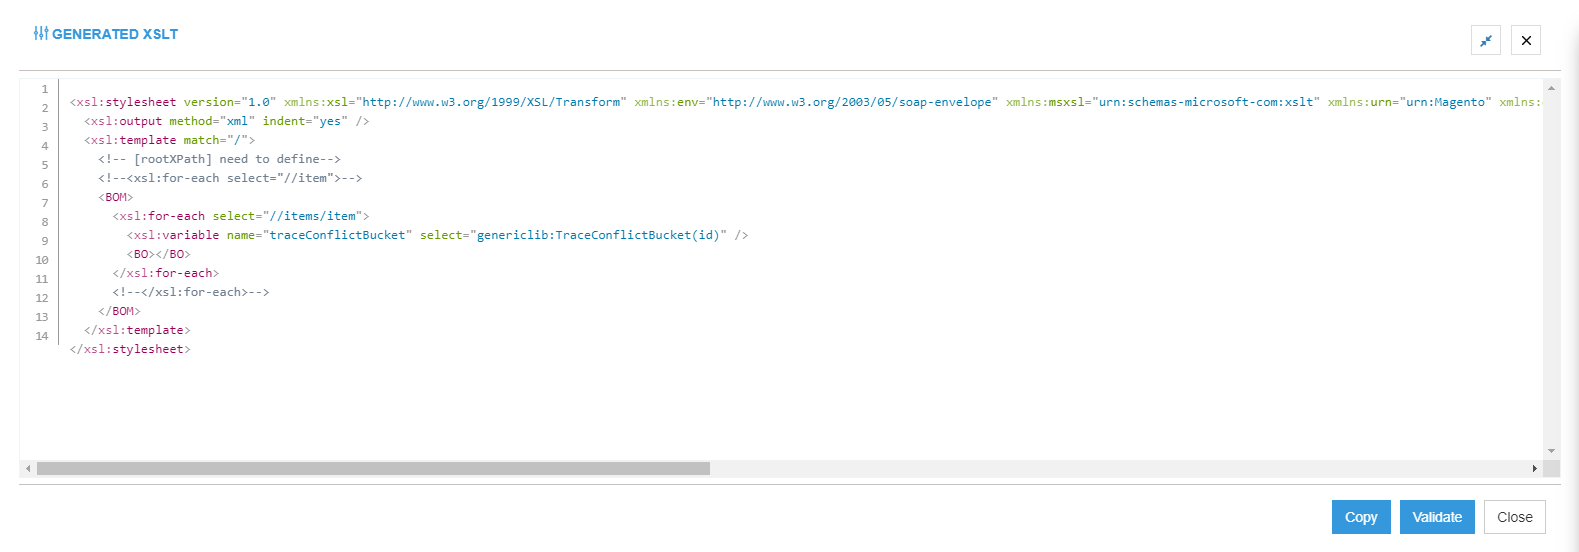 b. When the Protocol is selected as DI Server Object, you get the following XSLT Preview.
- When the Protocol is selected as DI Server Service, you get the following XSLT Preview.
- When the protocol is selected as FTP, you get the the following XSLT Preview.
Note: The XSLT format and structure for the protocols DI API & FTP remains same.
Following the above process you can successfully select a protocol for an application performing POST operation.

