Wayfair
Updated:
Wayfair engages in the e-commerce business in the United States and internationally. The company provides huge
products for the home sector under various brands. It offers online selections of furniture, decor,
housewares, and home improvement products through its sites.
As APPSeCONNECT is a Business Process Automation tool, this will allow you to develop and configure seamless integration between business applications.
Therefore, application configuration is a fundamental activity prior to the process of integration. If your chosen application is
Wayfair, credentials need to be provided for validating the agent both in case of OP and Cloud. Here you will find the detailed description on
how to configure the agents for the application Wayfair, Troubleshooting issues, action and its filters.
Pre-requisites for Wayfair Configuration
1) Register with Wayfair and create a Production Application.
2) Client Id and Client Secret generated from the application.
3) Click here to know the Authentication and APIs of the application.
On-Premise Agent Configuration
Installation of On-Premise Agent
You need to install the agent on your local server. To Know about On-Premise Agent Configuration, Click here.
Configure the Wayfair Application in OP Agent
1) Create a processflow with Wayfair as source or destination application, and deploy the processflow in On-Premise agent.
2) Open the agent and click the checkbox in Settings Panel.
3) Move into the App Configurational Panel of the agent and configure the details of the respective application.
Steps to Configure the credentials in OP Agent
1) Open the OP Agent by providing correct login credentials.
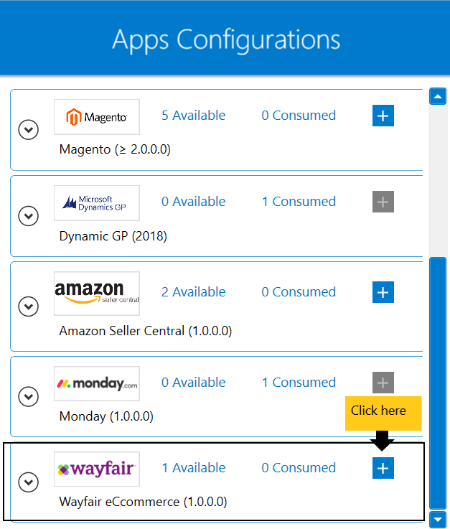
2) In the App Configurations panel of the agent, click on the + button, beside the wayfair application.
The credential panel opens for the application wayfair.
3) Enter the Client Id and Client Secret at the required place.
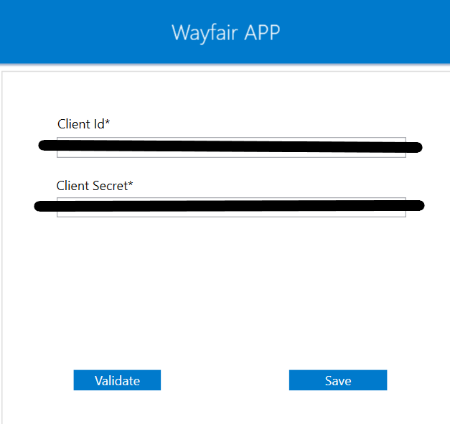
4) After providing the required details in all the fields, click on Validate. If the credentials provided is
correct, then a message Connection Validated Successfully will be shown. Click on Save button to save the details.
Cloud Agent Configuration
Configure the Wayfair Application in Cloud Agent
1) Login to APPSeCONNECT portal with valid credentials.
2) Navigate to Manage > App. Expand the wayfair application and click on Credential.
3) Expand the REST node, click on Add New Credential.
4) Provide the necessary information Credential Name, Client Id and Client Secret.

5) Click on Save and a toaster message will be displayed confirming the same.
Troubleshooting
ISSUE 1 : Agent Validation failed due to improper credential provided in the agent
While validating the credentials in the agent, sometimes the validation fails due to improper Client Id and Client Secret.
Check the credentials once again and re-Validate the credentials.
Attributes and Actions
While defining a connection to an API in wayfair, you require clear understanding about the data requirements and endpoint configurations. You can refer to this document to find all the endpoint details of your wayfair application. To define the endpoint in APPSeCONNECT, you need to define Schemas and Actions. Actions are specifically targeted for an endpoint while schema is the data needed to execute the API. Here is the list of some of the pre-packaged API actions defined for you which you can easily plug and play while doing your integration.
You can refer to Wayfair to know the authuorization and APIs in details.
| Endpoint | Action | Action Type | Schema | UI Help | API Path |
|---|---|---|---|---|---|
| purchaseOrders | query | GET | purchaseOrders | This will fetch orders created in Wayfair. | This will retrieve purchase orders. |
| productInventory | query | GET | productInventory | This will retrieve the quantity of each product. | Fetching product quantity. |
| users | query | GET | This will fetch different users created. | Provides different users of the application. |
Action Filter Implementation
Data is fetched from source application using APIs, and as you are aware of, API provides filters
which will allow you to specify a subset of data from the whole bunch of data created in the server,
the same can be specified through Actions and Action filters. The Action generally defines the
endpoint of the application which is being fetched, while the filters define the search criteria
of the data. You can add parameters in the action filter to define the search criteria.
Let us consider there are several purchase orders created in wayfair application. The API structure of wayfair application, such as purchase order looks
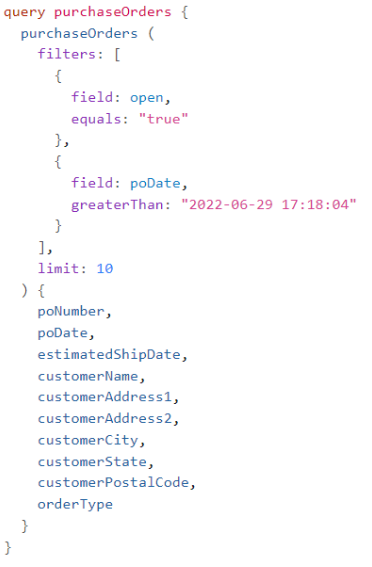
Looking at any API structure, you can frame your action filter for respective endpoints. Here we are going to see, how you can frame
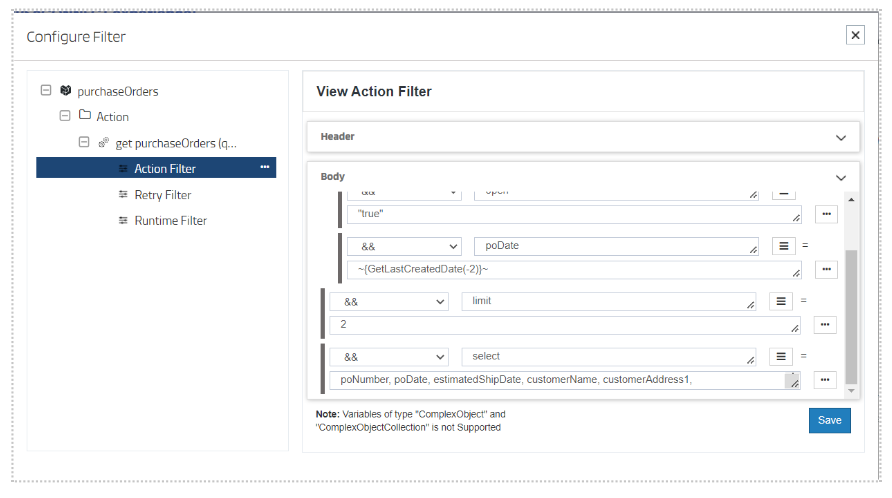
your action filter in case of purchaseOrders. In this scenerio, we haved used, filter as the key with 2 child clauses.
To retrieve active orders from the application, we have used open and true as key-value pair. poDate provides you to fetch
orders according to the date when the orders are created. So, use poDate and ~{GetLastCreatedDate(-2)}~ as key-value pair,
such that you can retrieve order of two days ago.
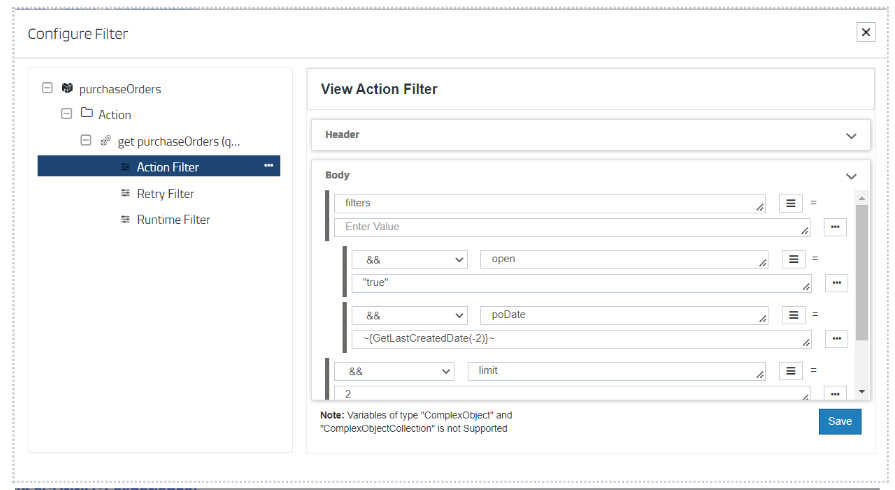
limit enables you to specify, how many order you want to retrieve from the application at a single API call. Here, we are retrieving
two orders at a single API call. select will allow you to mention the items that you want to fetch from the API structure.
Similarly, you can design action filters for other endpoints.


