
Prerequisite
Updated:
Adapter represents an interface between an APP and APPSeCONNECT. An adapter is the most important component which connects your app with APPSeCONNECT. There are few responsibilities of an adapter which are defined as under:
- Create a credentials view which allows connecting to the respective APP where you want to connect.
- Create Push and Pull method inside the adapter which can send and receive data to and from the application.
- Add additional business behavior with respect to the corresponding app.
The Adapter is loaded dynamically by the Agent and calls some specific methods using a fixed contract defined as an interface.
System Requirement of Adapter Development
Adapter development mainly requires Visual Studio to be installed on your system. So as per adapter development is concerned, we require the minimum system and hardware requirements needed to install Visual Studio 2017.
Supported Operating Systems
- Windows 10 version 1507 or higher: Home, Professional, Education, and Enterprise (LTSC and S are not supported)
- Windows Server 2016: Standard and Datacenter
- Windows 8.1 (with Update 2919355): Core, Professional, and Enterprise
- Windows Server 2012 R2 (with Update 2919355): Essentials, Standard, Datacenter
- Windows 7 SP1 (with latest Windows Updates): Home Premium, Professional, Enterprise, Ultimate
Hardware
- 1.8 GHz or faster processor. Dual-core or better recommended
- 2 GB of RAM; 4 GB of RAM recommended (2.5 GB minimum if running on a virtual machine)
- Hard disk space: up to 130 GB of available space, depending on features installed; typical installations require 20-50 GB of free space.
- Hard disk speed: to improve performance, install Windows and Visual Studio on a solid state drive (SSD).
- Video card that supports a minimum display resolution of 720p (1280 by 720); Visual Studio will work best at a resolution of WXGA (1366 by 768) or higher.
Additional Requirements
- Administrator rights are required to install Visual Studio and execute APPSeCONNECT.
- .NET Framework 4.5 is required to install Visual Studio. Visual Studio requires .NET Framework 4.6.1, which will be installed during setup.
- Windows 10 Enterprise LTSC edition and Windows 10 S are not supported for development. You may use Visual Studio 2017 to build apps that run on Windows 10 LTSC and Windows 10 S.
- Internet Explorer 11 or Edge is required for internet-related scenarios. Some features might not work unless these, or a later version, are installed.
Start developing adapter in easy steps
APPSeCONNECT needs adapter to connect to a specific Application and Get and Push data to and from the application. It is very easy to create an adapter after the pre-requisites software are installed properly. As a requirement to develop an adapter, the developer needs to know :
- C# or VB.NET language.
- XAML or WPF (Basic)
- Knows XML to represent Data.
- APPSeCONNECT Architecture
If you know all these you can follow the steps to create an Adapter :
- Open Visual Studio and Create new Class Library using your preferred language.
Lets name it as Insync.eConnect.FavApp (In your case, you can replace FavApp with your Application name) for our sample project.Click OK to create the project.

- After the application is created, delete “Class1.cs” that is automatically selected. Just from the solution explorer, right click on the Class1.cs file and select “Remove”.
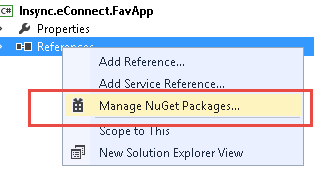
Right click on “References” and select “Manage Nuget Packages”.
- The Nuget Package manager will load, you can now type “APPSeCONNECT API” on the Search Online box on top and filter to our Adapter API.

- Select “Install”. The Installer will create all the necessary files that are needed to create APPSeCONNECT Adapter.
Now after you have the code ready, Go to View -> Task List from Menu and select Comments on the Box. It will show all the ToDo items you need to do to develop an adapter. Follow the steps to remove the ToDo items with code such to work.

Follow the instructions in ToDo and create the adapter. Let us know at support@appseconnect.com if you face any difficulties in developing or understanding a point.
Understanding the folder structure
Once you add the nuget package of APPSeCONNECT, you will find a number of files automatically created which will help in dealing with the various section of code. Let us define the different folders such that it is easier to develop an adapter.
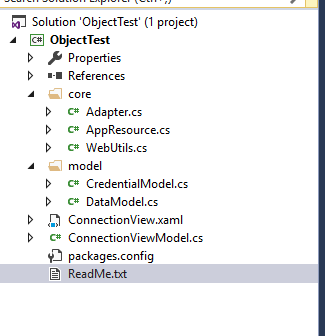
When you look at the Solution Explorer of Visual Studio project after you add the APPSeCONNECT nuget package, you will see files and folders like the one above.
- core : The core folder represents the files which are directly related to the execution of the adapter. These are the mandatory files to create an adapter. The
Adapter.csis the implementation of IAdapter andAppResource.csis the implementation of IAppResource. - model : The model folder indicates the data objects required to execute the adapter. The
CredentialModelholds all the information about the Credential required to communicate with the application while theDataModelis used for transactional storages. You can create as many classes here to represent various models. Both the CredentialModel and DataModel should have a default constructor in place such that the object could be searialized and deserialized easily. - ConnectionView.xaml : The ConnectionView is the User interface built using XAML, which will be loaded by the Agent to input Credential for the application.
- ConnectionViewModel : This is the ViewModel class associated with the ConnectionView.
- Readme.txt : A special help document which will help in developing adapter.
To deal with all these classes, you can go ahead with the actual implementation.

