QuickBooks Enterprise
Updated:
QuickBooks is the most popular small business accounting software used to manage income and expenses and keep track of the financial health of their business. You can use it for invoicing customers, paying bills, generating reports, and preparing taxes. The QuickBooks product line includes several solutions that work great for anyone, from a freelancer to a midsized business.
Application configuration is an integral activity prior to the process of integration. Here you will find the detailed description on how to configure the agents for the aforesaid application, the Integration Techniques and the Troubleshooting issues.
Pre-requisites for QuickBook Enterprise Configuration
- QuickBooks Enterprise is an On-Premise application. You need to dwonload the .exe file and install it in your local system.
- Create a user in QuickBook Enterprise application dedicated for APPSeCONNECT application. Allocate this user with all the admin privileges only for APPSeCONNECT Application.
- In the Task Manager, “AutoSync.exe” Service and “AppStarter” Service should run under same user name, which is used for “QuickBook.exe”.
On-Premise Agent Configuration
Installation of On-Premise Agent
You need to install the agent on your local server. To Know about On-Premise Agent Configuration, Click here.
Configuring the QuickBook Enterprise Application
- Open the agent and click the checkbox in Settings Panel.
- Create and Deploy ProcessFlows in the cloud portal.
- Move into the App Configurational Panel of the agent and configure the details of the respective application.
Uncheck the Show in Sync Panel checkbox before proceeding with the App Configurations.
-
Click on
+icon beside the QuickBook application in the OP agent to add a credential. Enter the QuickBook Desktop Company file path with .qbw extension. This file should be same as the one you have selected while opening the QuickBook Desktop application.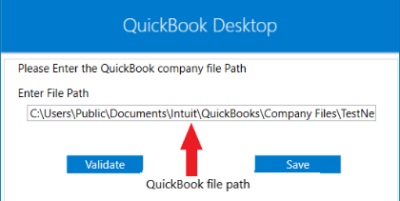
-
Then open Quickbook application(the company you have entered in the File Path of the OP-Agent) in Administrator mode with the User Credentials which you kept only for
APPSeCONNECT. After opening, stay on theQuickbook home page, and click on Validate button in the OP-Agent. A dialog box appears.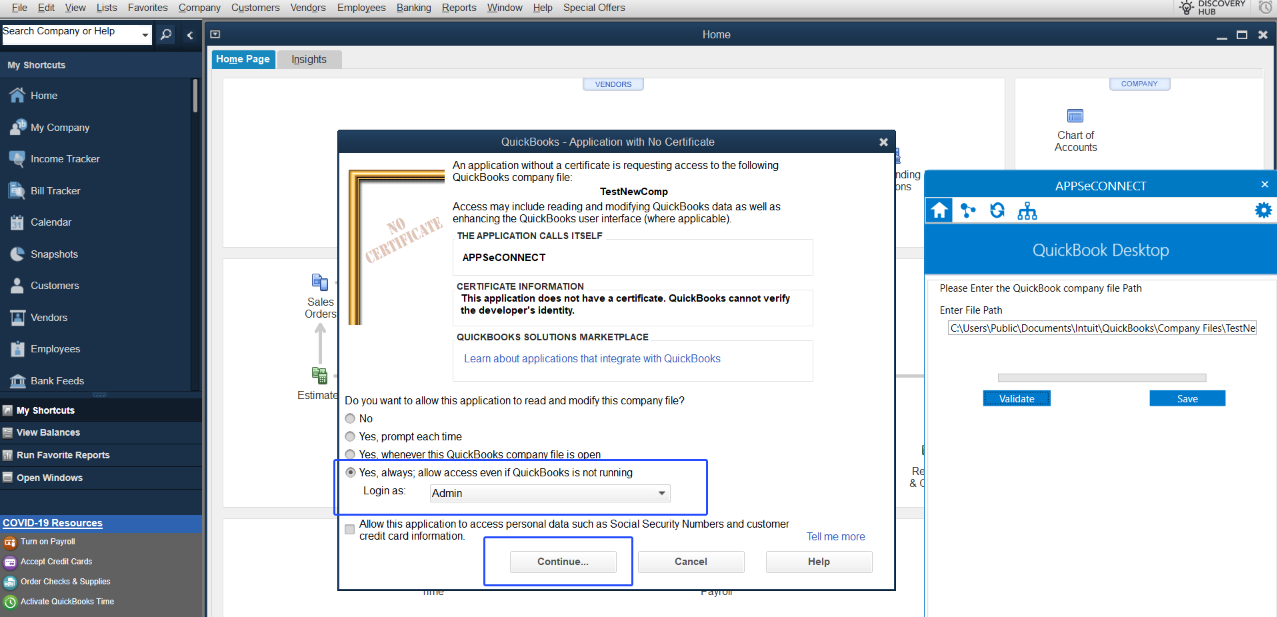
-
After the Pop-up has opened, choose the Yes, always allow access even if QuickBooks are not running. From the dropdown, choose the dedicated user, whose credentials APPSeCONNECT should use. Click on Continue button and allow access to
APPSeCONNECT. Now, click on Validate in the OP agent, a successful message will be displayed for validation.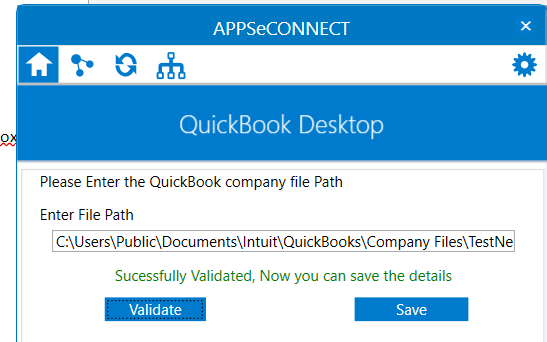
-
Click on Save button in the OP agent to save the validated QuickBook credentials.
- After
APPSeCONNECThas been added successfully to your Quickbook desktop, you need to close your Quickbook Application. Now you can deploy the ProcessFlow with the Quickbook Desktop credentials and execute the Processflow. After a successful execution, you can now open a quickbook instance with normal mode and login with your User Credentials.
Troubleshooting
Some of the basic troubleshooting issues happens due to improper validations or even if it is accurately validated, and if processflow don’t sync properly.
This basic issue resolves after removing the Temp and Cache files from the portal and from your system.
Therefore after clearing all this, you need to deploy and excute the processflow again to perform the required business integration in a smooth and free-flowing way.
For E.g. If the Source Application not Found in the log file appears, the probable cause is due to the presence of the
Temp and Cache Files.
Attributes and Actions
While defining a connection to a particular API endpoint in QuickBooks, you require clear understanding about the data requirements and endpoint configurations. You can refer to this document to find all the endpoint details of your shopify installation. To define the endpoint in APPSeCONNECT you need to define Actions and Entities. Actions are specifically targetted for a particular endpoint while schema is the data needed to execute the API. Here are the list of some of the prepackaged API actions defined for you which you can easily plug and play while doing your integrations.
| Endpoint | Action | Action Type | Schema | UI Help | API Help |
|---|---|---|---|---|---|
| Customer | CustomerQueryRq | GET | Retrieves the details of a Customer object that has already been created. | Fetch Customers | |
| Customer | CustomerAddRq | POST | Returns the newly created Customer object. | Customer Add | |
| Invoice | InvoiceQueryRq | GET | Retrieves the details of an Invoice that has already been created. | Fetch Invoice | |
You can visit to know more about different APIs and their endpoint configuration.
Action Filter implementation for Data Fetch/Push
API hits can be tamed using action filters on its actions. You will be able to fetch/push specific and limited data as per your filter.
With APPSeCONNECT, you will have the option to implement Action Filters that will enable you to fetch/push specific data
as required. You need to implement your filter on the basis of following criterias.
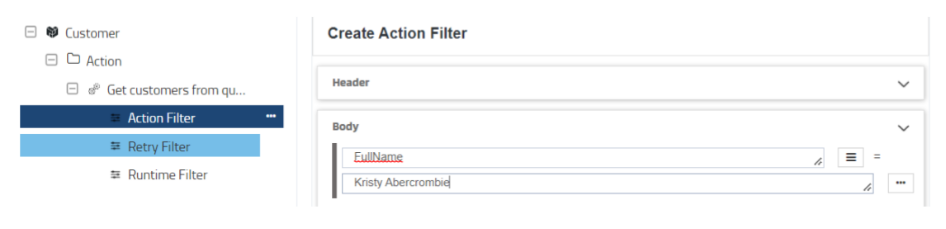
- To fetch a specific customer from
QuickBook Enterprise Application.
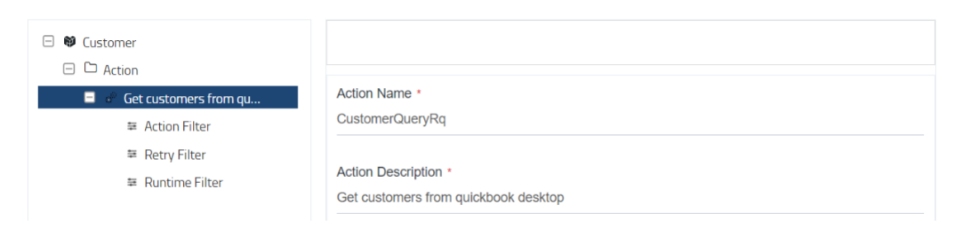
ActionName – CustomerQueryRq
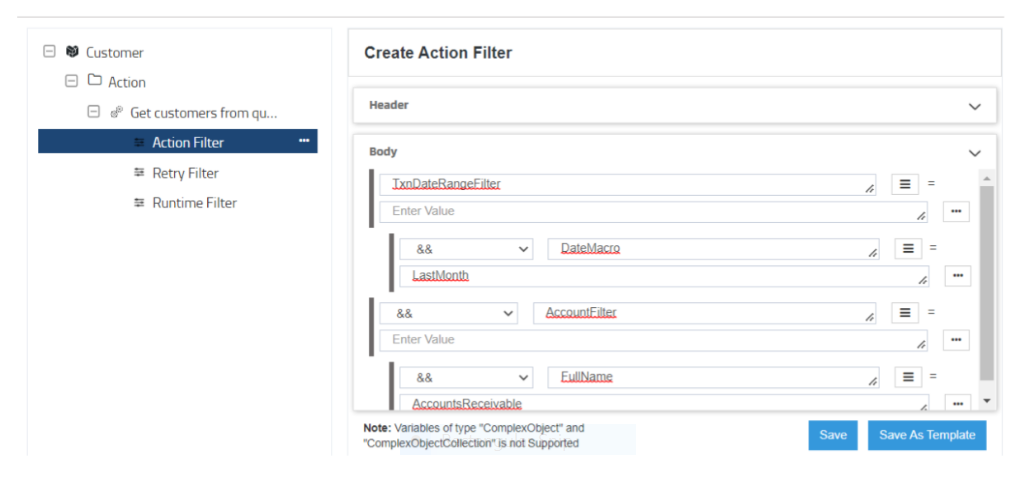
- To fetch a invoices from
QuickBook Enterprise Application. While you fetch invoices from the aforesaid application, depending on the data packet returned, you need to provide your action filter(s).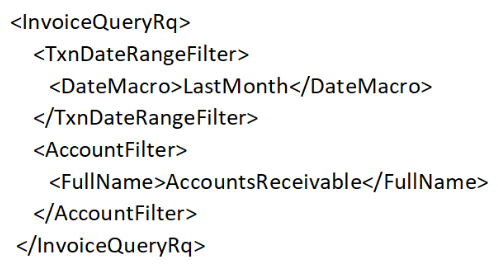 ActionName – InvoiceQueryRq
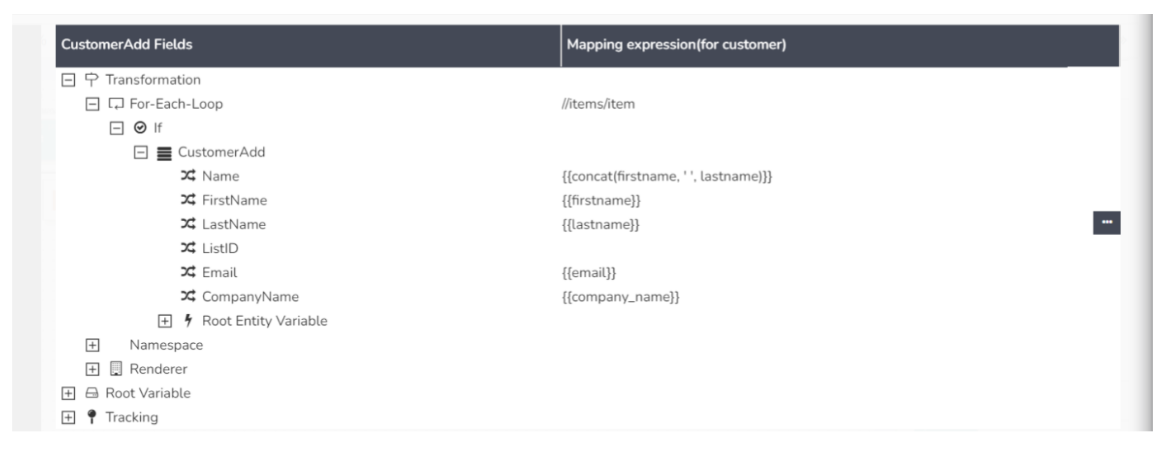
- You should use the following
SchemasandActionsto insert a customer record inQuickBook Enterprise Application.
Schema – CustomerAdd Action Name – CustomerAddRq
Mapping will be as