Calendly
Updated:
Calendly is an appointment scheduling application that individuals and organizations use to schedule meetings
and appointments with their leads/clients. It eliminates back-and-forth emails, creating a more streamlined
scheduling workflow and seamless customer experience. It’s an automated solution, which means users
can book an appointment by simply having access to your unique Calendly calendar.
It can sync and check availability across multiple calendars, such as Google Calendar, Outlook, and more.
This helps avoid double-bookings or other scheduling conflicts.
As APPSeCONNECT is a Business Process Automation tool, this will allow you to develop and configure seamless integration between business applications.
Therefore, application configuration is a fundamental activity prior to the process of integration. If your chosen application is
Calendly, credentials need to be provided for validating the agent both in case of OP and Cloud. Here you will find the detailed description on
how to configure the agents for the application Calendly, troubleshooting issues and APIs.
Pre-requisites for Calendly Configuration
1) Create an account in Calendly.
2) You need to know the authentication mechanism and different APIs of the application along with their structures.
3) You need to know the Personal Access Token.
How to get Personal Access Token
1) Open Calendly with valid login credentials.
2) From Home page, navigate to Integrations -> API and connectors -> API and Webhooks.
Click on Generate new Token. Provide a name to your token and click on Create Token. A newly generated token will be
displayed to you. Copy the token and save it for future use.
On-Premise Agent Configuration
Installation of On-Premise Agent
You need to install the agent on your local server. To Know about On-Premise Agent Configuration, Click here.
Configure the Calendly Application in OP Agent
1) Create a triggered processflow with calendly as source application, and deploy the processflow in On-Premise agent.
2) Open the agent and click the checkbox in Settings Panel.
3) Move into the App Configurational Panel of the agent and configure the details of the respective application.
Steps to Configure the credentials in OP Agent
1) Open the OP Agent by providing correct credentials.
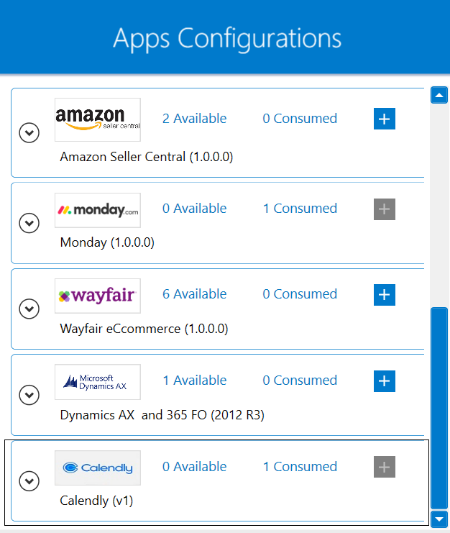
2) In the App Configurations panel of the agent, click on the + button, beside the application calendly.
The credential panel opens for the application calendly.
3) Enter Personal Access Token at the required place.
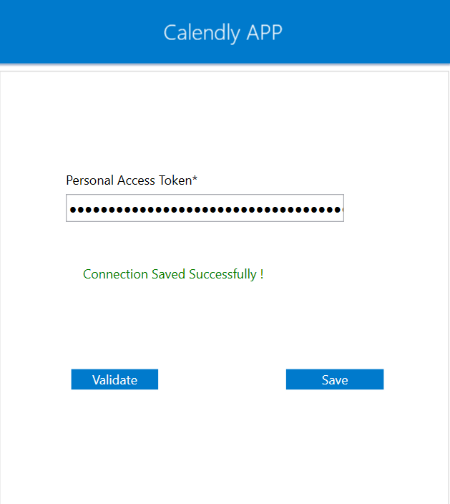
4) Click on the “Validate” button, to validate the connection. A message will appear confirming the same
if all the credentials provided by you for calendly is valid. Click “Save” button.
A message “Connection Saved Successfully!” will appear if all the credentials provided by you for calendly is valid.
Following the above processes, you can configure the calendly application in the OP agent.
Cloud Agent Configuration
Configure the Calendly Application in Cloud Agent
1) Login to APPSeCONNECT portal with valid credentials.
2) Navigate to Manage > App. Expand the calendly application and click on Credential.
3) Expand the REST node, click on Add New Credential.
4) Provide the necessary information Personal Access Token.
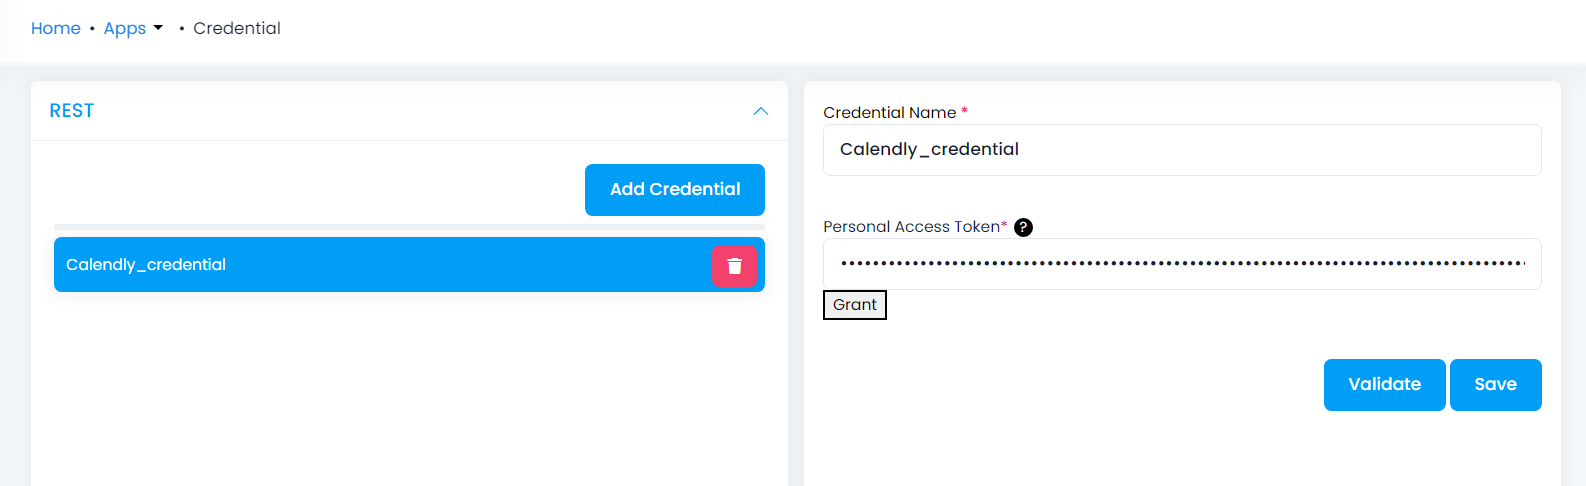
5) Click on Save and a toaster message will be displayed confirming the same.
Troubleshooting
ISSUE 1
Agent validation may fail due to improper Personal Access Token both in OP and Cloud agent.
Check the Personal Access Token once and re-validate the credentials in the agent.
ISSUE 2
Check whether you have created triggered processflow while fetching data from Calendly.
No need to configure the action filter in case of triggered processflow. However, you need to configure the webhook
by creating a processflow.
Attributes and Actions
While defining a connection to an API in Calendly, you require clear understanding about the data requirements and endpoint configurations.
You can refer to this document to find all the endpoint details of Calendly application. To define the endpoint in APPSeCONNECT, you need
to define Schemas and Actions. Actions are specifically targeted for an endpoint while schema is the data needed to execute the API. Here is the
list of some of the pre-packaged API actions defined for you which you can easily plug and play while doing your integration.
| Endpoint | Action | Action Type | Schema | UI Help | API Path |
|---|---|---|---|---|---|
| scheduled_events | scheduled_events | GET | scheduled_events | Returns information about a specified Event. | Events |
| users | users | GET | users | Returns information about a specified User. | Users |
| users/me | users/me | POST | users | Returns basic information about your user account. | users/me |
| event_types | event_types | GET | event_types | Returns all Event Types associated with a specified User | Events_types |
How to configure the Webhook Subcription?
Calendly provides you a platform to schedule appointments online as per the requirement of the invitee on real-time
execution basis. However, Calendly does not allow you to create webhook from any graphical interface heneceforth,
you need to create webhook using a processflow. Hence, you need to configure the webhook subscription to perform the same.
Follow the below steps to configure the webhook using a processflow.
-
Design a processflow with
Calendlyas the destination application withTrigger TypeasPolling. You need to providewebhook_subscriptionas schema andCreate Webhook Subscriptionas the action.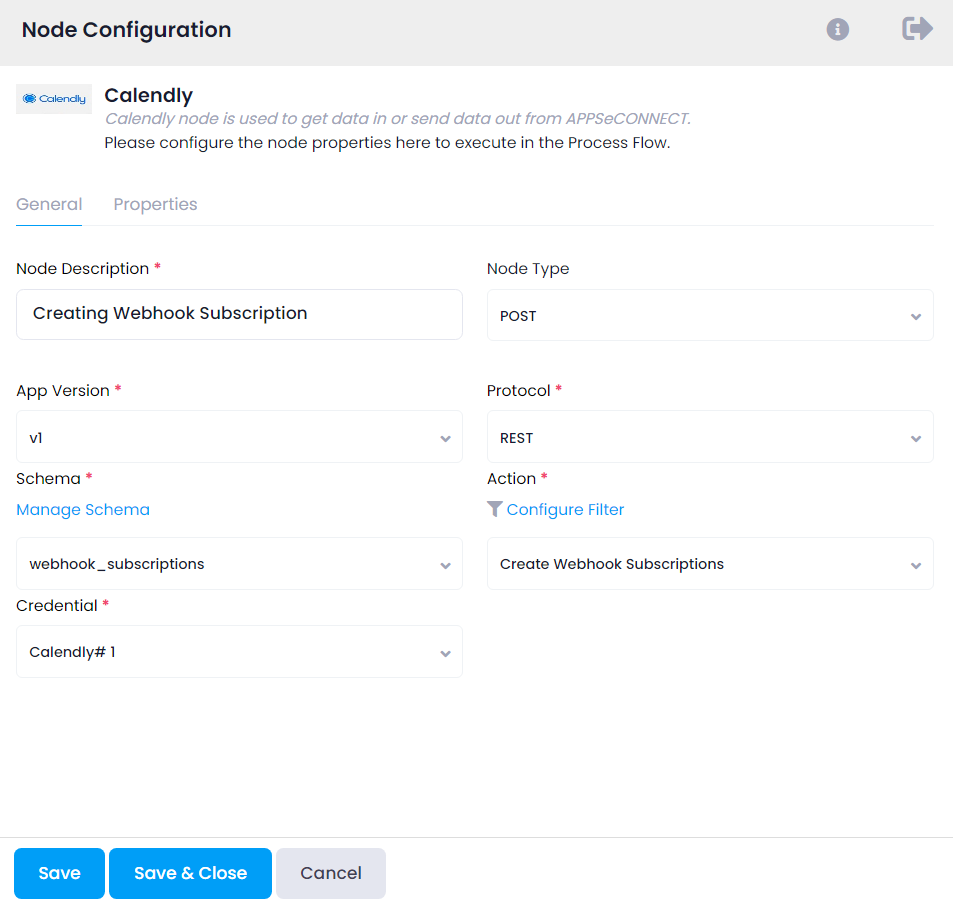
-
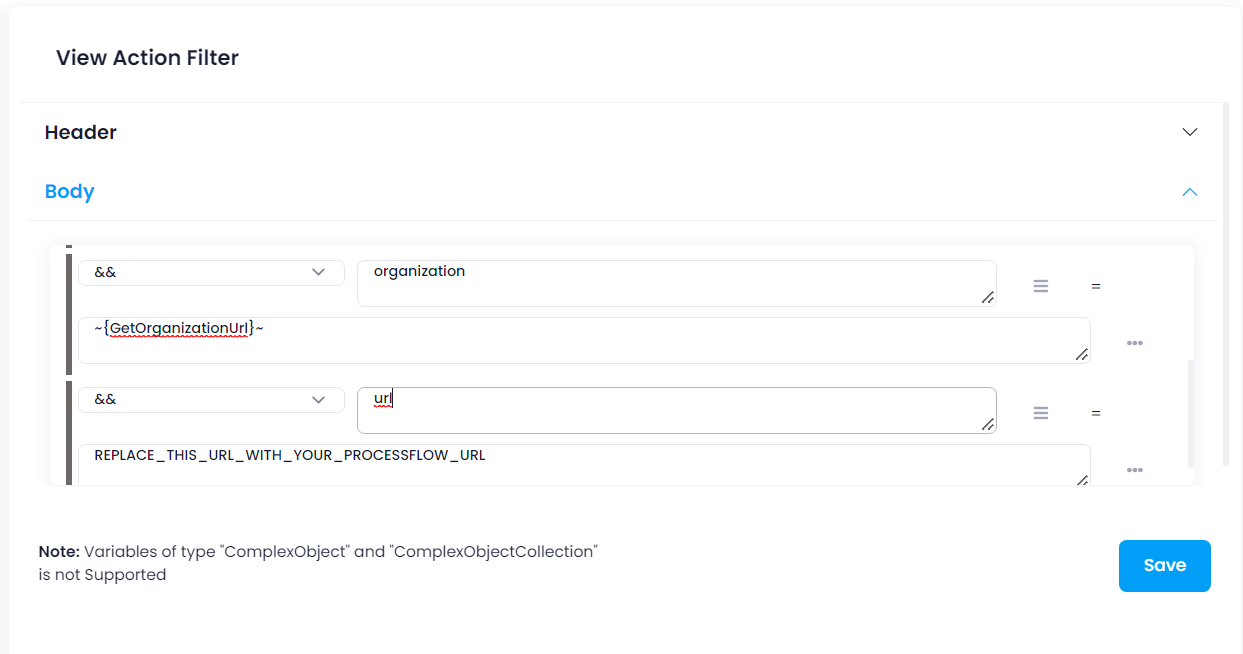
While configuring the action filter, specify
| Key | Value |
|---|---|
| events[] | invitee.created |
| scope | organization |
| organization | ~{GetOrganizationUrl}~ |
| url | mention the Processflow URL generated from the processflow |
In this scenerio, we are fetching only the invitee list from Calendly, thus invitee.created has been used as the key with events[].
Similarly, you can use any other APIs in the value section along with events[] as the key.
scope should always be maintained at the organization level, so you need to mention scope and òrganization as key value pair.
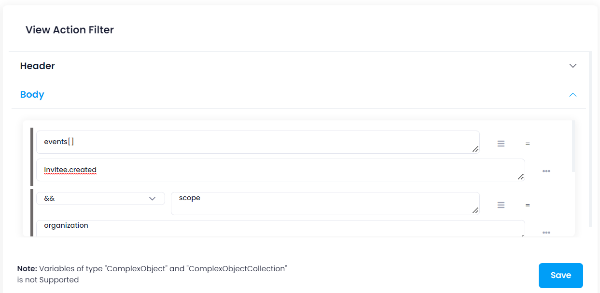
The apps resource function ~{GetOrganizationUrl}~ has been used to mention the organization that have beeen used at present.
Mention the Processflow URL that has been generated after the triggered processflow has been deployed in the
respective environment. You can mention all Processflow URL as the child condition.