Sage 300
Updated:
Application configuration is an integral activity prior to the process of integration. If your chosen application is SAGE 300, credentials need to be provided for validating the agent. Here you will find the detailed description on how to configure the agents for the application SAGE 300, Troubleshooting issues, action and its filters.
Sage 300 ERP is a flexible enterprise resource planning(ERP) system that allows distribution and many other types of businesses to manage end-to-end processes under a single umbrella, including finances, inventory, and sales. This software modules and features provides capabilities and weighs them against the average ERP solution to find out how the system stacks up against the competition for ERP distribution.
Pre-requisites for Sage 300 Configuration
- Register with Sage 300 and Login into it.
- Username and Password to access the application.
- You need to know the Authentication and APIs of the application.
On-Premise Agent Configuration
Installation of On-Premise Agent
You need to install the agent on your local server. To Know about On-Premise Agent Configuration, Click here.
Configure the Sage 300 Application in the Agent
- Create a processflow with Sage 300 as source or destination application, and deploy the processflow in On-Premise agent.
- Open the agent and click the checkbox in Settings Panel.
- Move into the App Configurational Panel of the agent and configure the details of the respective application.
Steps to Configure the credentials in the Agent
- Login to the APPSeCONNECT Agent.
-
In the Apps Configurational panel of the agent, you will be able to view the Sage 300 application. Click on the
+icon to add the credential.

- Specify the Base URL, Username, Password and Company Name in the provided fields in the Sage 300 configuration window.
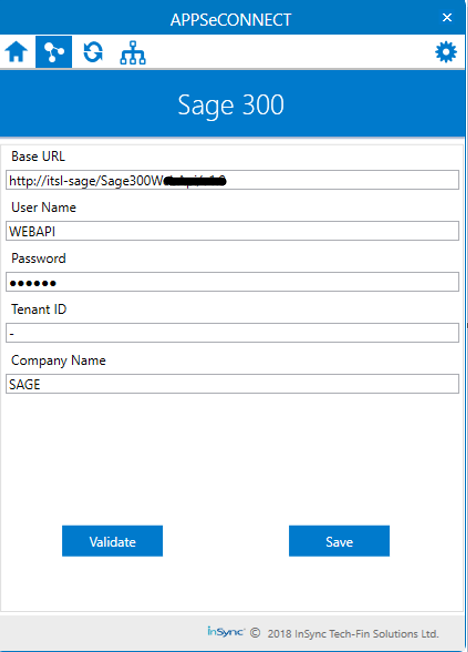
- Base URL : This the Base URL of the users SAGE Application.
- User Name : The User Name of the application.
- Password : This is the password of the application which is being used by the user.
- Tenant ID : Click. For more details regarding the Tenant ID.
- Company Name : This is the Company database name of the SAGE Application.
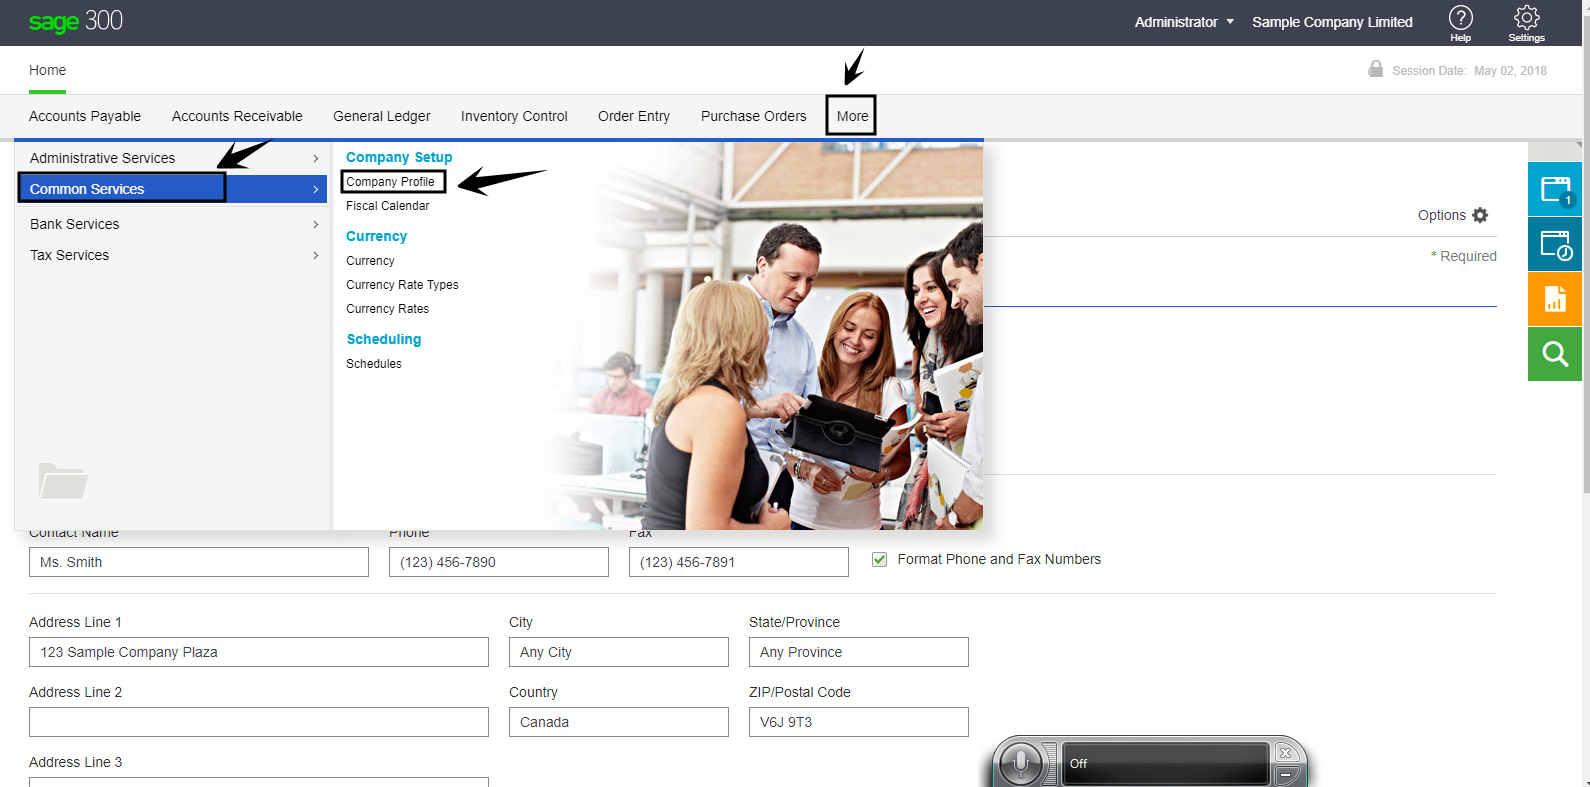
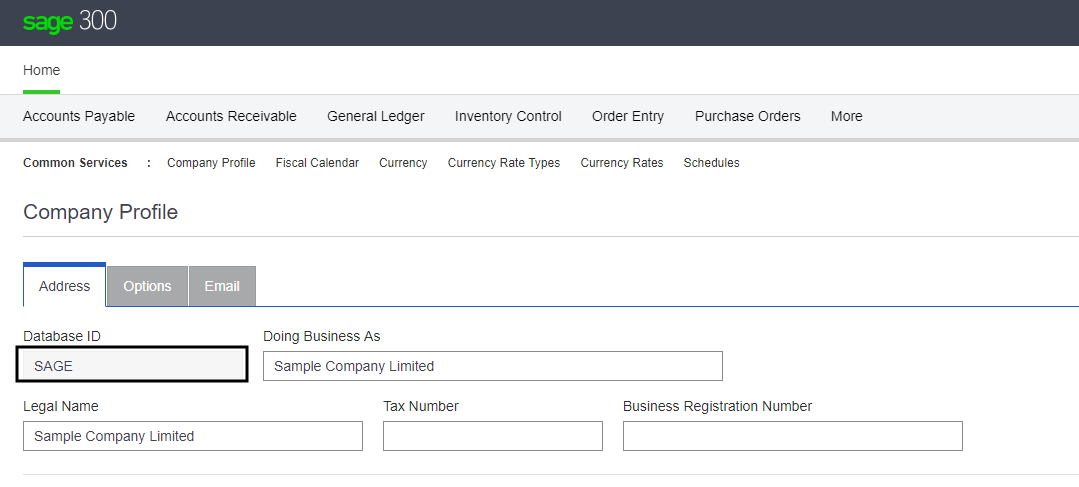
You can get the Database ID of your organization from More > Common Services > Company Profile
- After providing all the credentials. Click “Save” button. A message “Connection Data Saved” will appear if all the credentials provided by you for Sage 300 is valid.
- Click on the “Validate” button, to validate the connection. A message “Test Connection Successful” will appear if all the credentials provided by you for Sage 300 is correct. Following the above mentioned steps, you can validate the credentials of the application.
Note :
- If you have any Tenant ID put it into the specified field, otherwise giving Hyphen (-)is mandatory.
- If AEC Agent is not opening after placing the adapter in AEC -> Adapter folder, please unblock the .dll and .pdb file from properties section.
Troubleshooting
ISSUE 1
Some of the basic troubleshooting issue happens due to improper validations or even if it is accurately validated but the processflows do not sync the data successfully. This basic issue resolves after removing the Temp and Cache files from the portal and from your system. Therefore, after clearing the Temp and Cache files, again deploy and execute your processflow.
For E.g. : If the Source Application Not Found appears in the log file, the probable cause is due to the presence of the Temp and Cache Files.
Attributes and Actions
While defining a connection to an API endpoint in SAGE 300, you require clear understanding about the data requirements and endpoint configurations. You can refer to this document to find all the endpoint details of your SAGE 300 installation. To define the endpoint in APPSeCONNECT you need Actions and Entities. Actions are specifically targeted for an endpoint while schema is the data needed to execute the API. Here, is the list of some of the pre-packaged API actions defined for you which you can easily plug and play while doing your integrations.
The API Documentation for SAGE 300 can be accessed from the SWAGGER Documentation. For accessing the same, navigate to “protocol://servername/Sage300WebApi”, where the protocol is HTTP or HTTPS and the servername is the name of the SAGE300 server. For Eg: https://localhost/Sage300WebApi
| Endpoint | Action | Action Type | Schema | UI Path | API Path |
|---|---|---|---|---|---|
| IC/ICItems | IC/ICItems | GET | ICItems | Fetch the updated inventory from Sage 300. | - |
| IC/ICItems | IC/ICItems | GET | ICItems | Fetch the Products from Sage 300. | - |
| OE/OEInvoices | OE/OEinvoices | GET | OEInvoices | Fetch the Invoices from Sage 300 | - |
| OE/OEInvoices | OE/OEOrders | POST | OEOrders | Post orders from Source Application to SAGE 300 | - |
| AR/ARCustomers | AR/ARCustomers | POST | Customers | Post customers from Source Application to SAGE 300. | - |
Action Filter Implementation
Data is fetched from source application using APIs, and as you are aware of, API provides filters
which will allow you to specify a subset of data from the whole bunch of data created in the server,
the same can be specified through Actions and Action filters. The Action generally defines the
endpoint of the application which is being fetched, while the filters define the search criteria
of the data. You can add these parameters in the action filter to define the search criteria.
In Sage 300, a database is maintained containing various tables. Each such table contains information regarding Customers, Products, Orders, Quotations and many more. To know the details regarding the database tables, click here.
-
General filters : It represents the overall filter criteria of the API. To define such filters, you do not need to specify anything special.
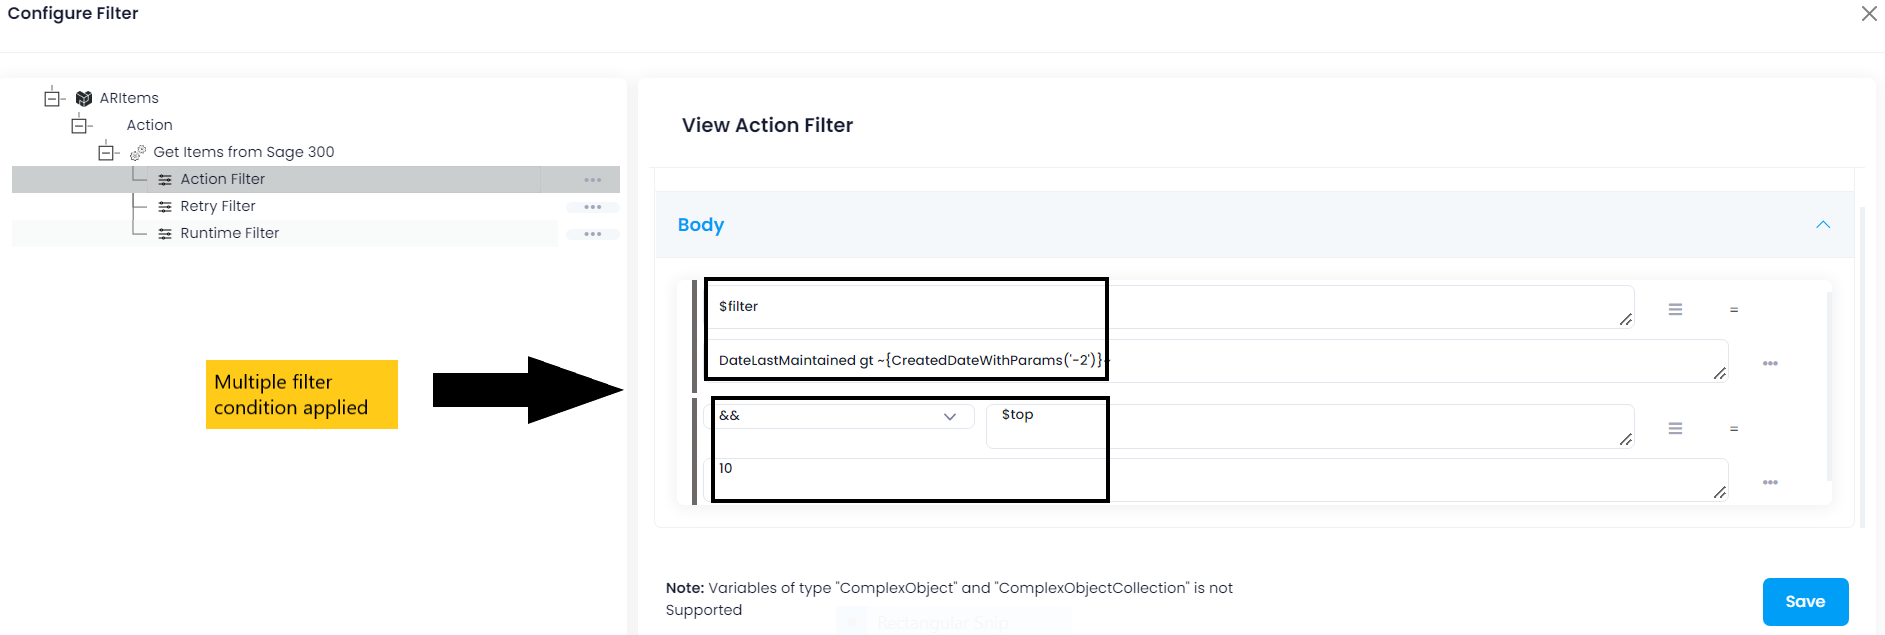
$filterdefines the query to fetch the data from the respective endpoints and$topdenotes the number of data to be fetched. -
Let us consider a scenerio where you need to fetch products from
Sage 300. In such situation, you need to specify the filtering condition askey-valuepair. Specify$filterin key field and the query in the value field. The query will beDateLastMaintained gt CreatedDateWithParams('-2'). CreatedDateWithParams(‘-2’) function will be used to fetch those product fromSage 300created 2 hours before the current time. -
You can specify multiple filtering conditions combined using
&&or||. Suppose you want to fetch only 10 products from the application, provide the above filter along with$topin the key field and the 10 in the value field.