
Uniconta
Updated:
Application configuration is an integral activity prior to the process of integration. If your chosen application is Uniconta credentials need to be provided for validating the agent. Here you will find the detailed description on how to configure the agents for the application of Uniconta, attributes and action and the Troubleshooting issues.
Pre-requisites for Uniconta Configuration
- Select the application Uniconta in the APPS section of the APPSeCONNECT Portal.
- Create and publish the connection of UNICONTA in the cloud portal.
- Update the Configuration in your On-Premise AEC Agent. You will find your Connection present in the agent.To Know about Agent Configuration, Click here
- Move into the App Configurations window in your agent and configure the details.
- Provide the Uniconta Login details, GUID, Company Type and Company Name for the validation process.
- Click on Validate and Save.
Configure the Uniconta Application in the Agent
- In the App Configuration panel of the agent, click on the + button beside the app Uniconta.
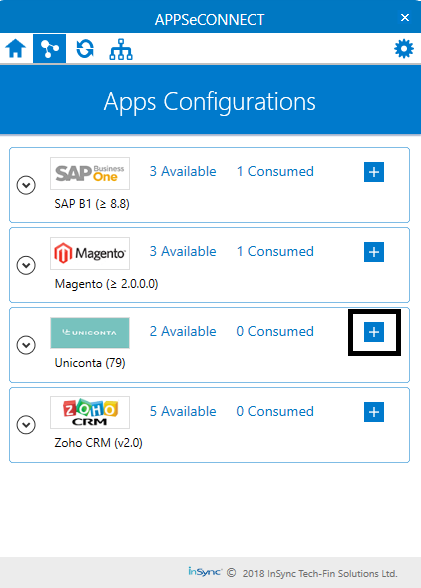
- On clicking the + button, the credential panel opens for the application Uniconta.
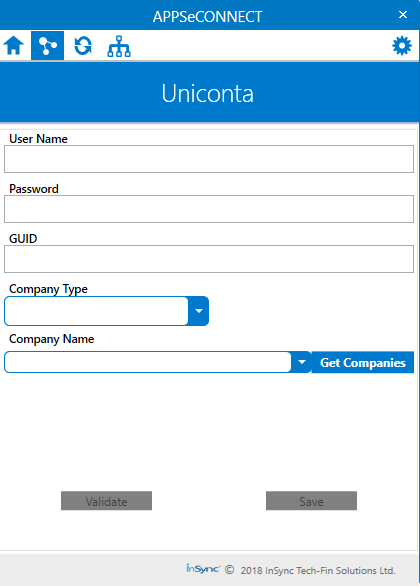
- The credential page has 5 fields:
a. User Name: The login user name of the application Uniconta.
b. Password: The Password for the username provided.
c. GUID: The Unique identity for the application Uniconta. Note: The GUID is provided by UNICONTA, when purchased a licensed version of it.
d. Company Type: The purpose of the use of the application is selected from the drop down below.
e. Company Name: The companies present under the company type is displayed in the drop-down after clicking on the button Get Companies.
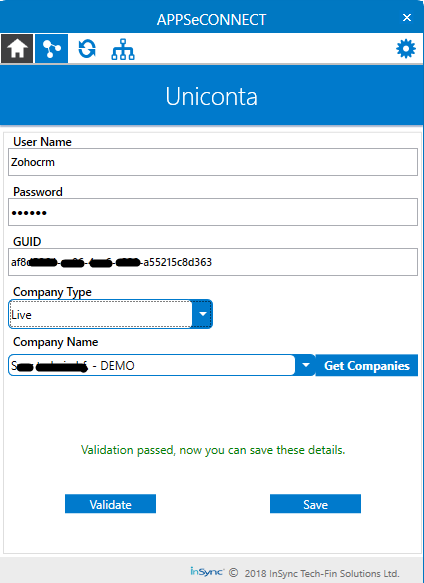
Provide the above details and click on the Validate Button. Once Validated, click on SAVE.
Troubleshooting
ISSUE 1: Some of the basic troubleshooting issue happens due to improper validations or even if it is accurately validated and if touchpoints do not sync, this basic issue resolves after removing the Temp and Cache files from the portal and from your system. Therefore, after clearing all this publish the touchpoints again along with Update Configuration on the agent.
For E.g. If the Source Application Not Found in the log file appears, the probable cause is due to the presence of the Temp and Cache Files.
Attributes and Actions
While defining a connect to a particular API endpoint in Uniconta, you require clear understanding about the data requirements and endpoint configurations. You can refer to this document to find all the endpoint details of your Uniconta installation. To define the endpoint in APPSeCONNECT, you need Actions and Entities. Actions are specifically targeted for a particular endpoint while schema is the data needed to execute the API. Here, is the list of some of the pre-packaged API actions defined for you which you can easily plug and play while doing your integrations.
Uniconta has a generic API Document. Click here to know about the API Code structure.
For viewing the related APIs, Navigate through the Provided pathway:
Login to the Uniconta Application-> Tools-> Table Browser.
Here the user can view the complete list of the APIs that could be required for the Integration.
| Endpoint | Action | Action Type | Schema | UI Path |
|---|---|---|---|---|
| InvItem | InvItem | GET | InvItem | Fetching products from Uniconta |
| Debtor | INSERT | POST | Debtor | Post customers to Uniconta from the source application |
| DebtorOffer | INSERT | POST | DebtorOffer | Post sales quotations from Source Application to Uniconta |
| Debtor | INSERT | POST | Debtor | Post Deals/Accounts from source application to Uniconta |

