
Environment Management
Updated:
Pre-requisites
- To visit the ENVIRONMENT page in portal, navigate to Deploy > Environments.
- It is recommended that user should upgrade/install the latest Agent from cloud. Even though we are backward compatible, and older Agents can still communicate with server, we still ask users to upgrade to get full flavour of new features.
- Users having On-Premise agents upto 4.3.0.12 will be considered as Old Agents. Users having On-Premise agent version 4.4.0.0 and more will be considered as new agents.
- You must have Environment Management privilege to perform actions on the Environment Settings panel.
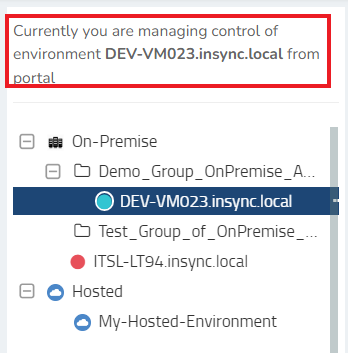
- By default, on landing up on the environment page, you will be selected with the On-Premise section. Scroll below to view more details on the On-Premise section.
- Enviroments that are available on your organisation, will have the indicators that displays whether the agents are active or inactive for an On-Premise agent.
- RED indicator - Agent is either detached or inactive.
- BLUE indicator - Agent is up and running.
- The will be no colour indicators for an Hosted Agent.
- You can group your On-Premise environments by creating Folders. The Folder names can have maximum of 100 letter counts.
- The view for the Last Deployment Log is same for both Hosted and On-Premise environment.
On-Premise
By default, you will be on the On-Premise section, when landing in the environment page. This section will allow you to know about the On-Premise environments that will be installed on your local server for executing the sync processes.
1) If you are a new user and if you do not have any On-Premise Environment installed, you would get the following view.
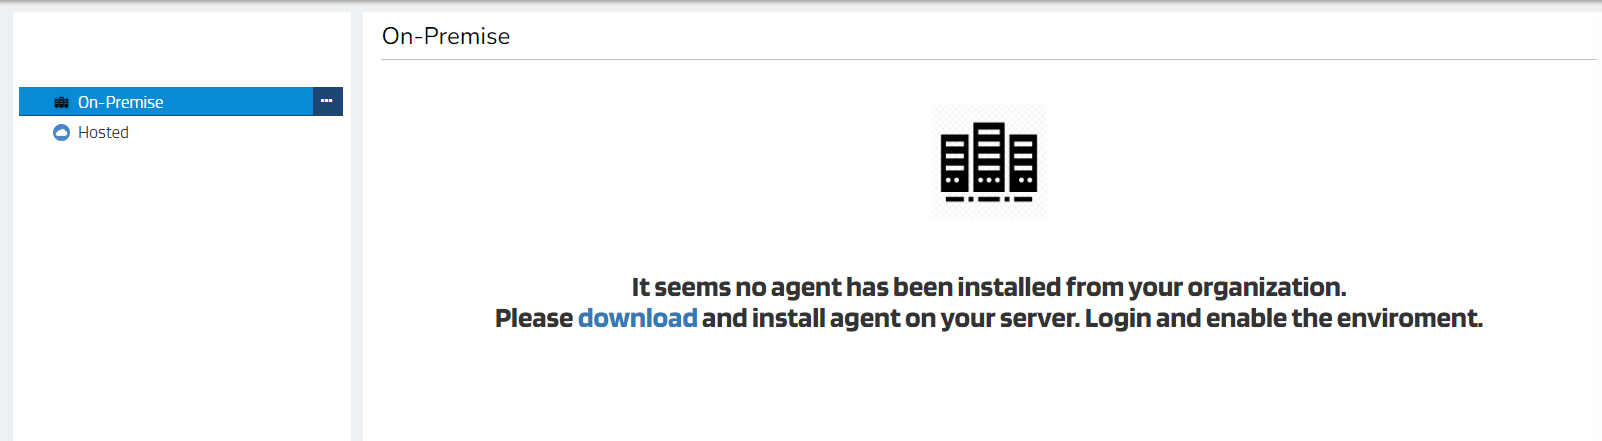
However, clicking the DOWNLOAD button will start the download process of the On-Premise environment. Click Here to know more about its installation process.
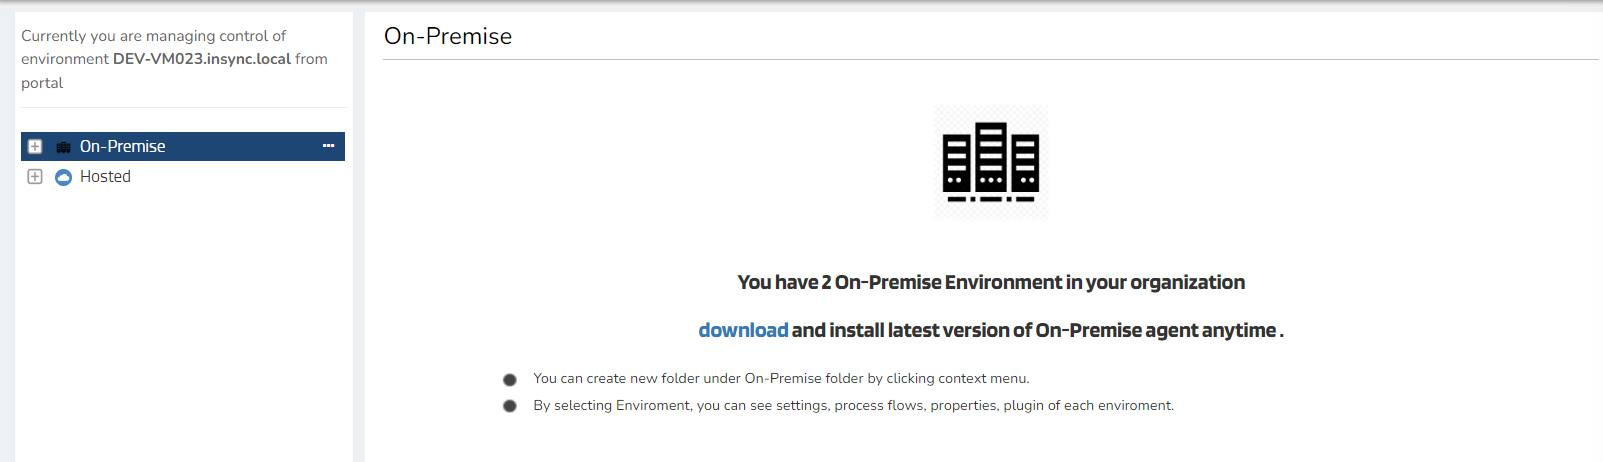
2) If you already have the On-Premise agents installed, you will be getting the following view. Click Here to know more about the On-Premise environment details page.
Note : To upgrade the On-Premise agent to the latest version, you will be required to download the latest agent. For more details on upgrading to the latest agent, Click Here.
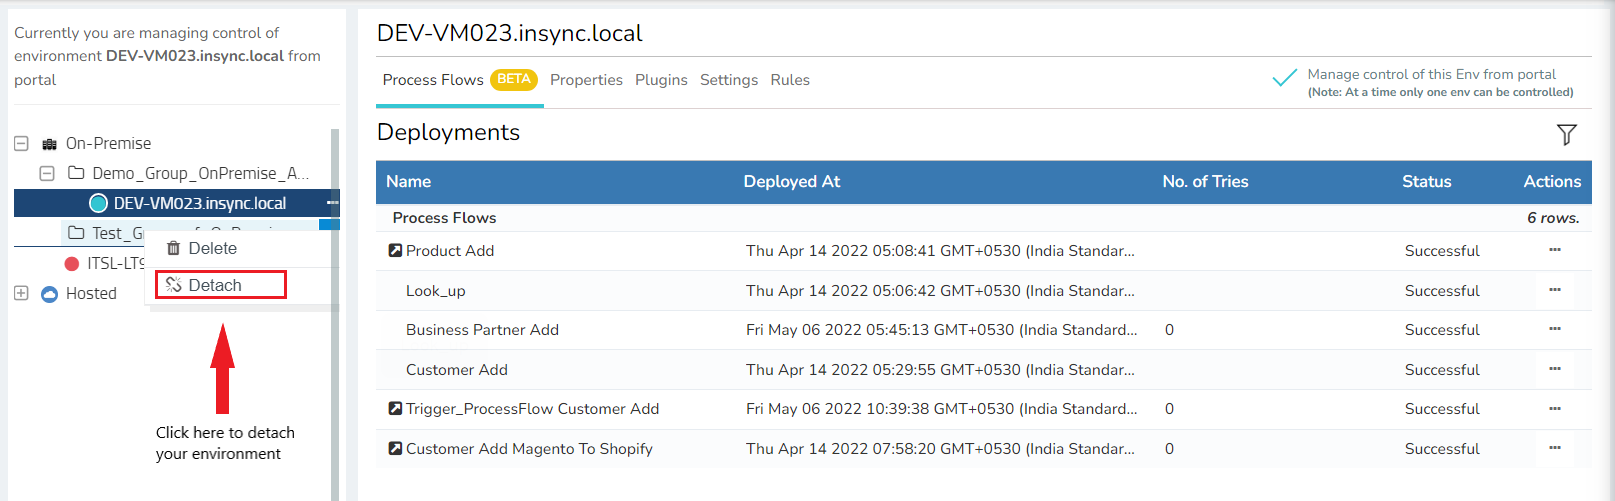
On-Premise Environment Details page
This section of the document will allow you to view and understand the details of your On Premise environments. Click on the On-Premise environment, you will be able to view the following tabs : Process Flows, Properties, Plugins, Settings, Rules.
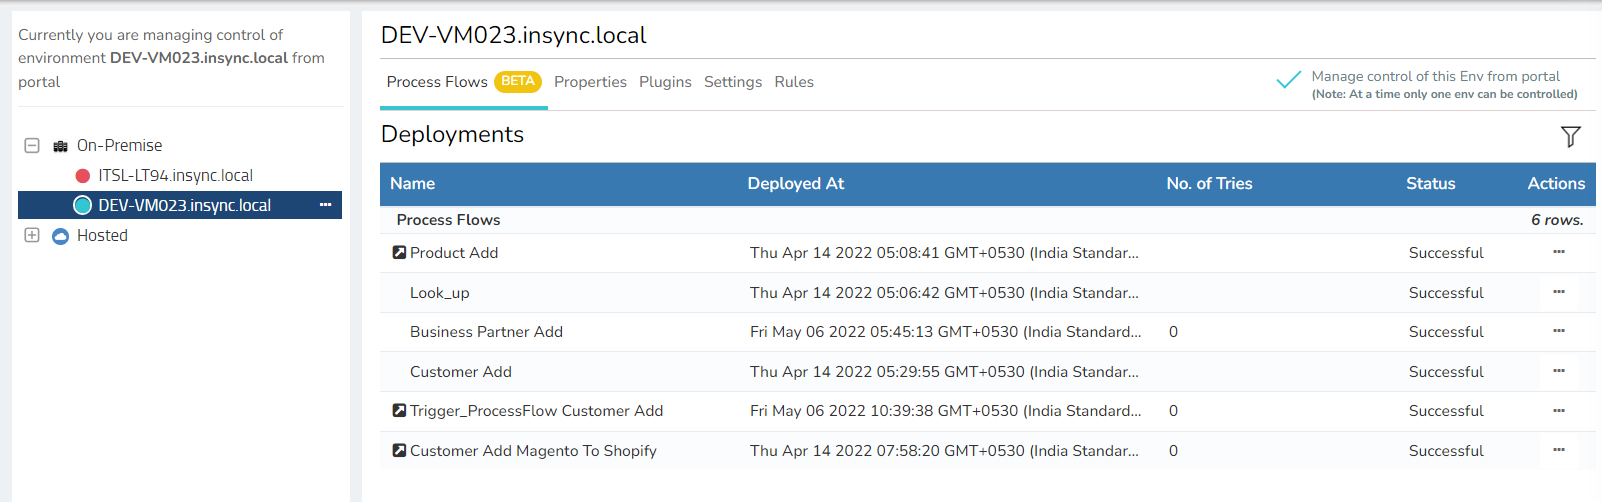
Process Flow Tab
By default the Process Flows tab will be displayed in the Environment Details Page. You can view all the Process Flow those are deployed on that environment. The following are the details that will displayed for deployed Process Flows.
- Process Flow Name : The name of the process flow, deployed, will be displayed.
- Deployed At : The last deployment of the process flow will be displayed. The time displayed here will be as per the UTC timezone settings in your organization.
- No. of tries : You will be able to view the count of the number of retries performed.
- Status : The status of the attempt of the deployment process (Successful or Unsuccessful) will be displayed.
-
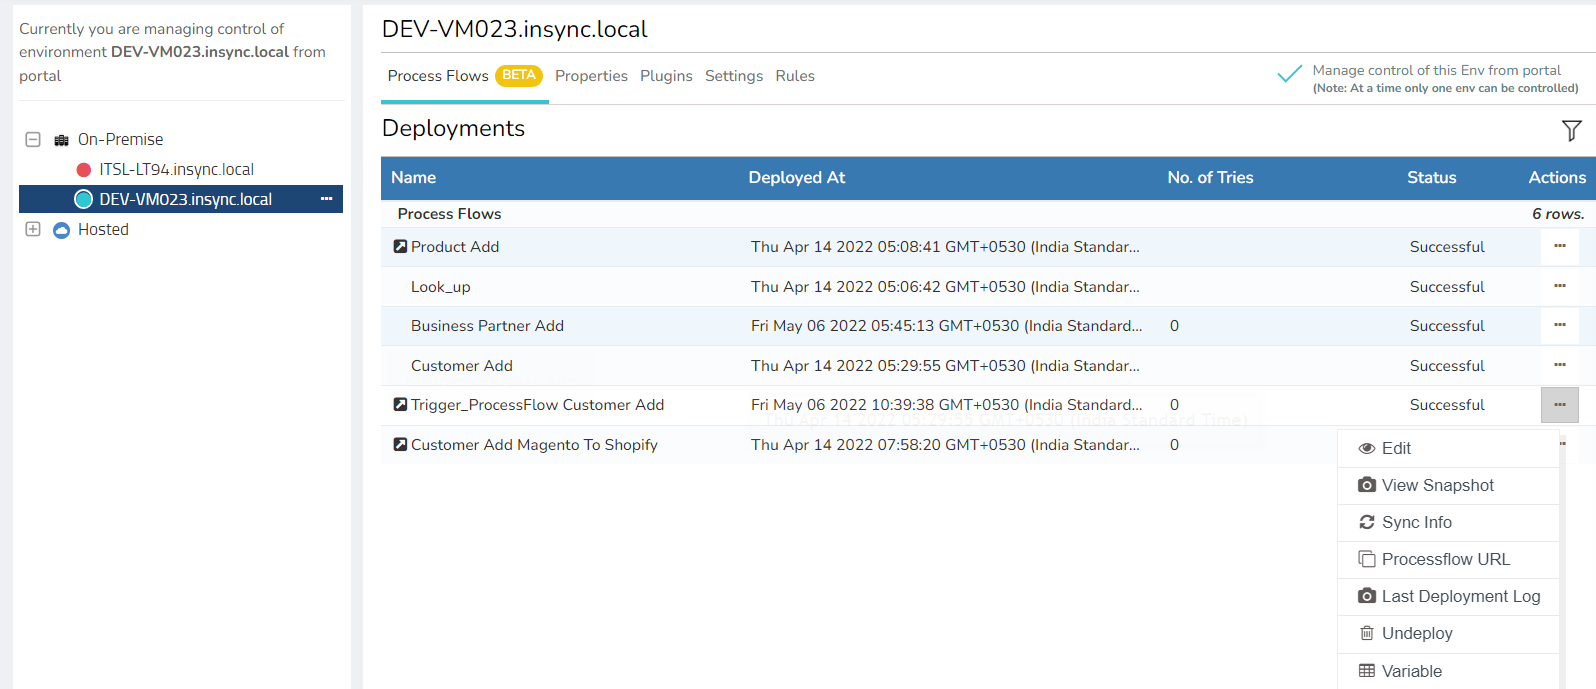
Actions : The following actions can be formed for each process flow.
- Edit - This will redirect you to the proccesflow designer page where you can make any changes to the exsisting ones.
- View Snapshot - This will enable you to view the snapshot for a process flow that is executed.
- Sync Info - This will provide you the status of the execution as Success or Error.
- Last Deployment Log - This will store and enable you to view the log details of the Process Flow Deployment process, deployed previously. If a new deployment is done, the last deployment log will now store the latest logs until any further deployment is done for that process flow.
- Undeploy - This will enable you to undeploy a deployed process flow.
- Variable - The variables that are used in the node configuration of the processflow will be displayed.
Note : If your ProcessFlow triggered is of EVENT Type, the ACTIONS column will have the option of ProcessFlow URL that will display you the Triggered URL of your Organisation.
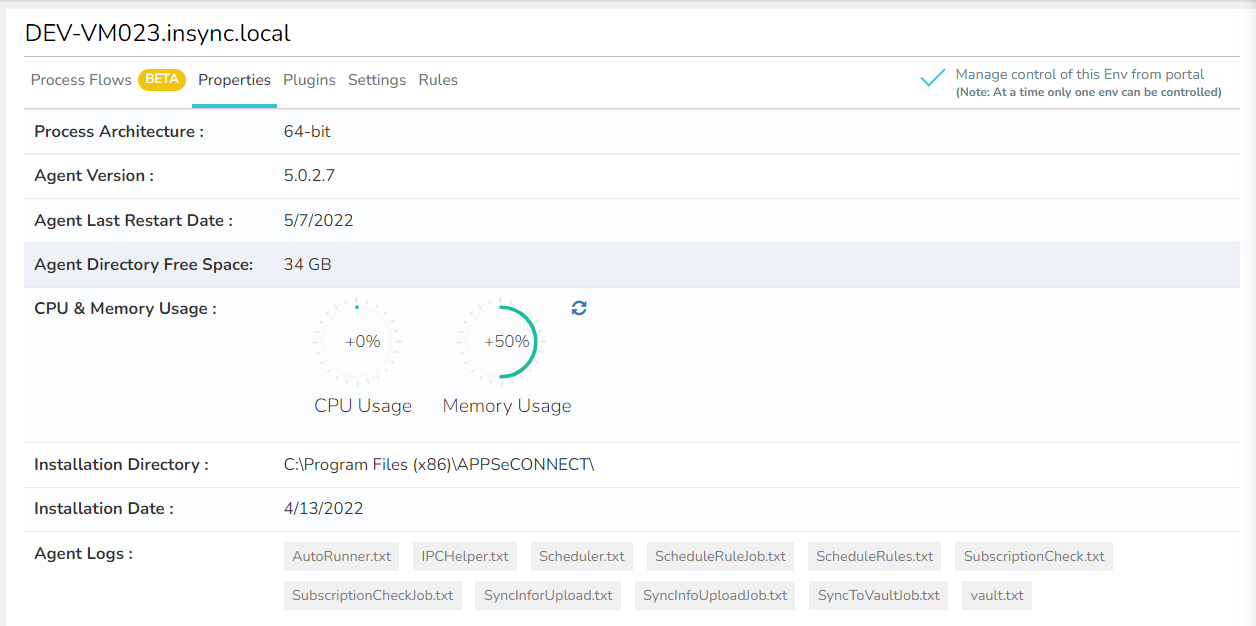
Properties Tab
Click on the Properties tab, you will able to view the live architectural details of your On-Premise environment. The follwoing details will be displayed.
- Architecture in use.
- The latest agent deployment version for the selected environment.
- Last Date when the agent is restarted.
- APPSeCONNECT directory free space available.
- CPU and Memory Usage displays the dynamic data depending on the consumption rate.
- Agent Installation directory path.
- Date of Agent Installation.
- Agent Logs - These are the dynamic process logs and the notifications, from where one can keep track of Scheduler details, rule that are scheduled and are under execution, service status etc.
Note : User can view the log files by double clicking on them.
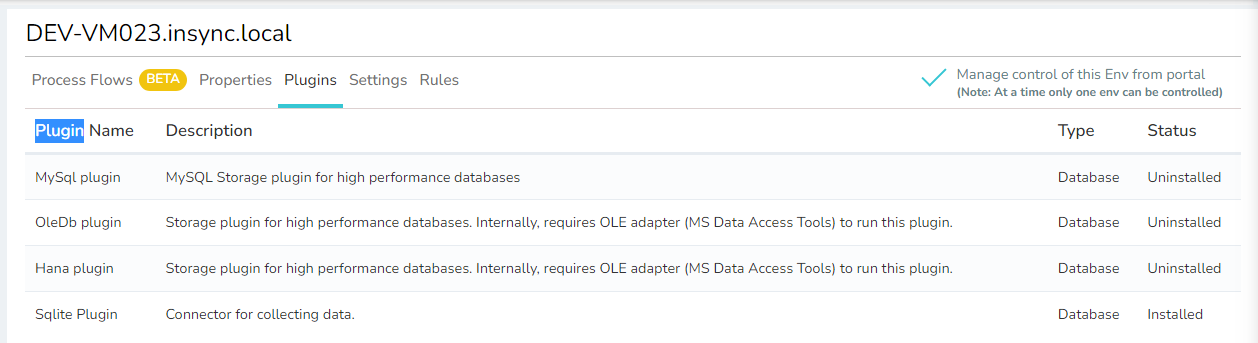
Plugins Tab
On clicking, the Plugins tab, you will be able to view all the plugins available on your On-Premise environment. The following plugins will be listed : MySQL, OLEDB , HANA and SQLite.
Setting Tab
Clicking on the Settings tab, you get the following view. This page is only accessible to users who has the privilege to control the settings of On-Premise environment.
Settings have FIVE available sections for managing OP Agents :

After saving the changes in settings, the updated information gets auto-reflected in OP Agent.
Note :
-
Any changes done and saved in the environment settings page of the portal, will get updated in the Settings section of the corresponding OP Agent and vice-versa.
-
The environment details page appears only when the autosync checkbox is enabled and activated in the settings of OP Agent as keeping autosync activated keeps the Agent and the Portal connected.
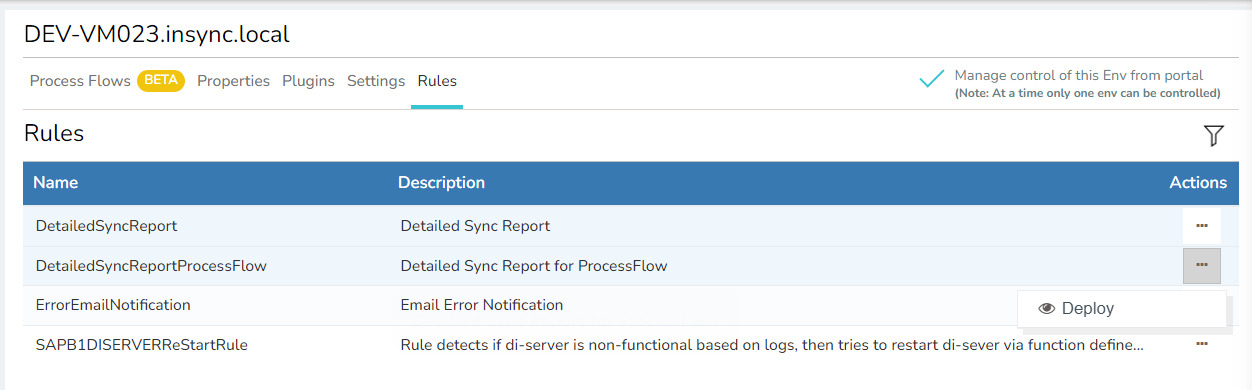
Rules
If you want to perform ACITONS based on the type of the event encountered during agent execution such as Execution Failure, Application Crash, Execution Start, Execution End that can be performed using APPSeCONNECT Rules. During the occurrence of any event, the rule against that event if created and its action associated with the rule will be triggered automatically. Click on Rules tab, select Deploy/Undeploy under the ACTIONS and your rule will be activated/de-activated as per your configuration.
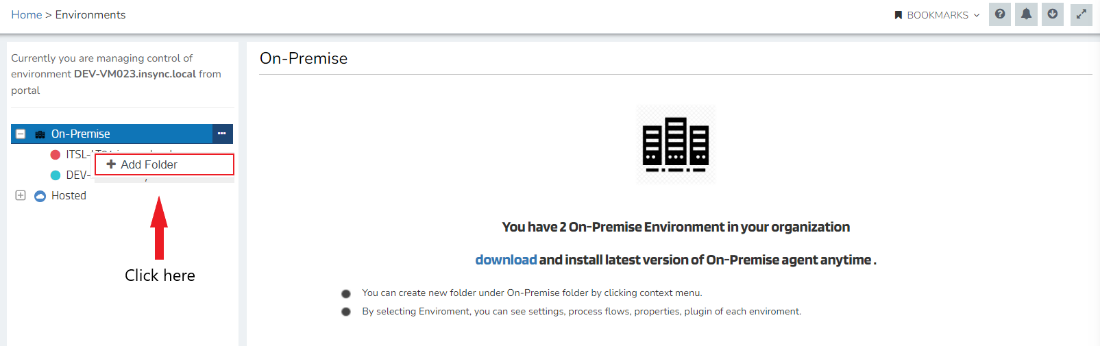
Grouping of On-Premise Environments
This section of the document will allow you to Group multiple OP environments in folders. Grouping is initiated to manage and the arrangement of multiple similar elements for distinguishing its exact purpose. In APPSeCONNECT, for On-Premise environments , you can group environments in folders as per your requirement. You can view all your created folders on expanding the On-Premise section. Follow the process below to create folders for grouping.
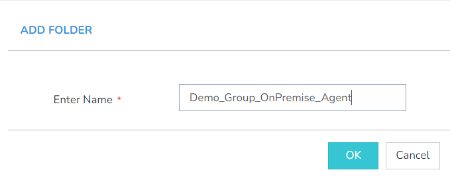
1) Navigate to Deploy > Environments. Click on the Ellipses (Three Horizontal Dots) beside the On-Premise Node and click on Add Folder.
2) You get the window for providing the name of the folder. The folder would be created with the provided name under the On-Premise section.
3) Expand the On-Premise node, to view your created Folder. Clicking on the folder, you will view following page.
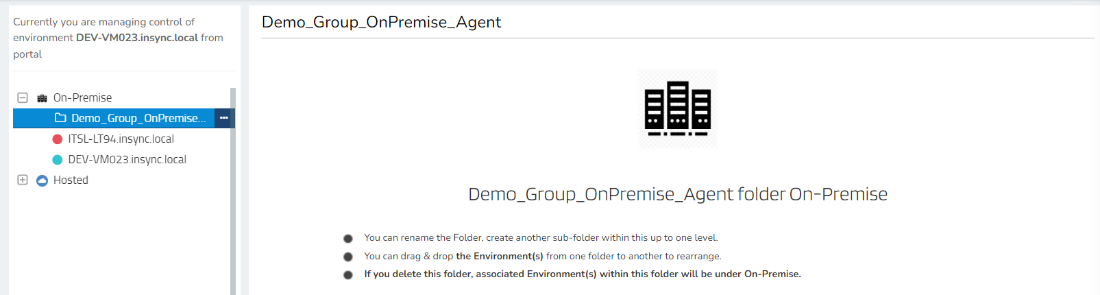
4) You can Drag and drop the OP environments to the folders for easy arrangements.
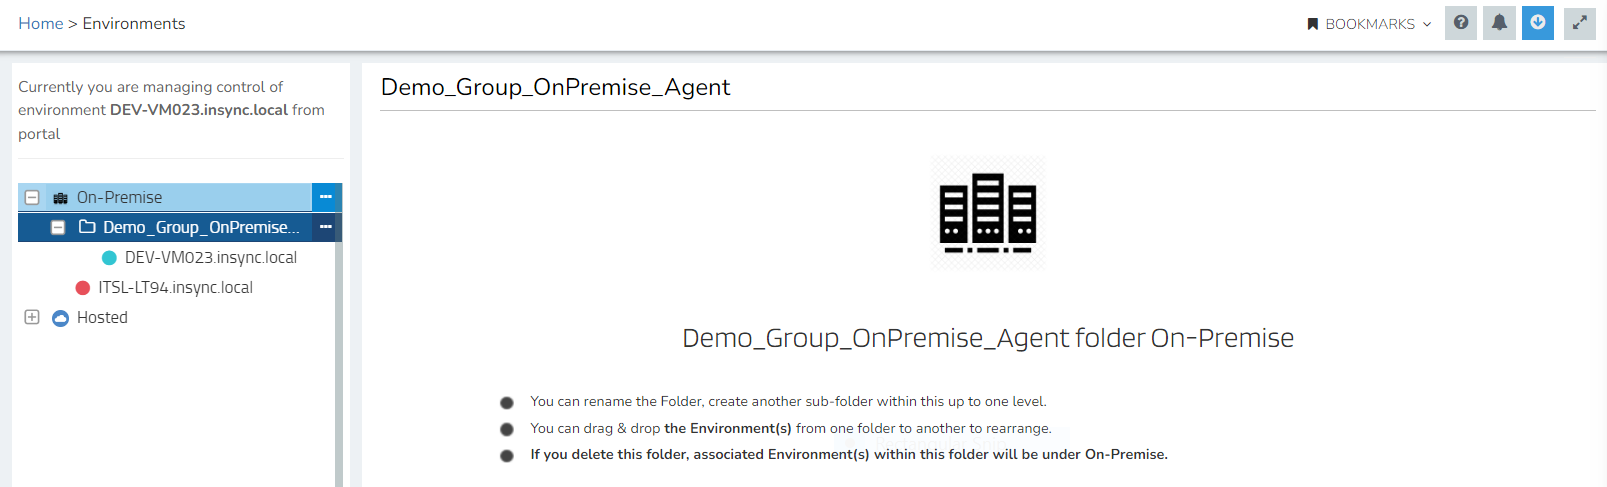
5) You can perform the following functionalities within a created folder. Click on the Ellipses beside the created folder to view these following option in the context menu.
- Rename : You can anytime RENAME your created folder as per the need of yours.
- Delete : In case the folder is not required, you will be able to delete the created folders anytime.

You can delete your created folders anytime. On its deletion, all the On-Premise Enviroments under that folder will be unparented and will shift under the main On-Premise folder. Following the above process you can easily create and group your On Premise Environments.
Note : The folder name can have upto 100 letter counts.
Hosted
This section will enable you to create a Hosted (Cloud) environment. You can view all the related environment details in its Environment Details page.
1) If you do not have the support of the Hosted (Cloud) environment, you will get the following view.
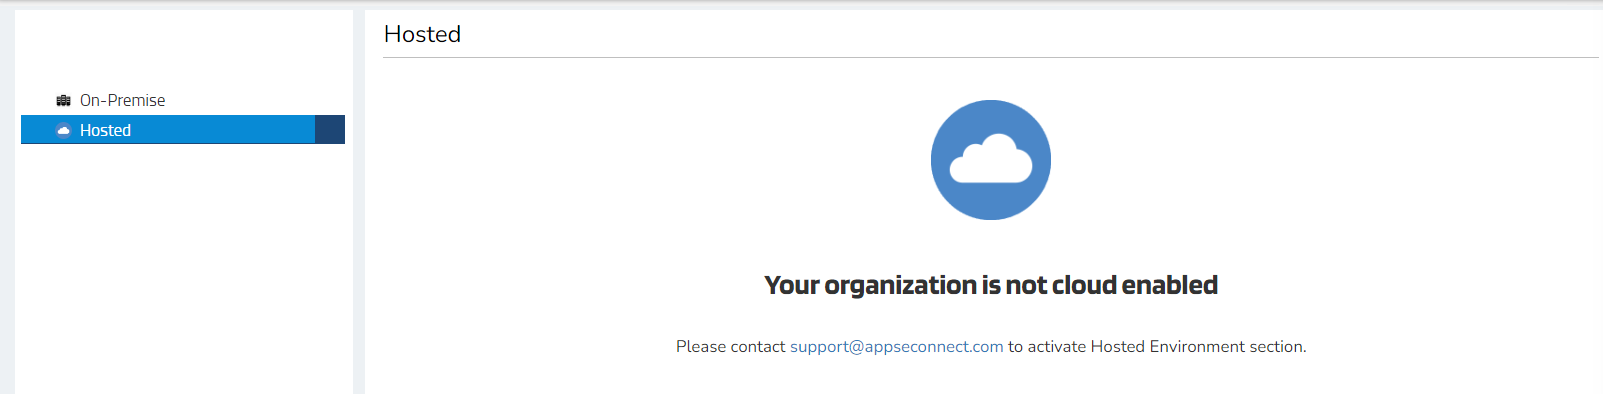
To enable your organisation with cloud support, Click here.
2) If you have the support of Hosted (Cloud) environment on your organisation, yet, you don’t have a Hosted environment created, you will get the following view.
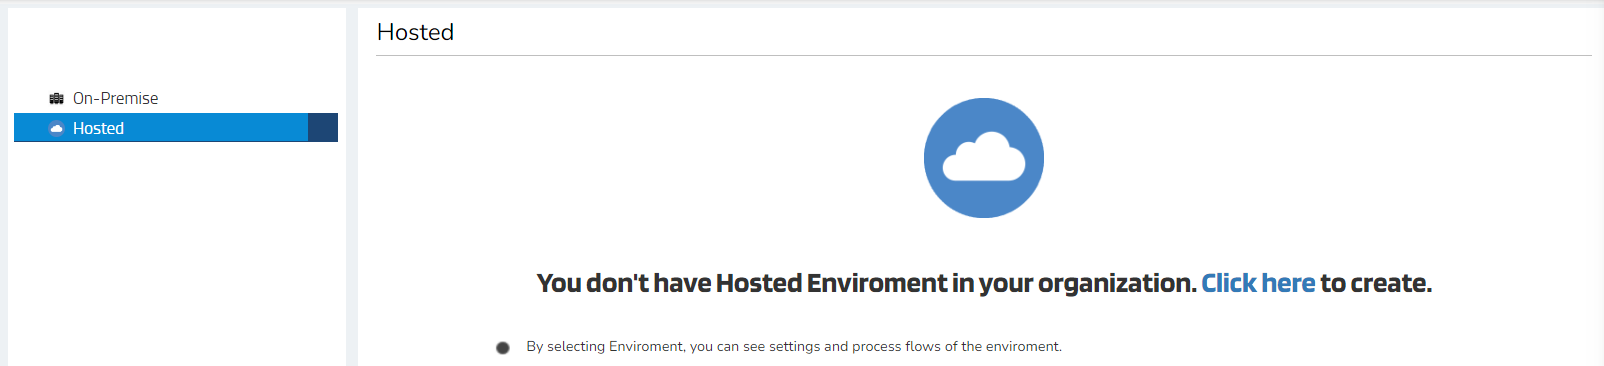
Click here to know more about Hosted Environment creation.
Note : There can be scenarios where you may have an hosted environment present, yet clicking on the HOSTED section it displays Your organisation is not cloud enabled and your Hosted agent will be in GREYED form and clicking on the environment, will also display Your organisation is not cloud enabled. For such cases, you will have to enable your organisation with HOSTED Support.
Create Hosted Environment
This section of the document will help you to create the Hosted (Cloud) environment on your organisation, provided your organisation has to be cloud supported. To enable your organisation with cloud support, Click here.
1) Navigate to Deploy > Environments. The Environment page opens.
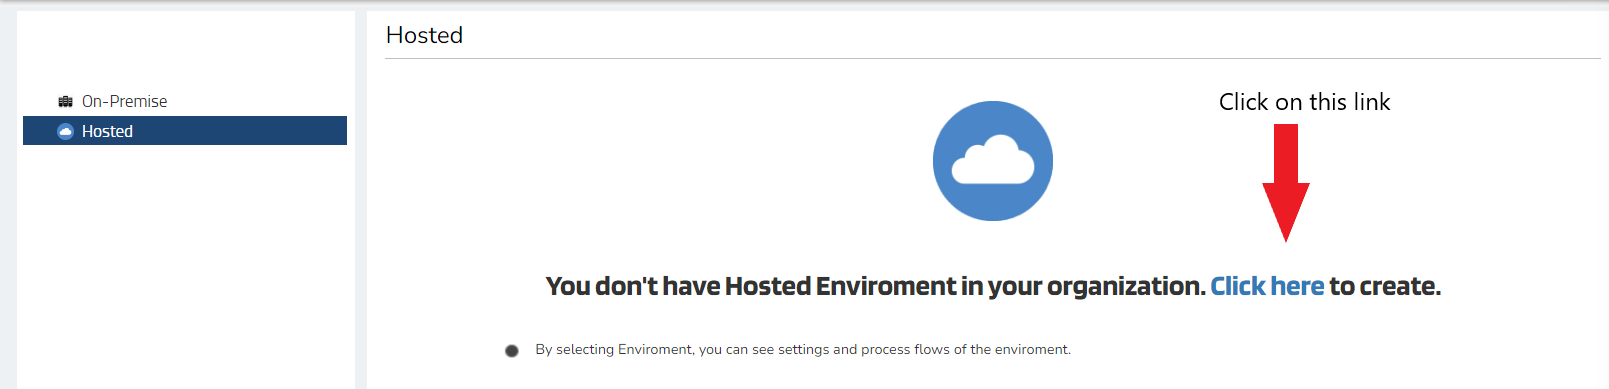
2) You will get the following view if you do not have the hosted (cloud) environment created. Click on the Click Here button.
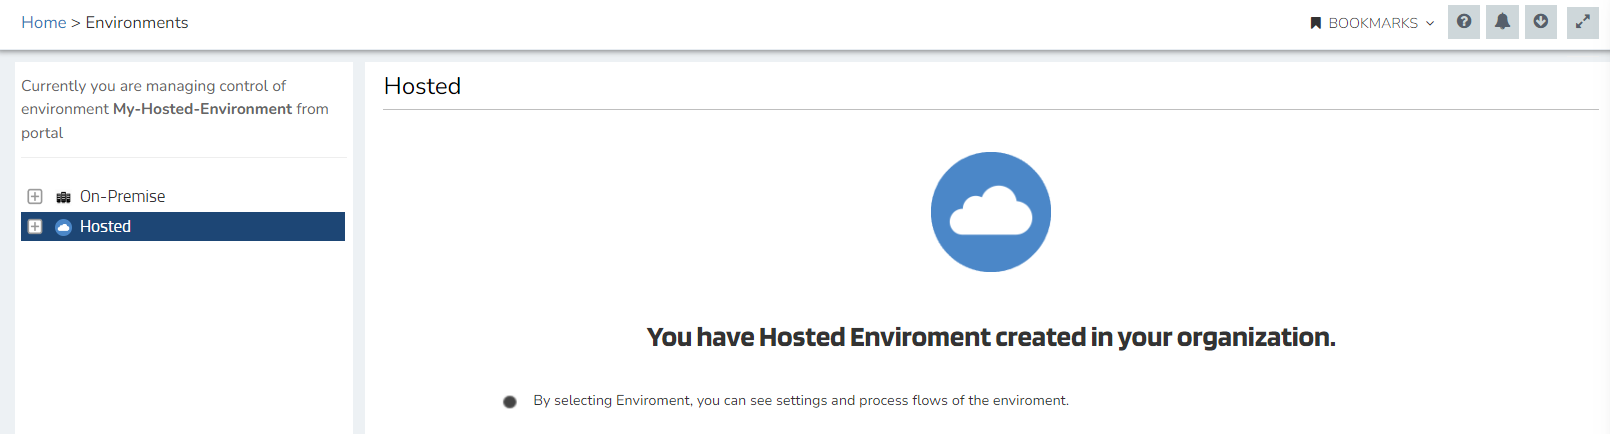
3) Your Hosted environment will be created automatically. You will be provided with a confirmation message on its successful creation. You can also view the created environment in the listing, by expanding the Hosted Node. By default, the name of hosted environment will created as My-Hosted-Environment.
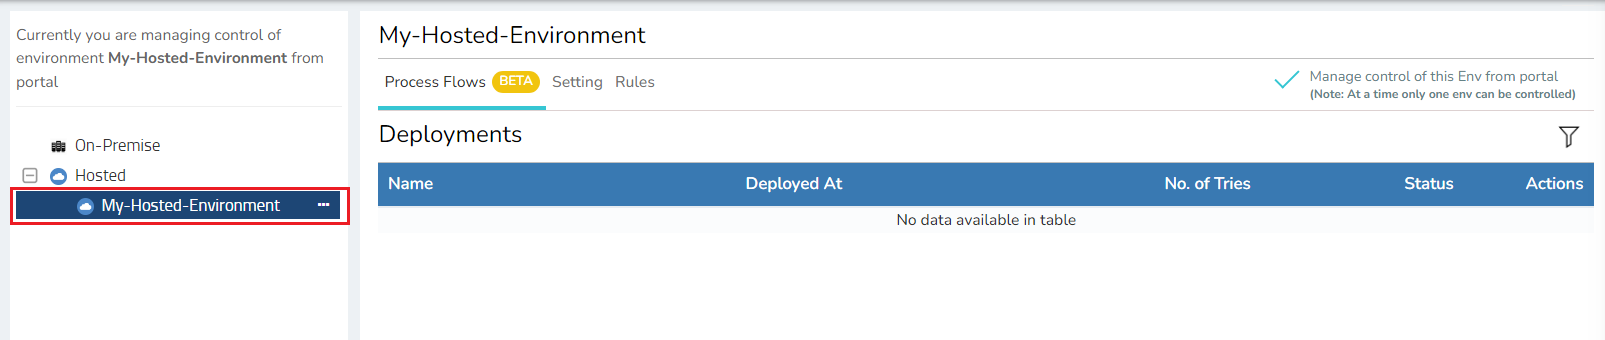
4) Clicking on the created environment, you will be able to view the details page consisting of the following tabs :
- Process Flow -> You will be able to view all the deployed process flows, related snapshots, retry, undeploy etc.
- Settings -> You can modify and update the environment setting from this tab.
- Rule -> You can activate/deactivate the rules that are available in your organisation so that the datas are synced can be tracked in any error occurs.
For more details on the Environment Details page, Click Here.
Note :
-
Every organisation can have only one Hosted environment created.
-
You cannot rename the name of the created hosted environment.
-
You cannot group environments in folders in the HOSTED section.
Hosted Environment Details page
You will be able to view this page only when you have your hosted environment created. Clicking on the Hosted environment, you can view the details page. For My Hosted Environment, you will not have the Properties Tab as provided for an On-Premise Environment.
1) Clicking on the Hosted environment, you will be provided with THREE tabs : Process Flows, Settings and Rules.
2) Clicking on the Process Flows Tab. You can view all the Process Flow those are deployed on that environment. The following are the details that will be displayed for deployed Process Flows.
- Process Flow Name : The name of the process flow, deployed, will be displayed.
- Deployed At : The last deployment of the process flow will be displayed.
- No. of tries: You will be able to view the count of the number of retries performed.
- Status : The status of the attempt of the deployment process (Successful or Unsuccessful) will be displayed.
-
Actions : The following actions can be formed for each process flows.
- Edit - This will redirect you to the proccesflow designer page where you can make any changes to the exsisting ones.
- View Snapshot - This will enable you to view the snapshot for a process flow that is executed.
- Sync Info - This will provide you the status of the execution as Success or Error.
- Last Deployment Log - This will store and enable you to view the log details of the Process Flow Deployment process, deployed previously. If a new deployment is done, the last deployment log will now store the latest logs until any further deployment is done for that process flow.
- Undeploy - This will enable you to undeploy a deployed process flow.
- Variable - The variables that are used in the node configuration of the processflow will be displayed.

Note: If your ProcessFlow triggered is of EVENT Type, the ACTIONS column will have the Option of ProcessFlow URL that will display you the Triggered URL of your Organisation.
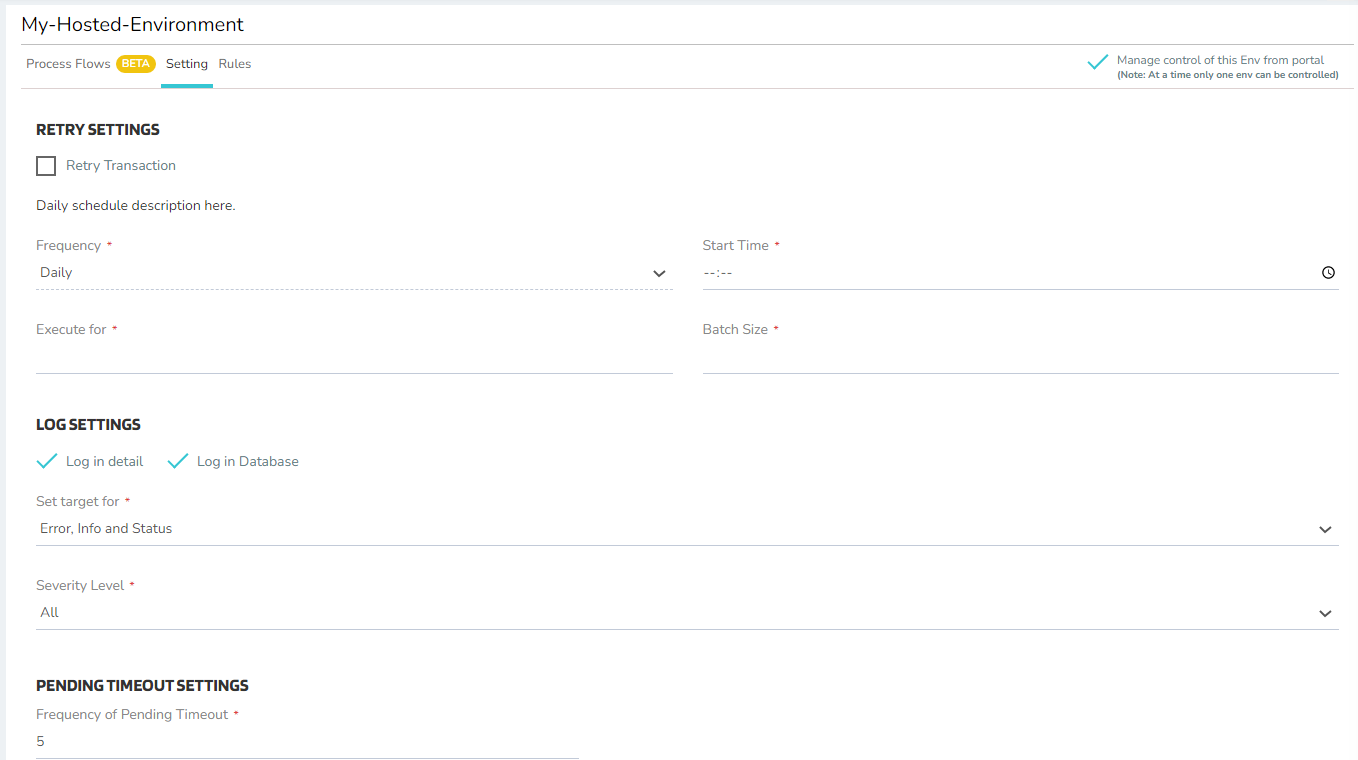
3) You will be able to view the following section when clicked on the Settings tab. You can view the following settings panel in the page.
- Retry Settings - This will enable you to configure the retry/resync of the integration process if executed on this environment. The following configuration can be made in the retry section.
- Log Settings - You can control the way you want to view and store the logs for every execution on you hosted environment.
- Pending Timeout Settings - Users will be provided with the Frequency of Pending Timeout field in which users can provide with a timeout time period for a pending deployment process to suspend.
Following the above process, you can easily view and update the details of the Hosted agent.
SETTINGS tab on Details Page for Hosted & On-Premise Agent
Configurations for the SETTINGS tab remains same for both On-Premise & Hosted Environment details page. The following configuration can be applied on the SETTINGS page for either of the chosen environment : On-Premise or Hosted.
Note : For Hosted Agents Settings, only Three Settings are available - Retry, Log & Prending Timeout Settings.
Retry Setting
- One can schedule resync of failed integrations, where you can provide the start time, no. of iterations and batch size for each resync. Default frequency is daily. To make the resync schedule active,
you must activate Retry transaction. The following configuration can be made in the Retry Settings Panel.
- Frequency : This is a static field and is for the schedule period for the Resync to happen. By default, its configured as Daily.
- Start Time : This is a customizable field for the user. It defines the start time of the Resync Process.
- Execute For : This a time span as for how long the Resync process will occur. The span is processed in hours and users can customize it as per their requirement. By default, its configured as 0.
- Batch Size : This field states, the no of data in a batch to be resynced. The Default value is 100 but the users are open to customize as per their requirement.
Log Settings
- You can control the way you want to view and store the log in OP Agent from portal now. The following configurations can be performed in the Log Settings Panel.
- Log in Detail : Detailed log would be fetched as per the sync is processed.
- Log in Database : The log fetched, would be stored in the database.
- Set target for : Users can filter the failed sync based on Error, Info and Status.
- Severity Level : Users can filter the error logs based on the severity level of the errors generated. The severity level is categorized into Medium, High & Critical.
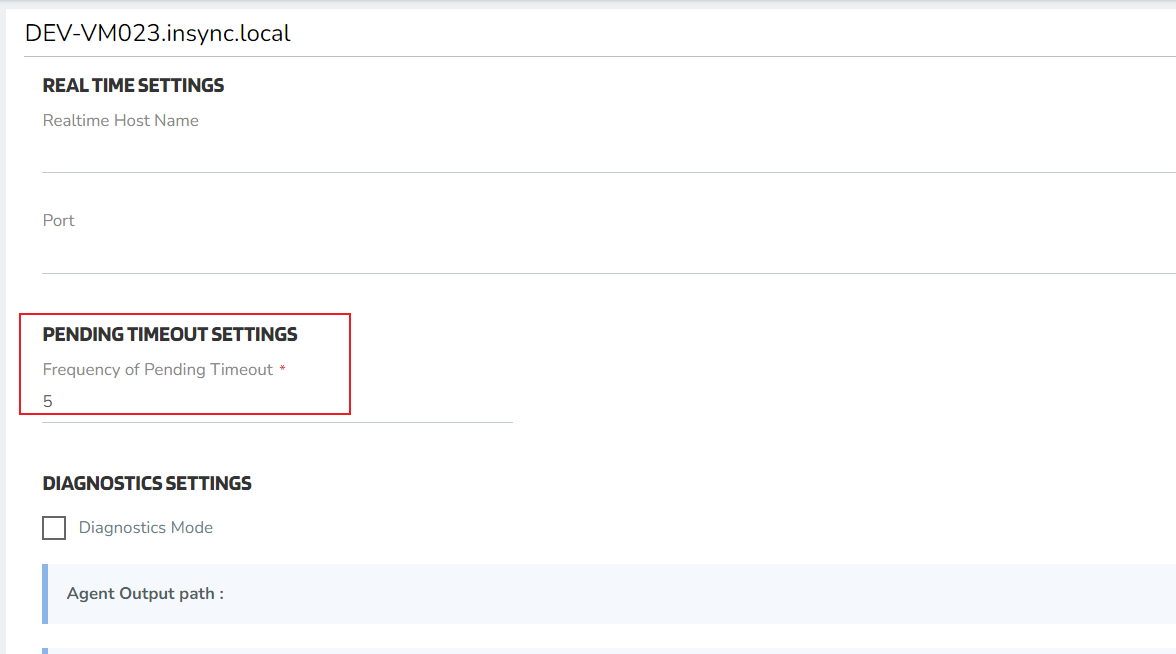
Real Time Settings
- Users can provide the Realtime details when working with APPSeCONNECT API Management. Users need to provide the Hostname and the Port for the RealTime Execution.
Pending Timeout Settings
- Users will be provided with the Frequency of Pending Timeout field in which users can provide with a timeout time period for a pending deployment process to suspend. The default time period of the Frequency of Pending Timeout field is 5 mins. Users can configure upto 60 mins. You cannot provide the Timeout time less than 5mins.
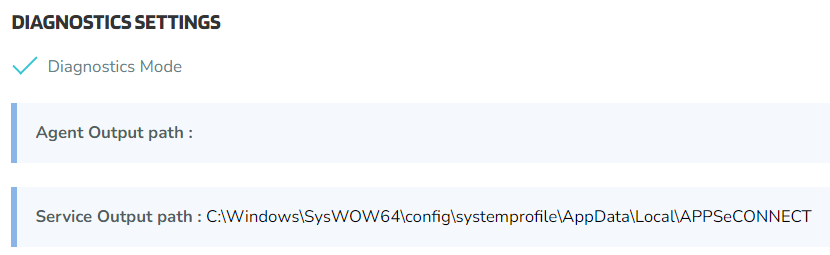
Diagnostic Settings
- You can turn the Diagnostic mode on, from portal itself. Once its active, all the transaction and process files will get available in Agent and service path as shown in the image.
Diagnostic Settings is provided with two output paths:
a) Agent Output Path : This path provides the details of the transformed files when triggered manually.
b) Service Output Path : Service path provides the details of the transformed files when triggered through Autosync.
Manage Control of Environments
Managing Control over an Environment is an esential requirement that depicts which environment is set as PRIMARY. As Processflow are deployed only to the environments which are set as PRIMARY. Therefore, users needs to manage control of their environment. This section of the document will allow you to manage the control of your environments be it the HOSTED or On-Premise.
1) Navigate to Deploy > Environments and click on the environment which you are required to control.
2) You get to view the Environment Details Page of your selected environment (either HOSTED or On-Premise). In this case, On-Premise environment is selected.
3) You are required to click on the checkbox available in the top-right corner of the details page. Enabling the checkbox will allow you to control the selected environment.
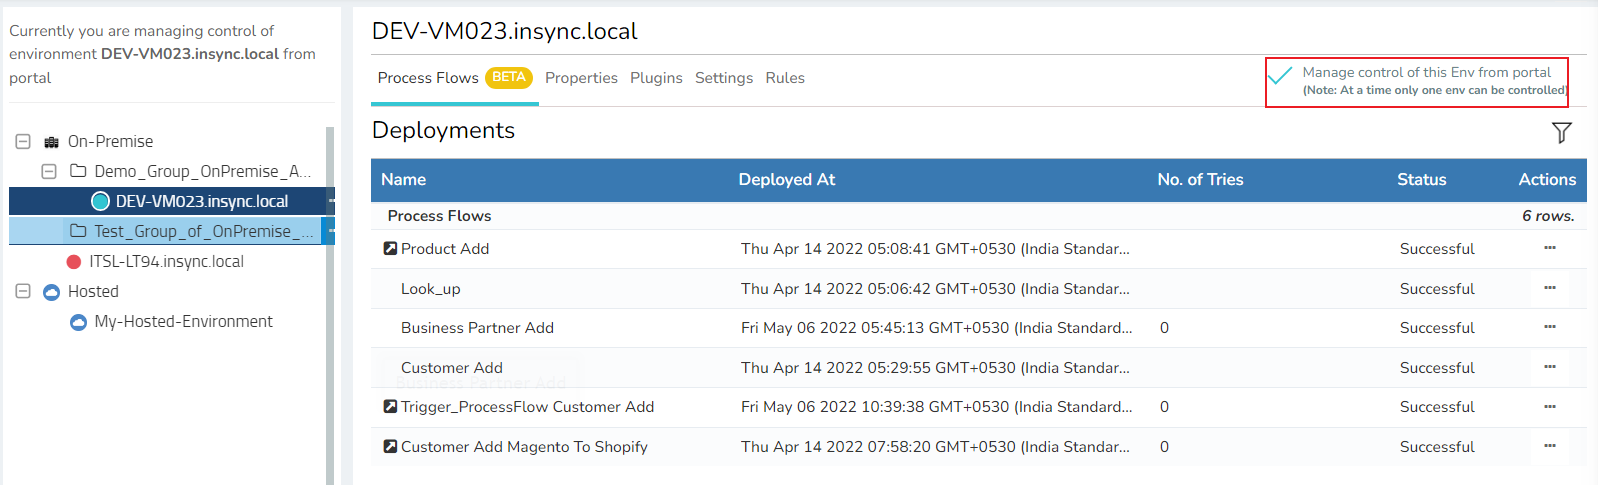
4) On enabling, you can confirm your current control status in the environment page itself.
Following the above steps, you can successfully control environments for your organisation.
Note :
- The steps to control an HOSTED environment is same as that mentioned in the above steps.
- You cannot control multiple environments at the same time for an organisation.
Detaching & Deleting the Environments
Environment detachment is a functionality that blocks the Agent from use in that specific environment. This section of the document will allow to attach/detach your environments. You can also DELETE you environments. The processes are given below.
Attach/Detach of Environments
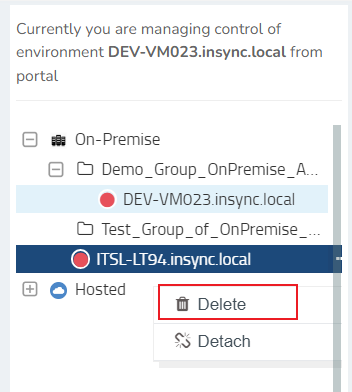
1) To detach your environment, you need to click on the ellipses (Three horizontal dots) beside the environment name that needs to be detached. Click on the DETACH option in the available in the contextual menu.
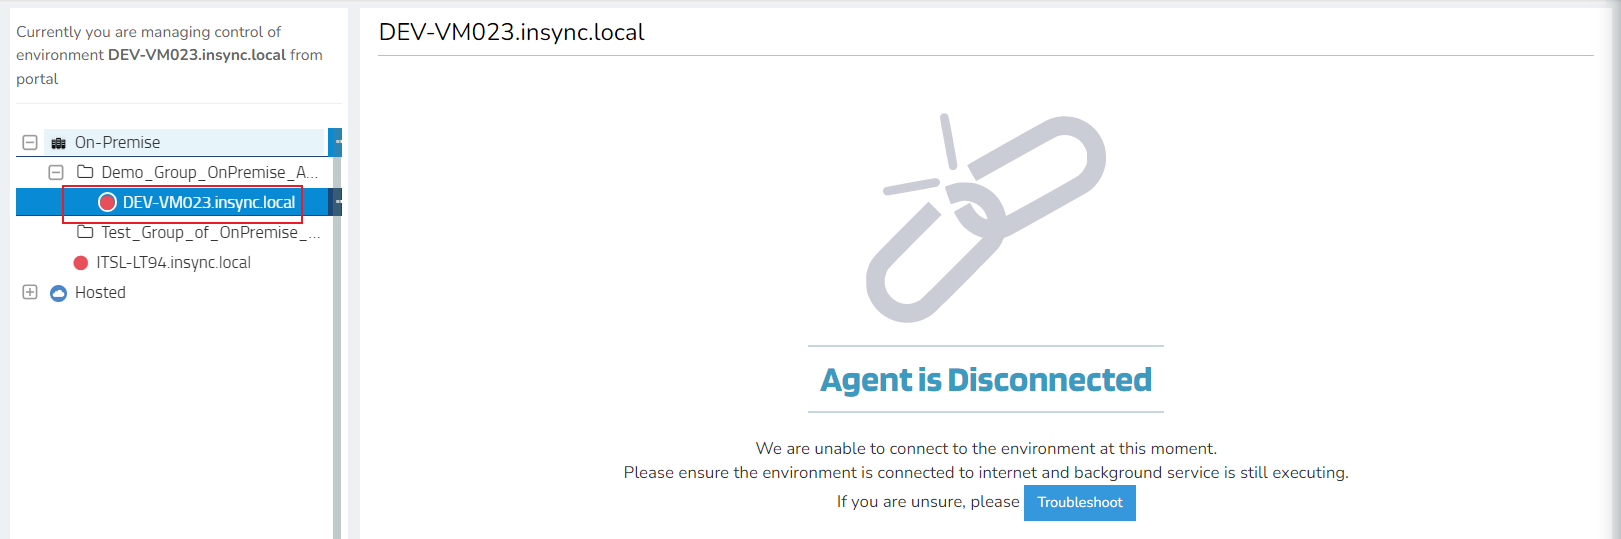
2) On detaching the selected environment from Portal, it remains in the list but will be displayed as Agent is Disconnected when clicked on it and the status symbol beside the environment would turn RED.
3) Post detachment, if the user tries to re-login to the On-Premise environment, it will display the message, Agent is Blocked.

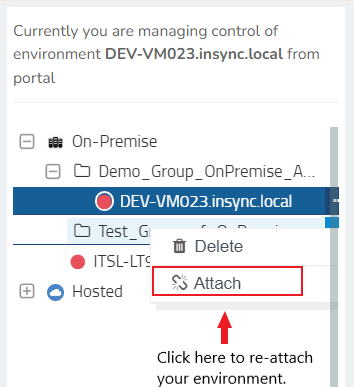
4) You can anytime re-attach your On-Premise environment by clicking on the ATTACH button in the contextual menu.
Note :
- On detaching the Agent from portal, the On-Premise Agent automatically gets shut down.
- Detached Agents, needs to be re-attached from the portal for further logging in to it.
- Users can anytime delete and detach/attach an inactive agent in the portal.
Deleting Environments
You can now directly delete environments that are no longer in use from the listing itself. As soon as you perform delete from portal, the OP Agent instance (active/inactive) gets auto-removed from the local environment and all the associated licenses will get removed. All the services and sync operations will get stopped. If any new user or different project user logs in further to the same environment, a new license will be generated against it. Follow the below steps to delete an environment (On-Premise or HOSTED).
1) Navigate to Deploy > Environments.
2) Click on the ellipses of the environment (On-Premise or HOSTED) which you want to delete. Click on the DELETE button in the context menu that appears.
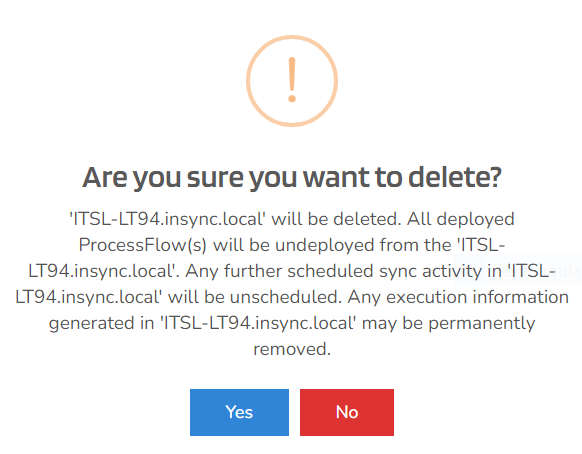
3) You will get a confirmation pop-up before the deletion process.
4) Once deleted, user get a successful message for the deletion of the environment. The environment gets removed from the environment list after the deletion process.
Note : If a user has relogged in to a deleted Agent from the portal, the deleted agent now will be visible in attached mode in the portal.
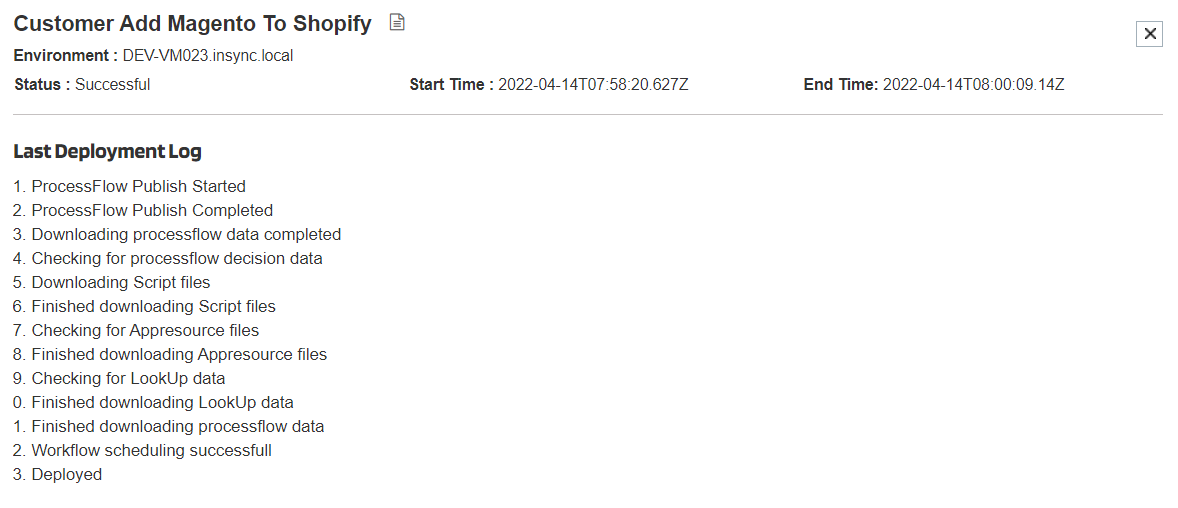
Last Deployment Log
This feature will store and will enable the user to view the stored deployment logs of the Process Flows, which was previously deployed. Clicking on the Last Deployment Log button, you can view the following details.
-
Process Flow Name - The Process Flow name will be displayed whose Last deployment log window is opened.
-
Environment Name - You will be displayed with the environment to which the process flow is deployed. The window of the Last Deployment Log will remain the same.
-
Deployment Status - The status of the Deployment will be displayed to the user. The status can either Successful, Unsuccessful or Pending. For more details on unfinished deployments, Click Here
-
Deployment Start Time - This will display you the Start Time of the deployment process.
-
Deployment End Time - This will display you the End Time of the deployment process.
-
Last Deployment Log - This section will display you the deployment logs, deployed previously.
Note : The view for the Last Deployment Log is same for both Hosted and On-Premise environment.
NOTE :The time displayed in last deployed log is similar to the UTC time set for the organization.
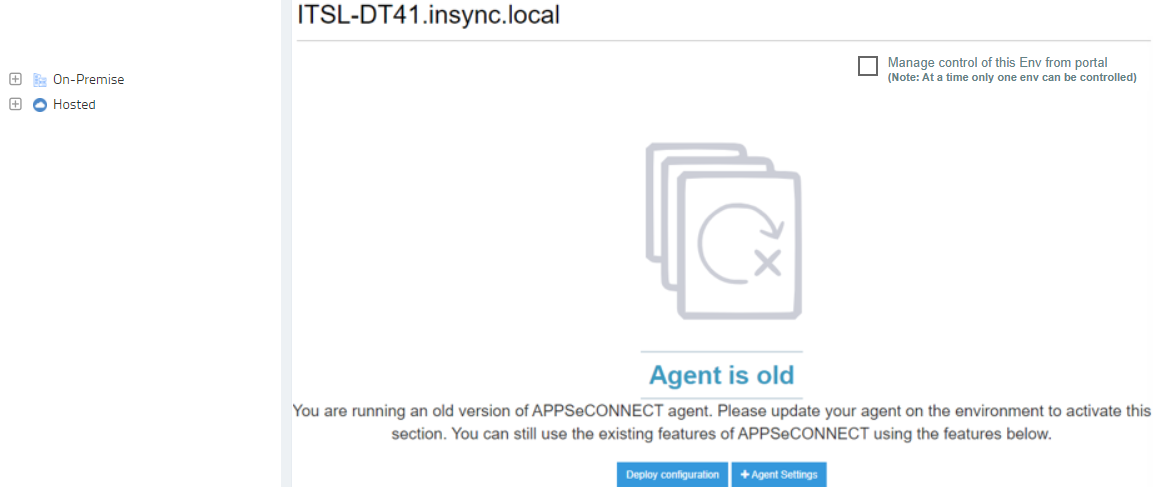
Environment View for Old Agents
APPSeCONNECT License management & environment management is equipped with the full supportability of old agents. However, old agent users are restricted from viewing the environment details which is available on for latest agents. Users need to update the old agent for viewing the details of the environment.
Old agent will support the complete functionality of the integration process. Old Agent user shall view the environment as given below:
Note: Users having On Premise agents upto **4.3.0.12 will be considered as Old Agents.**
The UI will have three buttons:
- Deploy Configuration: Any changes or modifications made in the portal will be deployed to the OP agent for the sync process when deployed the configurations from the portal.
- Agent Settings: This page has three tabs that configures the setting for the environment.
(a)Log Settings: Log settings captures the details of the Sync process.
(b)Real Time Settings: Real Time settings is required when working with Real Time touchpoints using Webhooks of the API Management.
(c)Resync Settings: Users can enable/disable the Autosync feature of the OP agent in the Resync Settings tab.
Note: Old Agent in Detached mode, will not be able to deploy any configuration to the corresponding agent.
Working with the Agent Settings Panel in Old Agent
Environments needs to be configured for the generation of the sync logs, autosync activation and Realtime settings configuration. Users need to configure the panel accordingly for detailed output and process.
Note: (a) Agent status for old agents will be displayed in RED but will have the complete functionality of an Active Agent.
(b) Users can detach/attach the agents for detaching/attaching the agent.
ProTip: (1) Agent needs to be dissociated first from the portal, before reassigning the same license key.
(2) APPSeCONNECT License Management is compatible even with older versions of the agent.
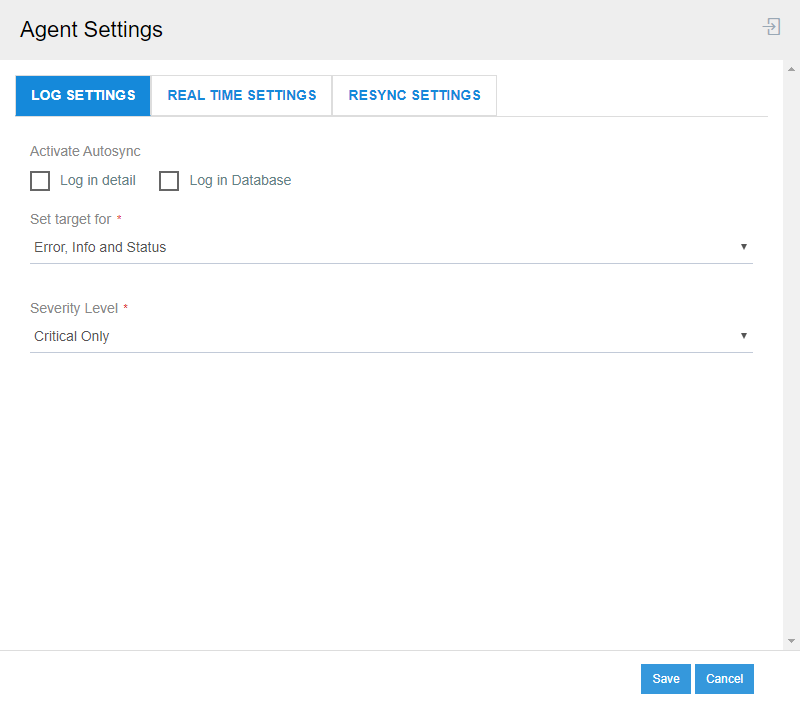
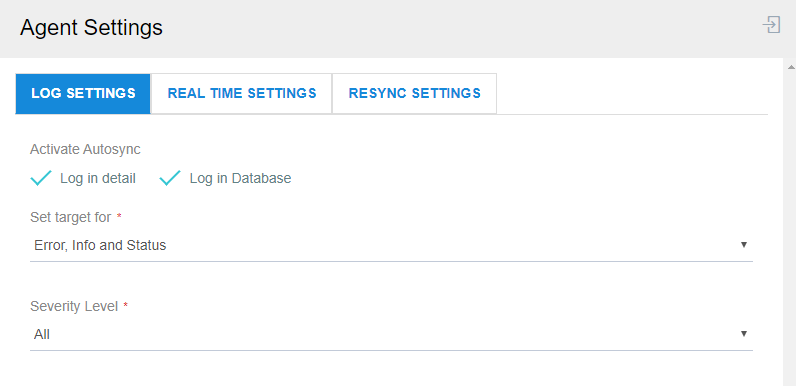
Log Settings: Log settings captures the severity details of the logs that are generated. User can filter accordingly as per severity basis of the logs. The page captures the following operations:
- Log in Detail: Detailed log would be fetched as per the sync is processed.
- Log in Database: The log fetched, would be stored in the database.
- Set target for: Users can filter the failed sync based on Error, Info and Status.
- Severity Level: Users can filter the error logs based on the severity level of the errors generated. The severity level is categorized into Medium, High, Critical.
Note: It is recommended that users select all the three option for detailed information for the SET TARGET FOR and SEVERITY LEVEL option.
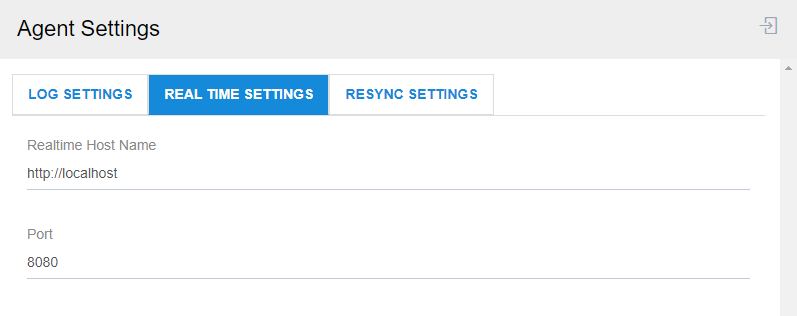
Real Time settings - Realtime settings is required when working with the Realtime Touchpoint in API Management. Configurations should be made only when working with the Webhook API(s) and the Real Time Touchpoints in APPSeCONNECT API Management. Real Time settings has two field for the configurations:
- Real Time Host Name: Users needs to enter the Register URL of the Real Time Touchpoints.
- Port: This is the Port number of the hosted URL.
Resync Settings: This section of the page has a checkbox for the user to Enable/Disable the autosync of resync.

