HubSpot
Updated:
HubSpot is a cloud-based CRM designed to help align sales and marketing teams, foster sales enablement, boost ROI
and optimize your inbound marketing strategy to generate more, qualified leads. This customer relationship management
software provides a platform where companies can organize, automate, and keep track of every interaction and
activity that happens within a company.
Benefits of using HubSpot
- Lead & Contact Conversation Tracking
- Live Chat & Chatbot Workflows
- Visible to all the members of the team
- Customer Satisfaction Surveys
- Provides an interface to use as a Content Management System
As APPSeCONNECT is a Business Process Automation tool, this will allow you to develop and configure seamless integration between business applications.
Therefore, application configuration is a fundamental activity prior to the process of integration. If your chosen application is
HubSpot, credentials need to be provided for validating the agent both in case of OP and Cloud. Here you will find the detailed description on
how to configure the agents for the application HubSpot, troubleshooting issues, action and its filters.
Pre-requisites for HubSpot Configuration
1) Create a developer account with HubSpot by providing necessary credentials.
2) Create an app in HubSpot.
3) You need to know the Authentication and APIs of the application.
On-Premise Agent Configuration
Installation of On-Premise Agent
You need to install the agent on your local server. To Know about On-Premise Agent Configuration, Click here.
Configure the HubSpot Application in OP Agent
1) Create a processflow with HubSpot as source or destination application, and deploy the processflow in On-Premise agent.
2) Open the agent and click the checkbox in Settings Panel.
3) Move into the App Configurational Panel of the agent and configure the details of the respective application.
Steps to Configure the credentials in OP Agent
1) Open the OP Agent by providing correct login credentials.
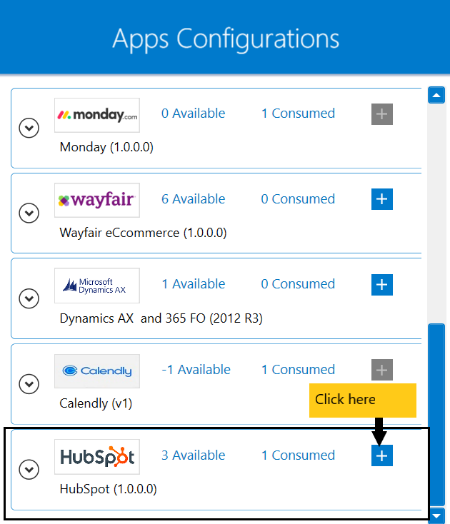
2) In the App Configurations panel of the agent, click on the + button, beside the HubSpot application.
The credential panel opens for the application HubSpot.
3) Enter Base URL, Auth Url, Access Token Url, Client ID, Client Secret, Redirect Url and Scope.
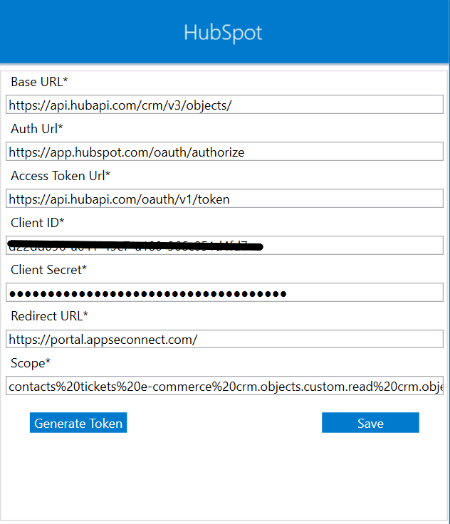
4) After providing all the required details in the specified fields, click on Save.
A message Connection saved successfully will be shown. On clicking Generate Token button, you will be
redirected to the login page of the application. Login with valid credentials and a token will be generated
through which the request made to the application will be authenticated.
Cloud Agent Configuration
Configure the HubSpot Application in Cloud Agent
1) Login to APPSeCONNECT portal with valid credentials.
2) Navigate to Manage > App. Expand the hubspot application and click on Credential.
3) Expand the REST node, click on Add New Credential.
4) Provide the necessary information Base URL, Auth Url, Access Token Url, Client ID, Client Secret, Redirect Url and Scope.
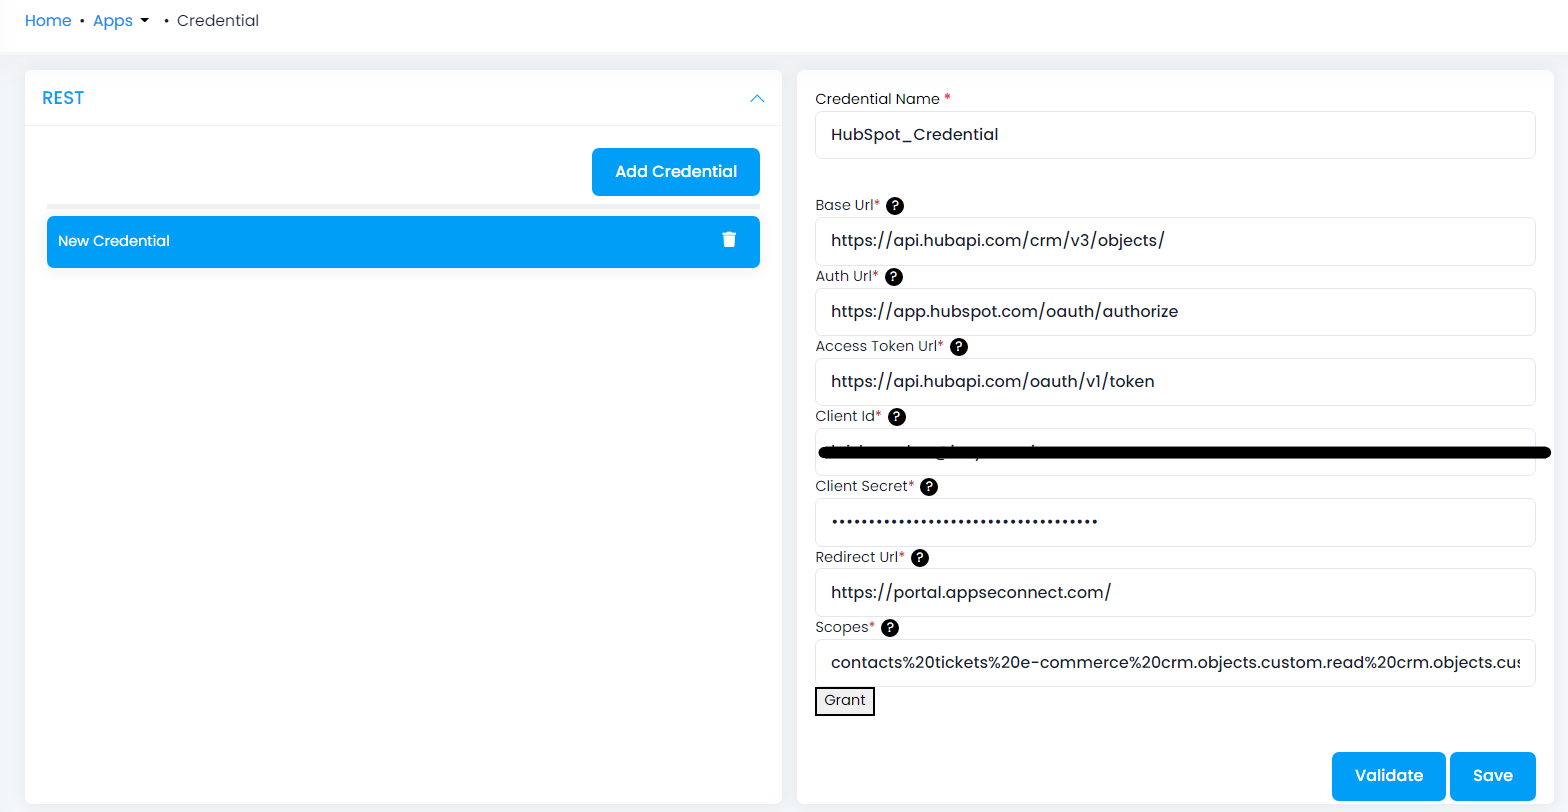
5) After providing all the required details in the specified fields, click on Save.
A message Connection saved successfully will be shown. On clicking Grant button, you will be
redirected to the login page of the application. Login with valid credentials and a token will be generated
through which the request made to the application will be authenticated.
How to get Client ID and Client Secret?
1) Login to HubSpot with valid credentials. You will be directed to the home page.
2) On clicking Apps on the menu bar, you will be provided with a list of existing Apps.
3) Open any App as per your requirement. On clicking Auth, you will be able to view Client ID and Client Secret.
Troubleshooting
ISSUE 1
You need to create an app inside HubSpot developer account before validating the credential in the agent.
ISSUE 2
While validating the credentials in the agent, sometimes the validation fails due to improper Client ID and Client Secret.
Check the credentials once again of the application that you are selecting and re-Validate the credentials.
Attributes and Actions
While defining a connection to an API in hubspot, you require clear understanding about the data requirements and endpoint configurations. You can refer to this document to find all the endpoint details of your hubspot application. To define the endpoint in APPSeCONNECT, you need to define Schemas and Actions. Actions are specifically targeted for an endpoint while schema is the data needed to execute the API. Here is the list of some of the pre-packaged API actions defined for you which you can easily plug and play while doing your integration.
| Endpoint | Action Name | Action Type | Schema | UI Help | API Path |
|---|---|---|---|---|---|
| Companies | POST | GET | companies/search | Company records store information about a business or organization allowing you to manage this data and sync it between HubSpot and other systems. | Retrieves company information. |
| Products | POST | POST | products | Create a new product. | Product |
| Deals | POST | GET | This will fetch sales order as deals. | Retrives sales order. | Sales Order |
| Contact | POST | POST | companies/search | Create a new contact in HubSpot. | Contact |
Action Filter Implementation
Data is fetched from source application using APIs, and as you are aware of, API provides filters
which will allow you to specify a subset of data from the whole bunch of data created in the application,
the same can be specified through Actions and Action filters. The Action generally defines the
endpoint of the application which is being fetched, while the filters define the search criteria
of the data. You can add parameters in the action filter to define the search criteria.
- General filters : It represents the overall filter criteria of the API. To define such filters, you do not need to specify anything special, just putting the field name and the value with the condition type is fine.
Let us consider any API of HubSpot such as company, the request structure will look like :
{
  "companies": [
    {
      "portalId": 62515,
      "additionalDomains": [

      ],
      "properties": {
        "website": {
          "sourceId": null,
          "timestamp": 1457513066540,
          "versions": [
            {
              "timestamp": 1457513066540,
              "sourceVid": [

              ],
              "name": "website",
              "value": "example.com",
              "source": "COMPANIES"
            }
          ],
          "value": "example.com",
          "source": "COMPANIES"
        },
        "name": {
          "sourceId": "name",
          "timestamp": 1464484587592,
          "versions": [
            {
              "name": "name",
              "sourceId": "name",
              "timestamp": 1464484587592,
              "value": "Example Company",
              "source": "BIDEN",
              "sourceVid": [

              ]
            }
          ],
          "value": "Example Company",
          "source": "BIDEN"
        }
      },
      "isDeleted": false,
      "companyId": 115200636
    },
    {
      "portalId": 62515,
      "additionalDomains": [

      ],
      "properties": {
        "website": {
          "sourceId": null,
          "timestamp": 1457535205549,
          "versions": [
            {
              "timestamp": 1457535205549,
              "sourceVid": [

              ],
              "name": "website",
              "value": "test.com",
              "source": "COMPANIES"
            }
          ],
          "value": "test.com",
          "source": "COMPANIES"
        },
        "name": {
          "sourceId": "name",
          "timestamp": 1468832771769,
          "versions": [
            {
              "name": "name",
              "sourceId": "name",
              "timestamp": 1468832771769,
              "value": "Test Company",
              "source": "BIDEN",
              "sourceVid": [

              ]
            }
          ],
          "value": "Test Company",
          "source": "BIDEN"
        }
      },
      "isDeleted": false,
      "companyId": 115279791
    }
  ],
  "has-more": true,
  "offset": 115279791
}
Suppose, you need to fetch several company details created before current date with name, email, phone, address,
city and country from HubSpot. In case of fetching data from any API of HubSpot, you need to use
filters and sorts as key in the action filter. However, the value field remains empty for each of the cases.
Under filters, you need to mention the filtering condition as child condition by which request made to the API fetchs the data from HubSpot.
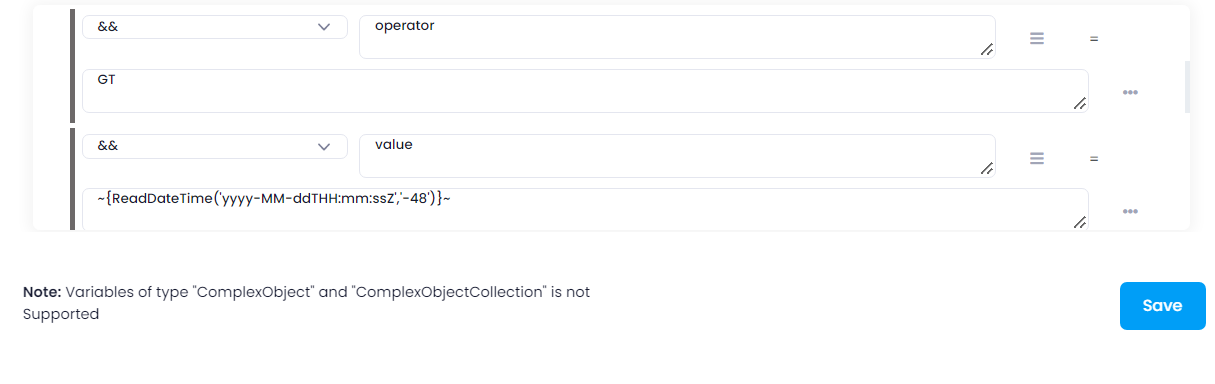
In this scenerio, we will be using createdate field as the filter condition. You need to use propertyName as the key and
any field from the json structure returned by the API as value; operator is used as the key and value field shall contain
any symbol depending on the date from which you need to fetch the data. The final parameter is value used as the key and
~{ReadDateTime('yyyy-MM-ddTHH:mm:ssZ','-48')}~ is used as the value.

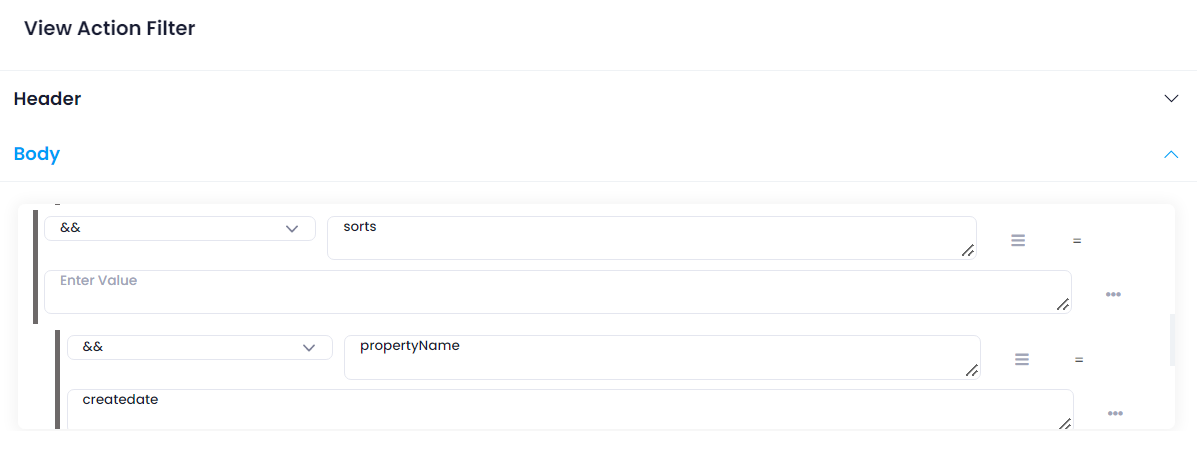
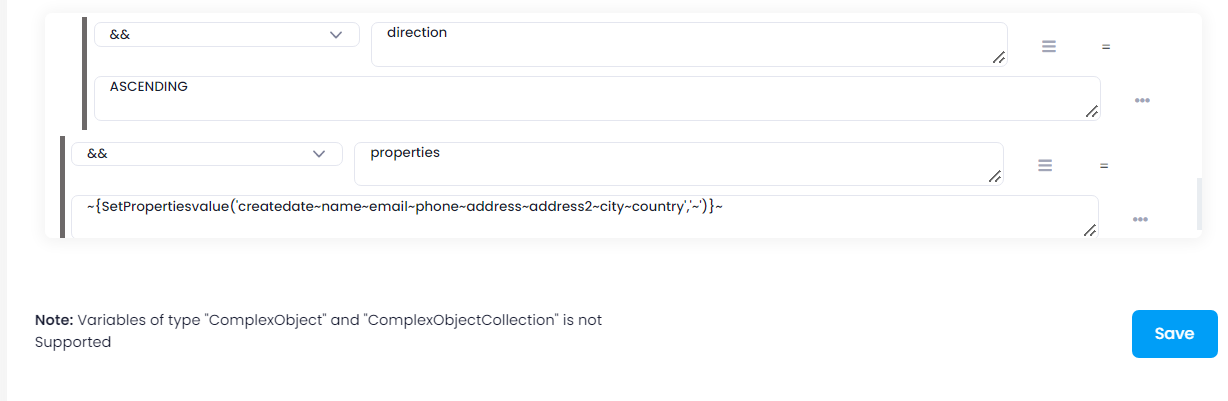
However, while retrieving the information from HubSpot you can specify the order. To mention the sorting order, use sorts
as the key with the value field remaining blank. Under sorts, mention the field name and sorting order as child condition.
Here, we have used propertyName as the key and createdate field as the value along with
dircetion and ASCENDING as key-value pair to mention the sorting direction. Use SetPropertiesvalue() to mention the
fields that would retrieved from corrosponding API of HubSpot.
Use properties and ~{SetPropertiesvalue('createdate~name~email~phone~address~address2~city~country','~')}~ as key-value pair.