
Salesforce
Updated:
Application configuration is an integral activity prior to the process of integration. If your chosen application is Salesforce, credentials need to be provided for validating the agent. Here you will find the detailed description on how to configure the agents for the application Salesforce, Troubleshooting issues along with attributes and action filters.
Salesforce is a REST Application which supports OAUTH 2.0 authentication. The adapter of the application Salesforce provides the leverage to communicate and adapt with the AEC Portal. This section provides you the detailed process of validating the credential of the application Salesforce.
Pre-requisites for Salesforce Configuration
- Create an account in Salesforce and Login into it.
- Username, Password, Call Back URL, Consumer Secret, Consumer key, Security Layer, Login URL and Version to access the application.
- Click here to know the APIs of the application.
Steps to generate the pre-requisites
-
Navigate to salesforce developer sign up page. Fill up the details and click on Sign me Up. An email containing the
Usernameand the link to activate the account will be available in the mail id provided during the registration process. Click on the link to activate the account. -
To Validate the adapter for Salesforce you will need the Consumer Secret and Consumer Key. To generate these credentials, login to the Salesforce Application. This will take you to the default home page.
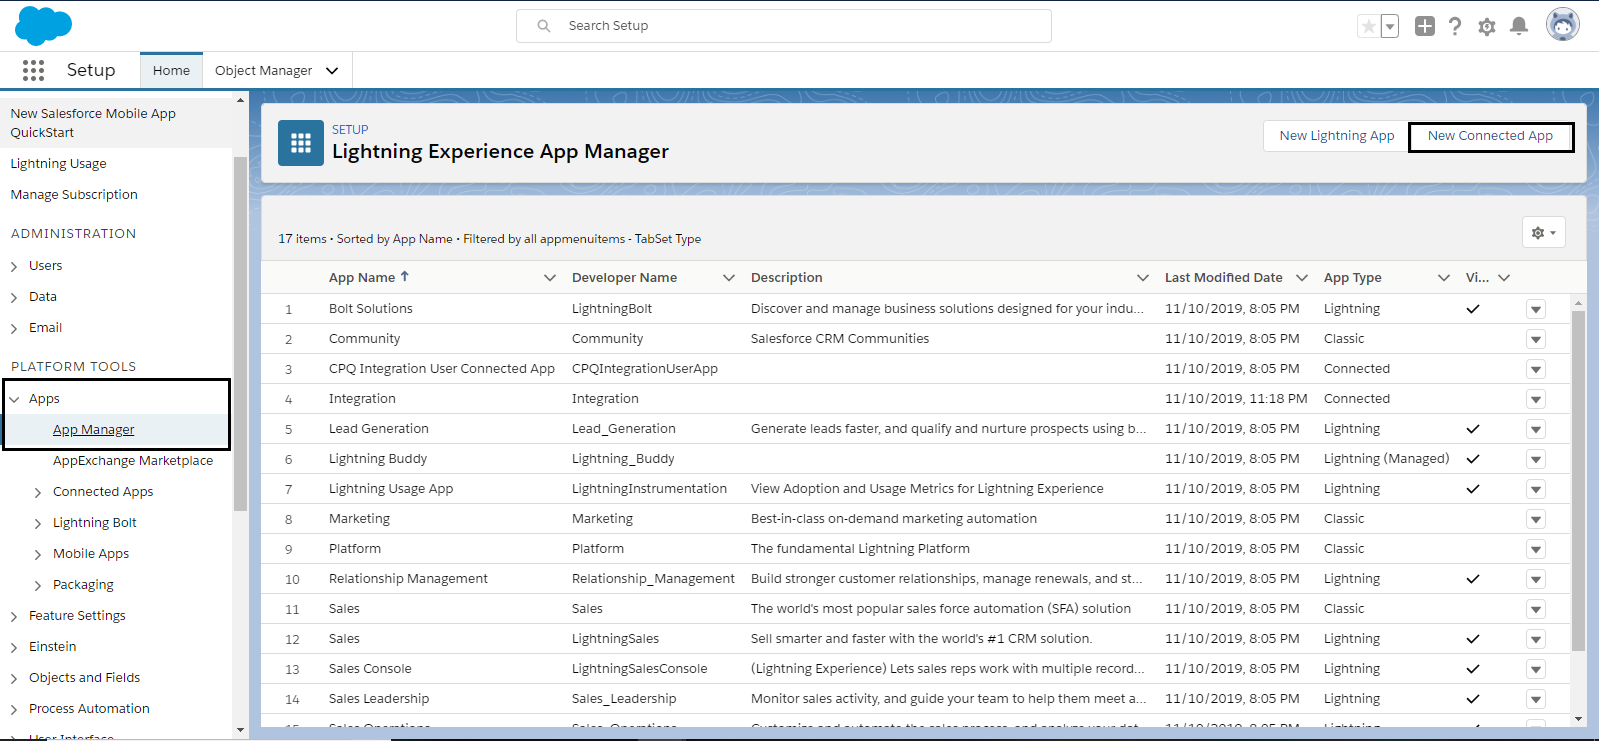
- In the Home page of Salesforce, navigate to Setup Module.

- Click the Setup icon from the drop-down list. Navigate to
Apps > App Manager. - Now, you can view the APP Manager page. Click New Connected App button.
- Enter name of your application, API Name, Contact email information, as well as any other information appropriate for your application and click on the checkbox
Enable Oauth Settings.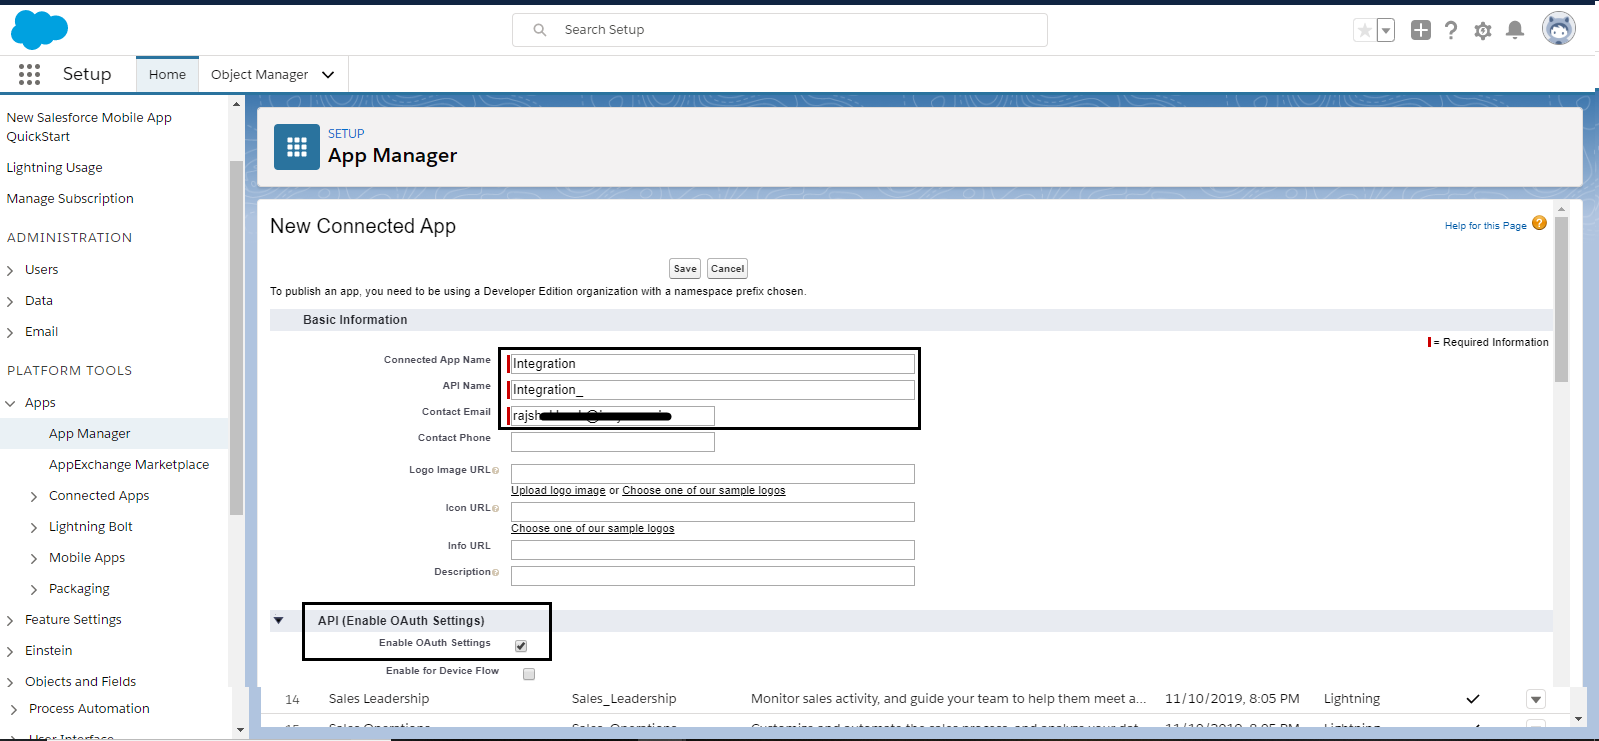
- Enable the checkbox
Enable for Device Flow, the callback URL will automaticaly be generated and select the OAuth scope as Full Access for complete access. User can select the desired scopes as these scopes refer to permissions given by the user running the connected app.Callback URL is the URL that a user browser is redirected to after successful authentication. As this URL is used for some OAuth flows to pass an access token, the URL must use secure HTTP (HTTPS) or a custom URI scheme.
- Provide the details, click on SAVE button and a window will appear showing you the APP details. You need to click on
Manage Consumer Detailsto generate theConsumer KeyandConsumer Secret.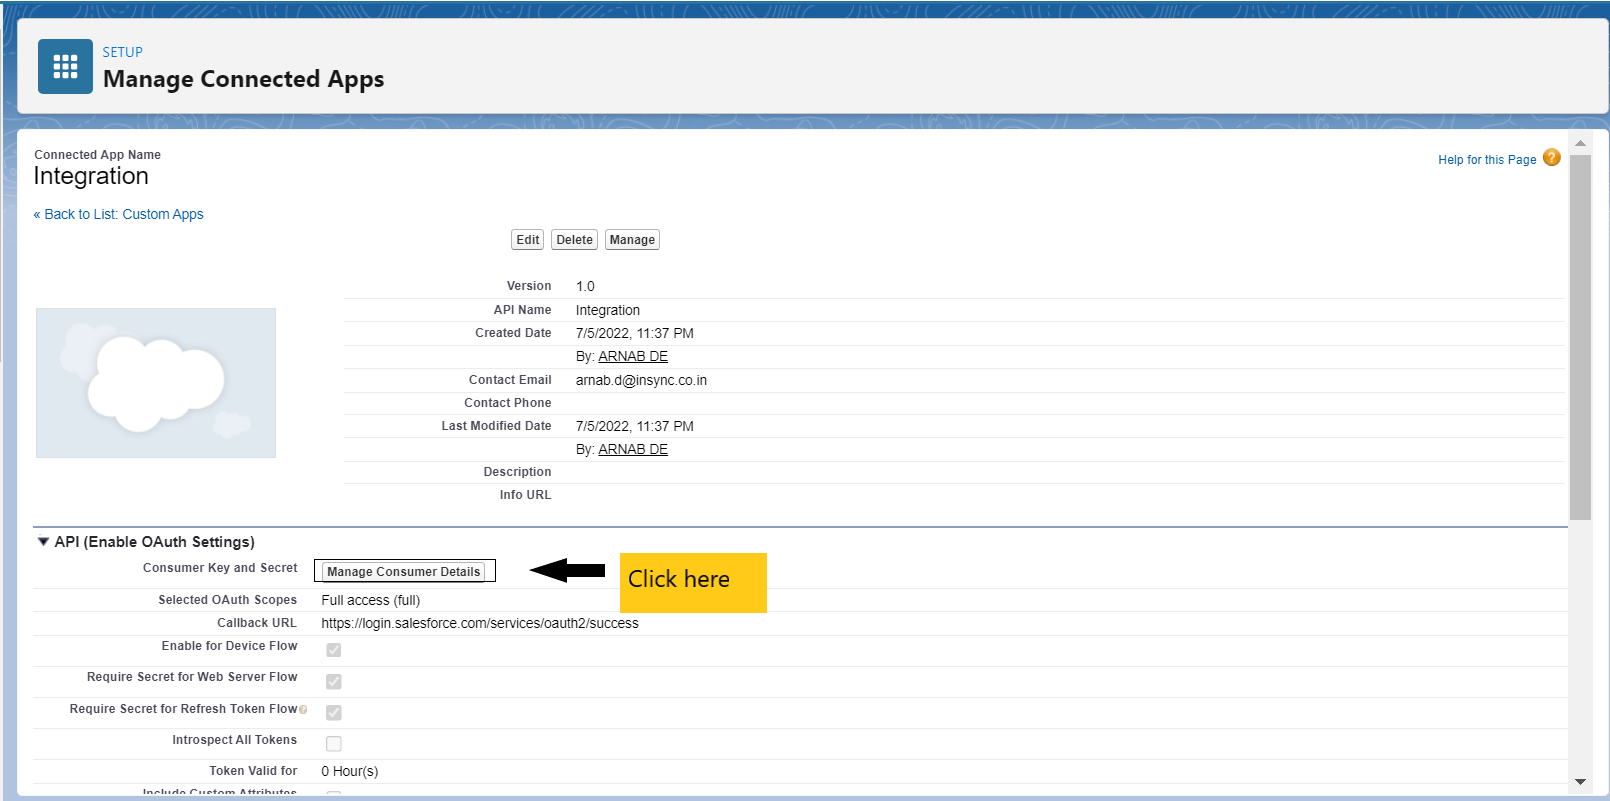 Note : It takes 15-20 mins to reflect the Oauth 2.0 settings in the Salesforce portal. Once it reflects, you can copy the generated credentials for validation process.
- On the Profile icon, click settings button to generate the Security Token.
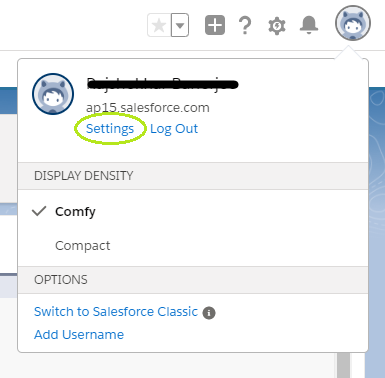
- From the
My Personal Informationdropdown, Click on Reset My Security Token.
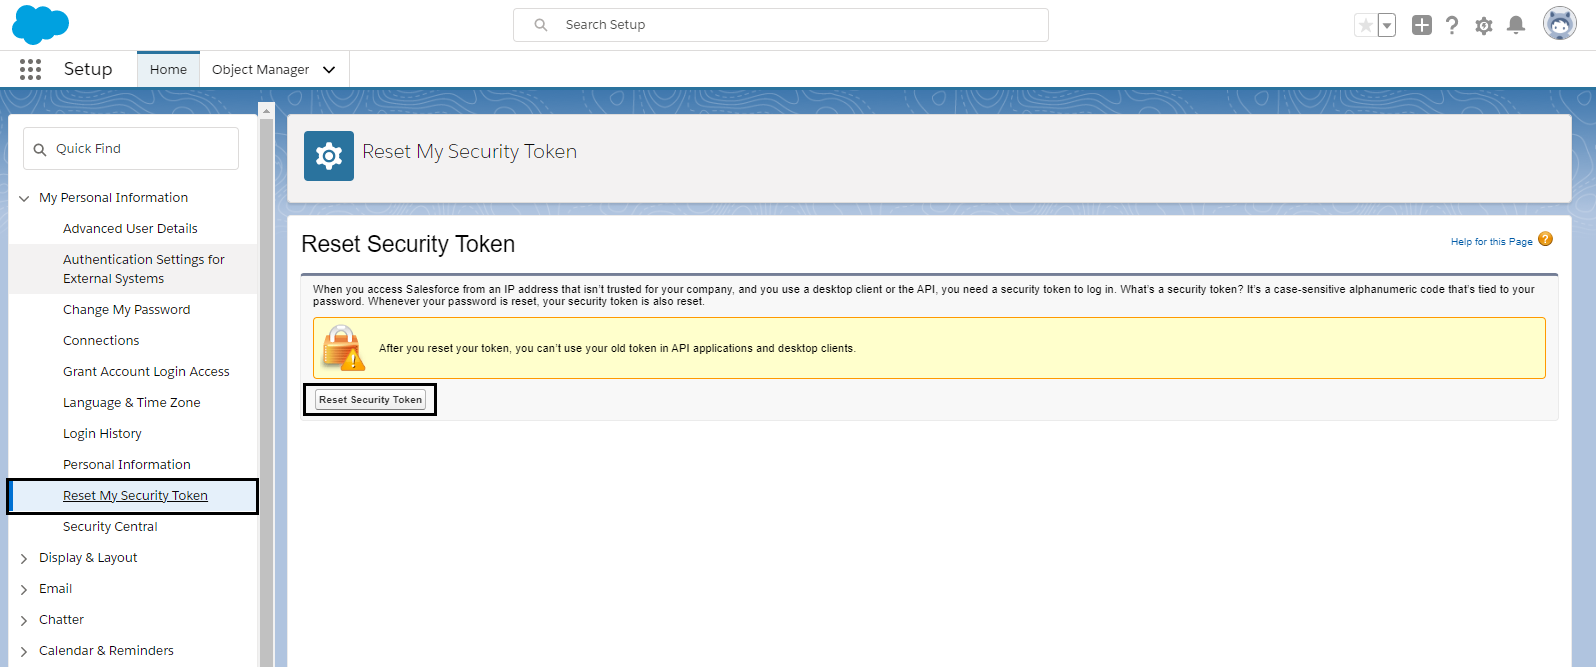
Note : The Security Token would be sent to the Email that was provided while creating the Salesforce Account.
On-Premise Agent Configuration
Installation of On-Premise Agent
You need to install the agent on your local server. To Know about On-Premise Agent Configuration, Click here.
Configure the Salesforce Application in OP Agent
- Create and Deploy ProcessFlows in the cloud portal.
- Open the agent and click the checkbox in Settings Panel.
- Move into the App Configurational Panel of the agent and configure the details of the respective application.
Steps to Configure Salesforce Application in OP Agent
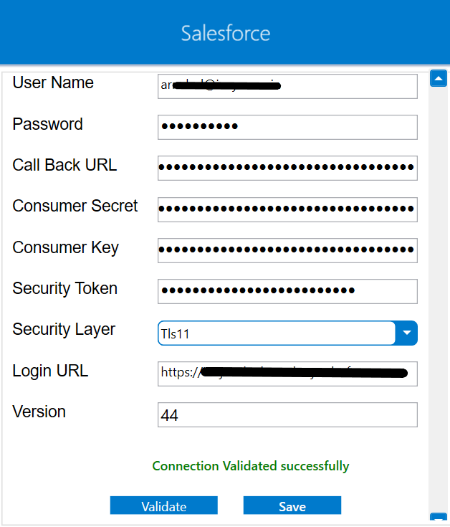
- In the App Configurations panel of the agent, click on the + button, beside the app Salesforce. The credential panel opens for the application Salesforce.
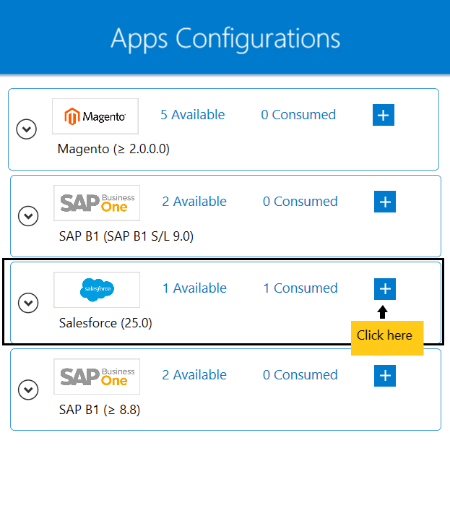
- Enter all the generated credentials in the OP Agent for the validation process. Click on Validate Button. A success message will be displayed if the credentials are validated properly. Finally, click on
SAVE.
Following this process, the Salesforce application can be configured in the OP agent.
Cloud Agent Configuration
Configure the Salesforce Application in Cloud Agent
-
Login to
APPSeCONNECTportal with valid credentials. -
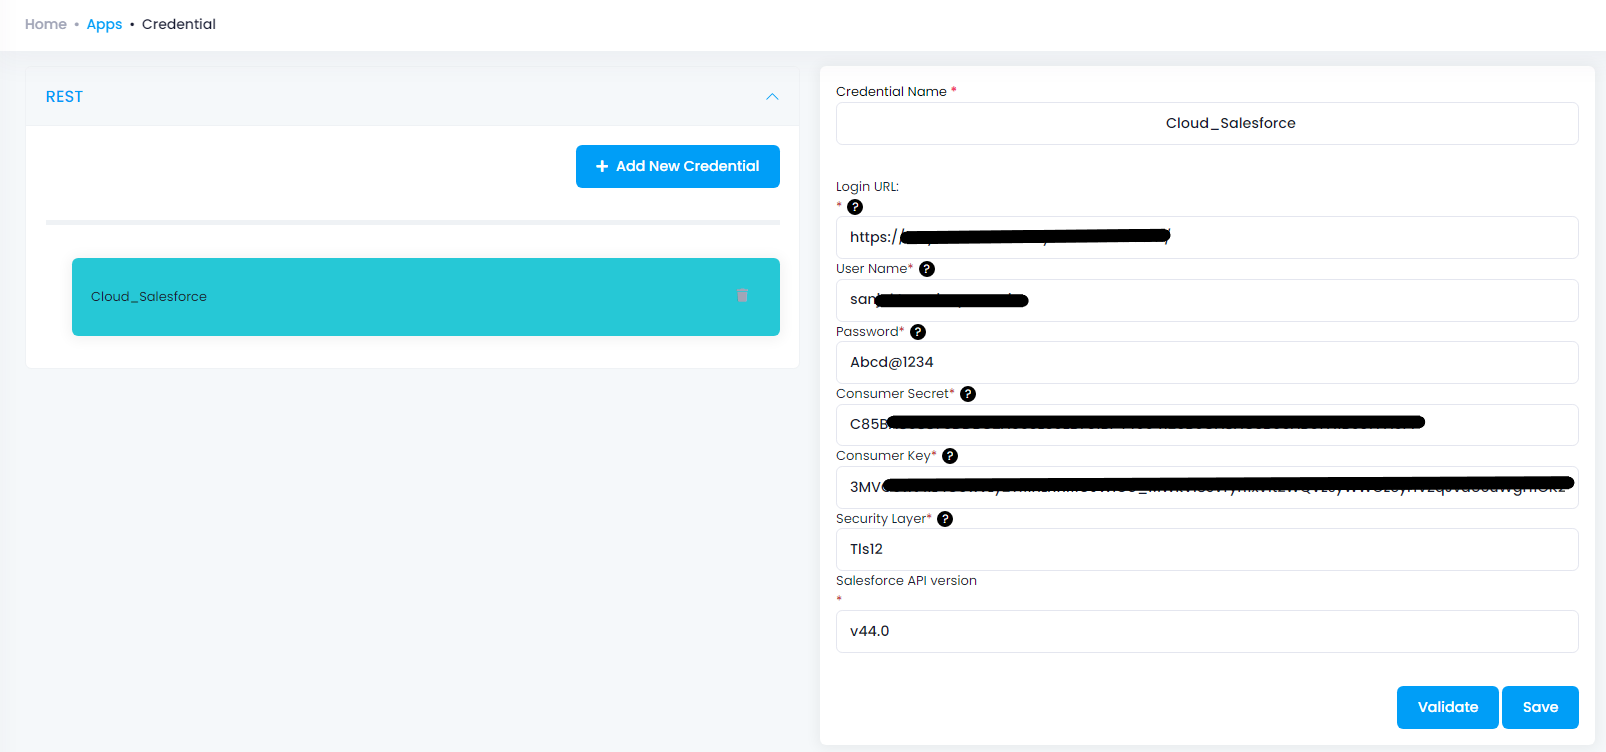
Navigate to Manage > App. Expand the Salesforce application and click on
Credential. -
Expand the
RESTnode, click onAdd New Credential. -
Provide the necessary information
Credential Name,Login URL,User Name,Password,Consumer Secret,Consumer Key,Security LayerandSalesforce API Version.
-
Click on Save and a toaster message will be displayed confirming the same.
Troubleshooting
ISSUE 1 : Source Application Data Not Found even if Data is present is the Source Application.
Some of the basic troubleshooting issue happens due to improper validations. In this case, check for the proper validations of the credential for the source application adapter. Also, try deleting the Temp and Cache files from the portal and the system, and try validating the adapter again. Once validated, re-deploy and execute the processflow for its successful execution.
For E.g. If the Source Application Data Not Found in the log file appears, the probable cause is due to the presence of the Temp and Cache Files.
Note : Integration between SAP B1 and Salesforce requires UDT & UDF creations
Attributes and Actions
While defining a connection to an API in Salesforce, you require clear understanding about the data requirements and endpoint configurations. You can refer to this document to find all the endpoint details of your Salesforce installation. To define the endpoint in APPSeCONNECT, you need to define Schemas and Actions. Actions are specifically targeted for an endpoint while schema is the data needed to execute the API. Here is the list of some of the pre-packaged API actions defined for you which you can easily plug and play while doing your integration.
Salesforce has a generic API Document and Authentication following the CRUD type REST API protocols.
| Endpoint | Action | Action Type | Schema | UI Help | API Path |
|---|---|---|---|---|---|
| Account | /query | GET | Account | This will fetch individual customers from the application. | Account |
| Product2 | /query | GET | Product2 | This will fetch product details. | Product |
| Contact | /query | GET | Contact | This will provide you to fetch contacts. | Contact |
| order | /query | GET | order | This will retrieve order that are currently available in salesforce. | Fetching sales orders from Salesforce |
| Pricebook2 | /query | GET | Pricebook2 | This will fetch the pricebooks added in the sales force application. | Pricebook2 |
| Account | PATCH | Patch | Account | This will update the account details in salesforce. | Account |
Action Filter Implementation
Data is fetched from source application using APIs, and as you are aware of, API provides filters
which will allow you to specify a subset of data from the whole bunch of data created in the server,
the same can be specified through Actions and Action filters. The Action generally defines the
endpoint of the application which is being fetched, while the filters define the search criteria
of the data. You can add these parameters in the action filter to define the search criteria.
Let us consider that any user creates several orders in the salesforce application. If you look at the API of the sales force application, such as order
{
    "attributes": {
        "type": "Order",
        "url": "/services/data/v49.0/sobjects/Order/8015i000000xJ0aAAE"
    },
    "Id": "8015i000000xJ0aAAE",
    "OwnerId": "0055i000003qnthAAA",
    "ContractId": "8005i000000LToBAAW",
    "AccountId": "0015i00000BePW9AAN",
    "Pricebook2Id": null,
    "OriginalOrderId": null,
    "EffectiveDate": "2022-07-07",
    "EndDate": null,
    "IsReductionOrder": false,
    "Status": "Draft",
    "Description": null,
    "CustomerAuthorizedById": null,
    "CustomerAuthorizedDate": null,
    "CompanyAuthorizedById": null,
    "CompanyAuthorizedDate": null,
    "Type": null,
    "BillingStreet": null,
    "BillingCity": null,
    "BillingState": null,
    "BillingPostalCode": null,
    "BillingCountry": null,
    "BillingLatitude": null,
    "BillingLongitude": null,
    "BillingGeocodeAccuracy": null,
    "BillingAddress": null,
    "ShippingStreet": null,
    "ShippingCity": null,
    "ShippingState": null,
    "ShippingPostalCode": null,
    "ShippingCountry": null,
    "ShippingLatitude": null,
    "ShippingLongitude": null,
    "ShippingGeocodeAccuracy": null,
    "ShippingAddress": null,
    "Name": null,
    "PoDate": null,
    "PoNumber": null,
    "OrderReferenceNumber": null,
    "BillToContactId": null,
    "ShipToContactId": null,
    "ActivatedDate": null,
    "ActivatedById": null,
    "StatusCode": "Draft",
    "OrderNumber": "00000100",
    "TotalAmount": 0.0,
    "CreatedDate": "2022-07-07T08:00:32.000+0000",
    "CreatedById": "0055i000003qnthAAA",
    "LastModifiedDate": "2022-07-07T08:00:32.000+0000",
    "LastModifiedById": "0055i000003qnthAAA",
    "IsDeleted": false,
    "SystemModstamp": "2022-07-07T08:00:32.000+0000",
    "LastViewedDate": "2022-07-07T08:00:52.000+0000",
    "LastReferencedDate": "2022-07-07T08:00:52.000+0000"
}
To retrieve these orders from the application, use the following in the action filter. q in the key field and write the fields that needs to fetched in the value field in the form of query.
Since we are going to fetch Id and AccountId from the aplication whose account name is JD_Cosmo , so mention select+Id+,+AccountId+from+Order+where+AccountName+=+JD_Cosmo
in the value field. Similarly, in case of fetching records from other APIs write the select query in the value field.

- Use
select+Id+,+Name+,+AccountNumber+,+CreatedDate+from+Accountto fetch Id, Name, Account Number and date of creation from the account created. - Use
select+Id+,+Name+,+ProductCode+,+CreatedDate+from+Product2to fetch Id, Name, ProductCode and CreatedDate attributes of the product created.

