WooCommerce
Updated:
Application configuration is an integral activity prior to the process of integration. If your chosen application is WooCommerce, credentials need to be provided for validating the agent. Here you will find the detailed description on how to configure the agents for the application of WooCommerce, Troubleshooting issues and the attributes and actions.
WooCommerce is a REST Application which supports both the BASIC & OAuth 1.0 authentication. The Adapter of the application WooCommerce provides the leverage to communicate and adapt with the AEC Portal. This section provides you the detailed process of validating the credential of the application WooCommerce.
Pre-requisites for WooCommerce Configuration
- Create an account in
WooCommerceand Login into it. - As
WooCommerceis a cloud-based application, therefore it can be accessed through URL. The Base URL is your -http://templatebar.com/dev/wordpress1/wp-admin. - Username and Password to access the application.
On-Premise Agent Configuration
Installation of On-Premise Agent
You need to install the agent on your local server. To Know about On-Premise Agent Configuration, Click here.
Configuring the WooCommerce Application in On-Premise Agent
- Open the agent and click the checkbox in Settings Panel.
- Create and Deploy ProcessFlows in the cloud portal.
- Move into the App Configurational Panel of the agent and configure the details of the respective application.
Steps to Configure WooCommerce Credential in OP Agent
- The Base URL Endpoint has 2 options in the drop-down.
a. /wp-json/wc/ - This is the newer version of the WooCommerce that support the WordPress platform for WooCommerce.
The version for this WooCommerce version should be >=2.6
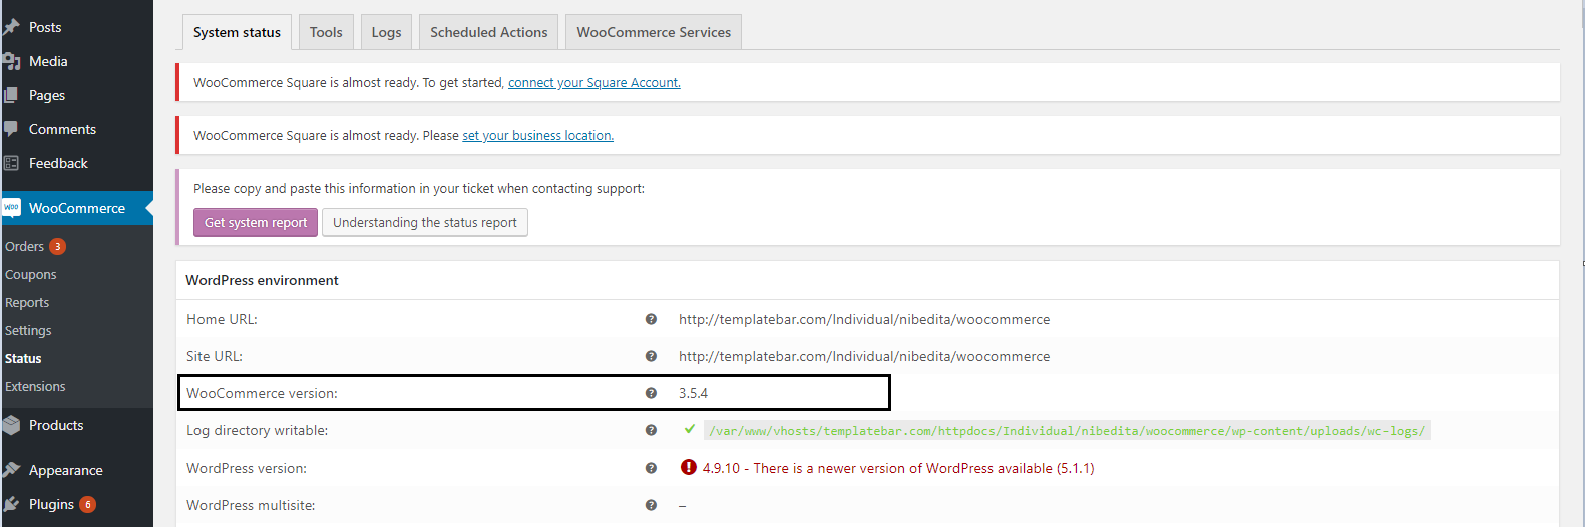
b. /wc-api/ - This endpoint is for the older version of the WooCommerce platform. If the user platform is based on the older version, this end point is needed to be selected for agent validation. The version for this WooCommerce version should be <2.6 - The API Version is the WooCommerce API Version. The user can have its WooCommerce Version by navigating to WooCommerce > Status > WooCommerce Version.
 Note : For more details about WC API versions, click here
- The check-box fields are the HTTP Headers that needs to be enabled if the http headers are required.
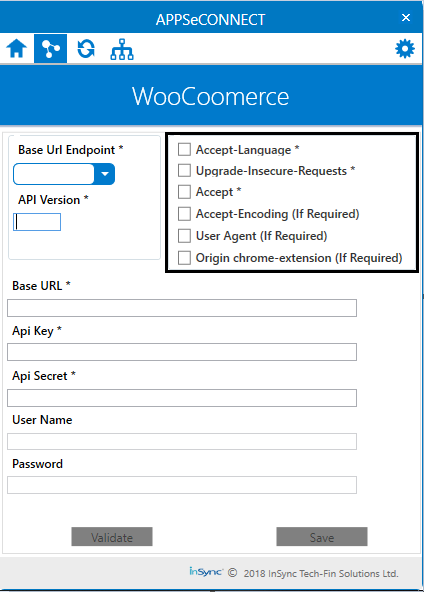
- The Base URL is the WooCommerce Base URL. For Ex:http://templatebar.com/Individual/abcd/woocommerce
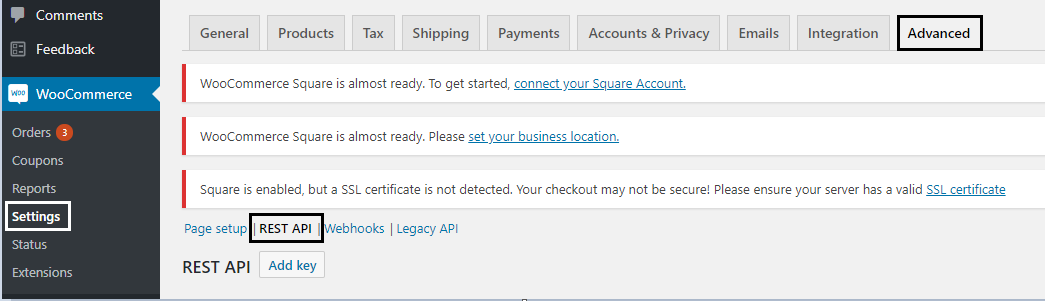
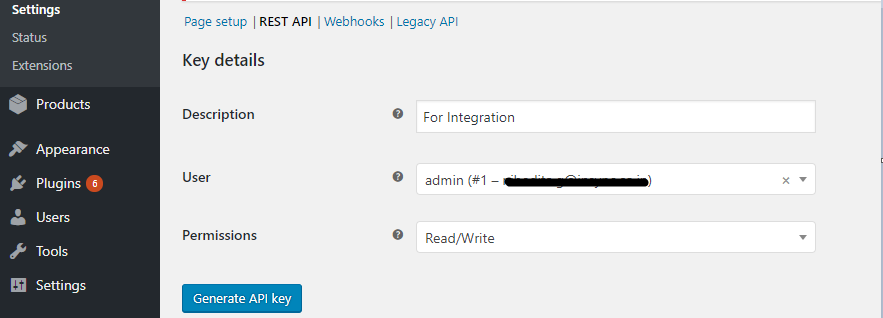
Note : If the URL has HTTP, the authentication OAuth 1.0 is supported and if the URL has HTTPS, the BASIC Authentication is supported. For both authentication process, the User Interface remains the same. - The API Key and the API Secret is generated from the WooCommerce platform. Navigate to WooCommerce > Settings > Advanced > REST API > ADD Key
- Provide the details in the field provided in the WooCommerce platform and click on the Generate API Key Button.
a. Description : This is the field for API Description.
b. User : This field is for specifying the User Type. The user should be as ADMIN
c. Permissions : This is a drop-down field; the permission should be selected as Read/Write for providing the permission for GET and CREATE operations.
- Input the generated API Key and the API Secret in the Agent.
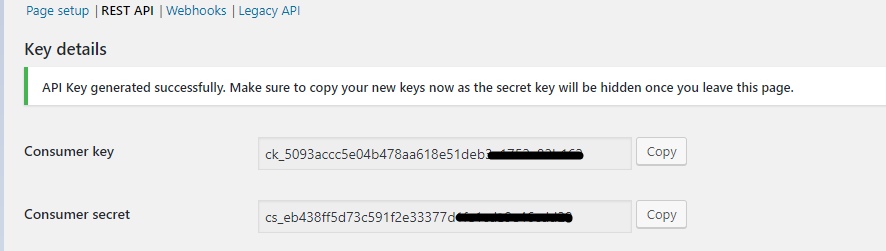
Note : The Consumer Key is the API Key and the Consumer Secret is the API Secret. - In the App Configuration panel of the agent, click on the + button, beside the app WooCommerce.
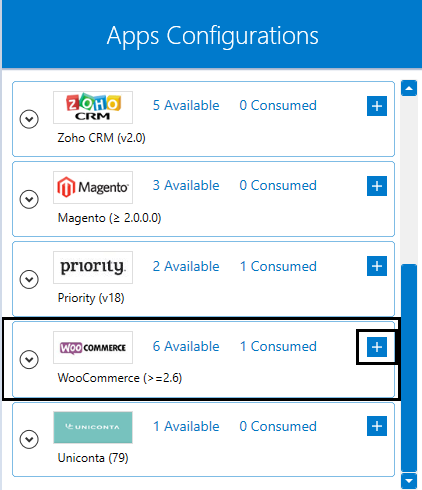
- On clicking the + button, the credential panel opens for the application WooCommerce.
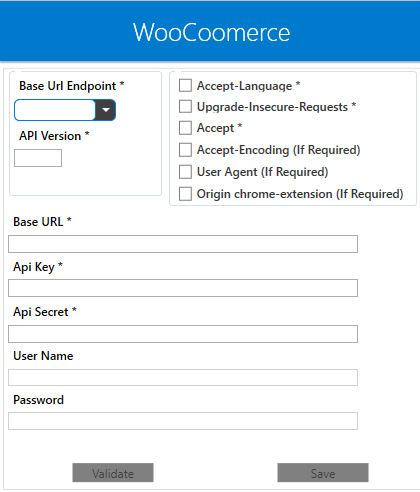
- Input the WooCommerce Username and Password in the Agent and click on the Validate and SAVE button.

Following these steps, ends the process for validating agent for the application WooCommerce.
Cloud Agent Configuration
Configuring the WooCommerce Application in Cloud Agent
-
Login to
APPSeCONNECTportal with valid credentials. -
Navigate to Manage > App. Expand the
WooCommerceapplication and click onCredential. -
Expand the
RESTnode, click onAdd New Credential. -
Provide the necessary information
Credential Name,Base Url Endpoint,API Version,Base Url,API Key,API Secret,UsernameandPassword.
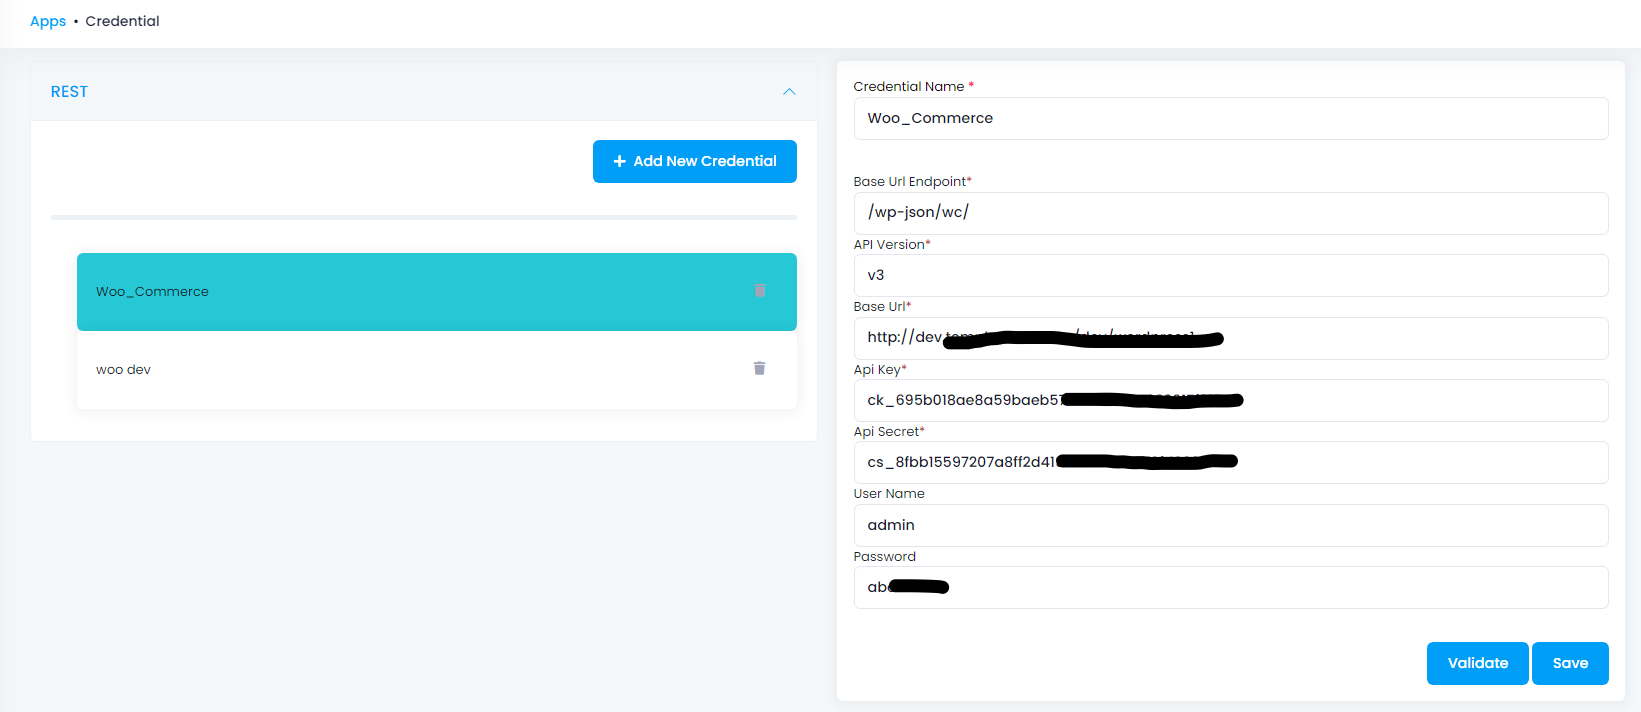
-
Click on Save and a toaster message will be displayed confirming the same.
Troubleshooting
ISSUE 1 : If the Source Application Not Found
Some of the basic issue in processflow happens due to improper validations or even if it is accurately validated, this basic issue resolves after removing the Temp and Cache files from the portal and from your system. Therefore, after clearing all this re-deploy and execute the processflow on the agent. For E.g. If the Source Application Not Found in the log file appears, the probable cause is due to the presence of the Temp and Cache Files.
ISSUE 2 : Plugin Installation Issue
On executing Customer Add processflow from WooCommerce to any destination application, it is noted that only first 10 customers created, successfully synced, but it fails or shows no result for rest of the customers. This is due to the plugin that might not have been installed.
Note : It is the feature in WooCommerce that without the AEC plugin, more than 10 customers will not sync.
Attributes and Actions
While defining a connection to an API endpoint in WooCommerce, you require clear understanding about the data requirements and endpoint configurations. You can refer to this document to find all the endpoint details of your WooCommerce installation.
To define the endpoint in APPSeCONNECT, you need Actions and Entities. Actions are specifically targeted for an endpoint while schema is the data needed to execute the API. Here, is the list of some of the pre-packaged API actions defined for you which you can easily plug and play while doing your integrations.
| Endpoint | Action | Action Type | Schema | UI Path | API Path |
|---|---|---|---|---|---|
| customers | Customers | GET | Customers | Fetch customers from WooCommerce and post it to the destination Application | customers |
| orders | Orders | GET | Orders | Fetch the order from WooCommerce and post it to the destination Application | orders |
| orders | ORDERS | POST | Orders | Post Invoices to WooCommerce from any Source Application | orders |
| products/productid | Products | PUT | Products | Update Inventory in WooCommerce from Source Application | products/productid |
| products | Products | POST | Products | Post products in WooCommerce from any Source Application | products |
Protip: Customers and Orders can be created and placed from the Front-End also. For Placing orders from front end, visit the E-Commerce store and follow the generic steps for placing orders and creating customers. this one.
Action Filter Implementation
Data is fetched from source application using APIs, and as you are aware of, API provides filters which will allow you to specify a subset of data from the whole bunch of data created in the server, the same can be specified through Actions and Action filters. The Action is generally defined as the endpoint of the application which is being fetched, while the filters define the search criteria of the data.
1) In case of retrieving Business Partner from Woocommerce use the filters as provided below with && operator.
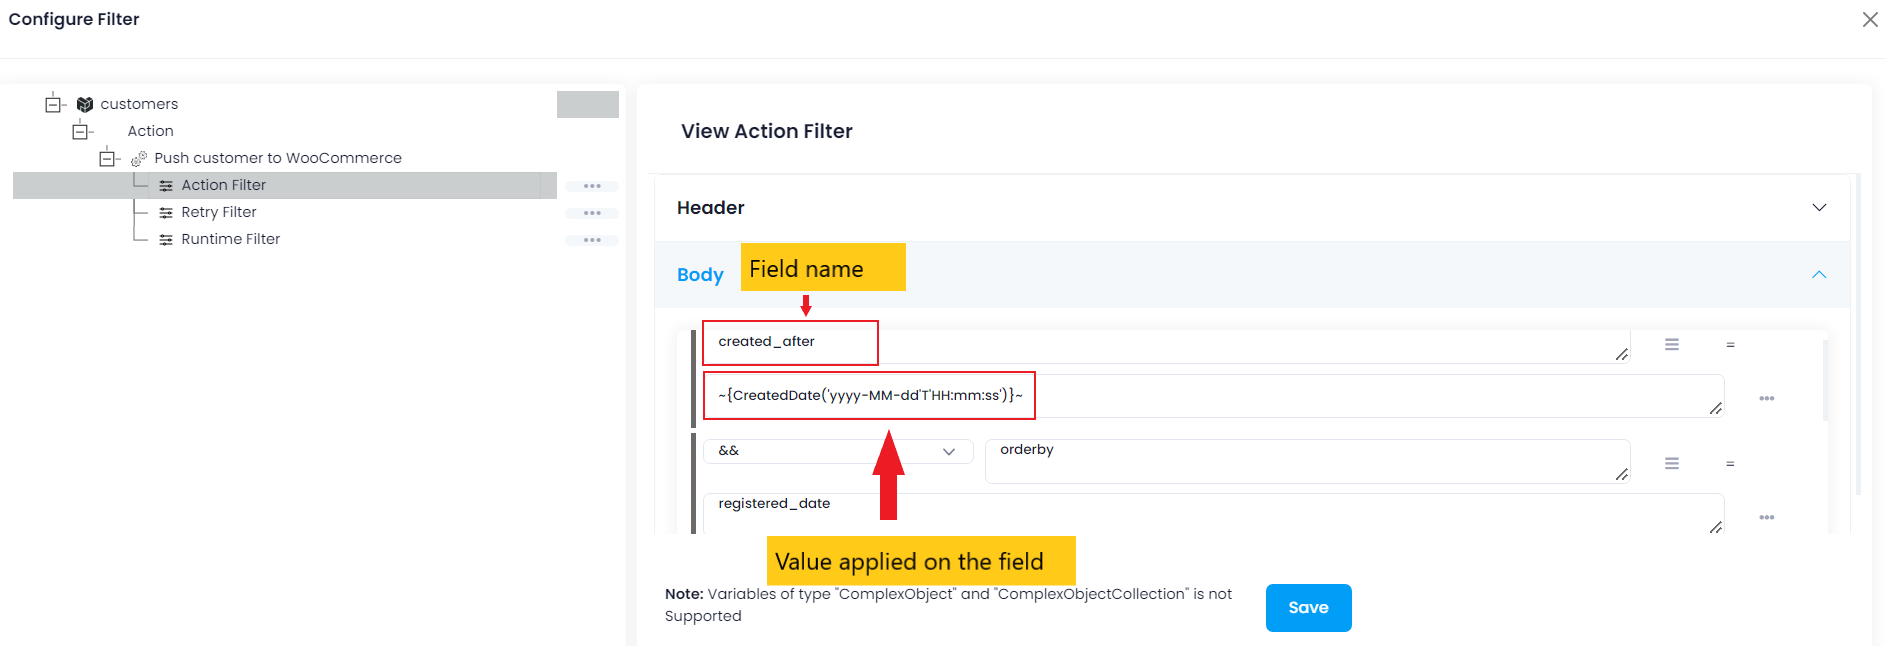
| Field Name | Filter |
|---|---|
| created_after | ~{CreatedDate(‘yyyy-MM-dd’T’HH:mm:ss’)}~ |
| orderby | registered_date |
| per_page | 50 |
| page | 1 |
| role | all |
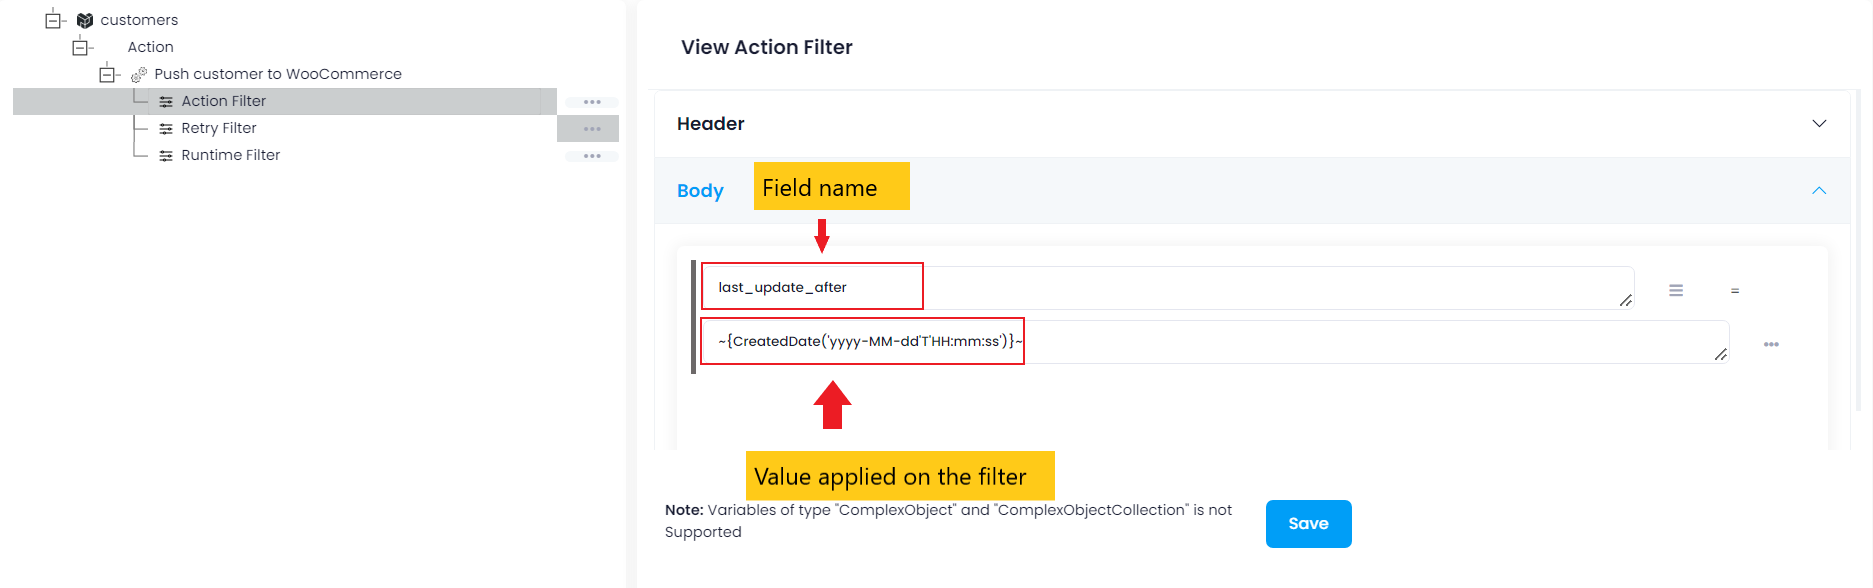
2) Use last_update_after as the key and ~{CreatedDate('yyyy-MM-dd'T'HH:mm:ss')}~ as its value, to fetch those business partners that have been updated as well as to fetch Sales Orderfrom the source application.
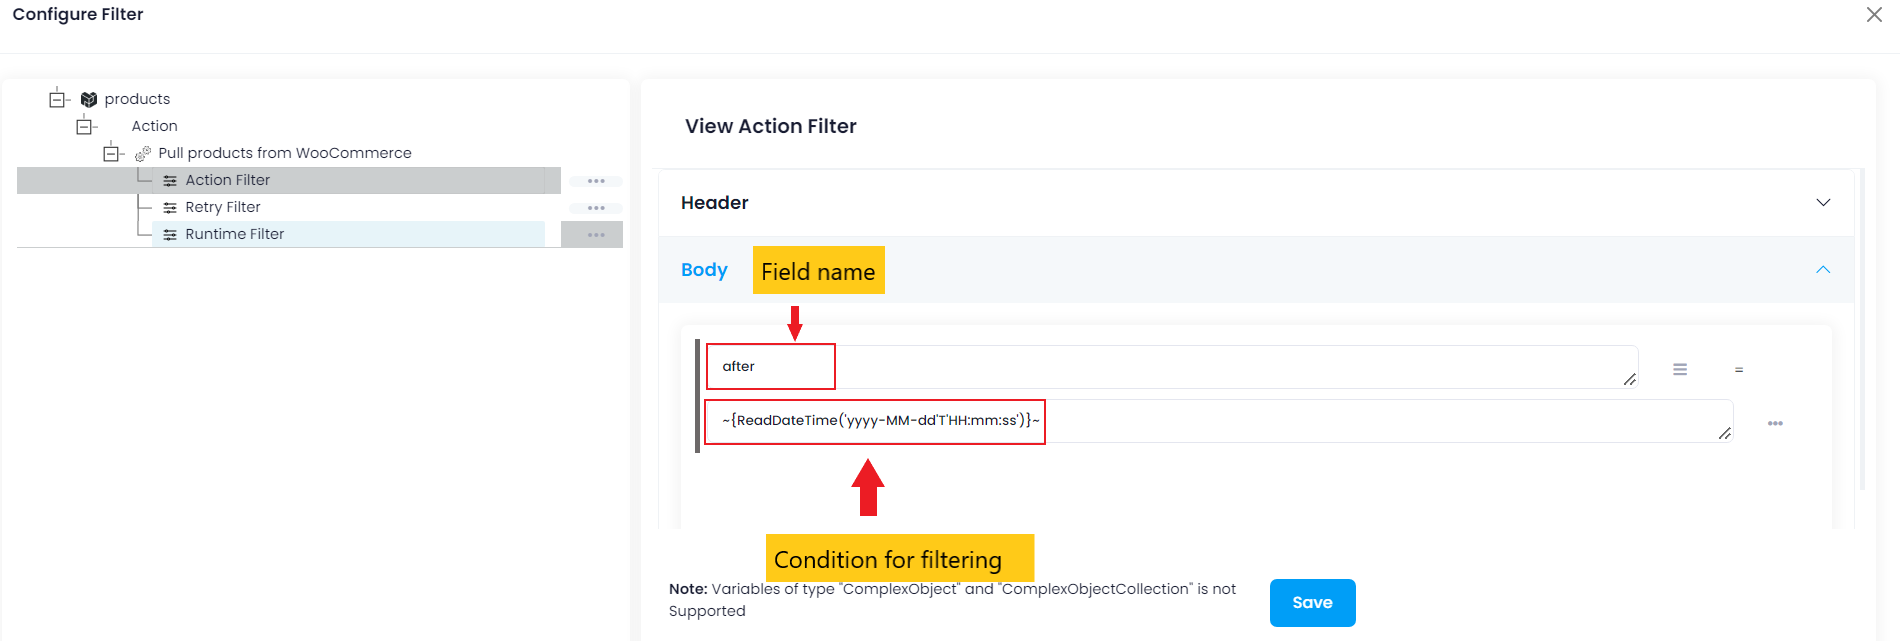
3) Use after as the key and ~{ReadDateTime('yyyy-MM-dd'T'HH:mm:ss')}~ as its value, to fetch Products from Woocommerce.