
Configurable Product Add Nav-Mage2 Multiconnection
Updated:
Executing the Process is a vital part when integrating any applications. This Document will let the users to understand how the integration process can be executed through workflow for adding Configurable Product from Ms Dynamics NAV to Magento2 (Multi-store).
Brief Description

In this integration scenario, multiple connections have been made for transformation of Configurable Products from Ms Dynamics NAV to Magento2 (along with multiple Magento websites from a single Magento admin).
As a pre-requisite, the user needs to create and sync the Simple Products first which you want to add as child items in your new configurable product. Click here, to know the process of creating simple products in MS Dynamics NAV.
- Login to the Ms Dynamics NAV Client and create a new item from the Items Page.
- Provide the details of the item say the Item No., Item description and the Unit of Measure.
- Input the details for multiple connections that can be selected from the drop down of the Web Product Details CP page
and select the
ConnectionName, ApplicationName, WebAttributeSetId, WebTaxClassIdand enable the checkbox forWebItemFlag. Also, select theWebProductTypeas Configurable from the dropdown. - Navigate to the Web ProductWebsites Page and select the
ConnectionName & the WebsiteIDfrom the Drop-down. - In the Web ProductAttribute Page select the `ConnectionName, AttributeID from the drop-down for the ConnectionName and the rest will be autopopulated.
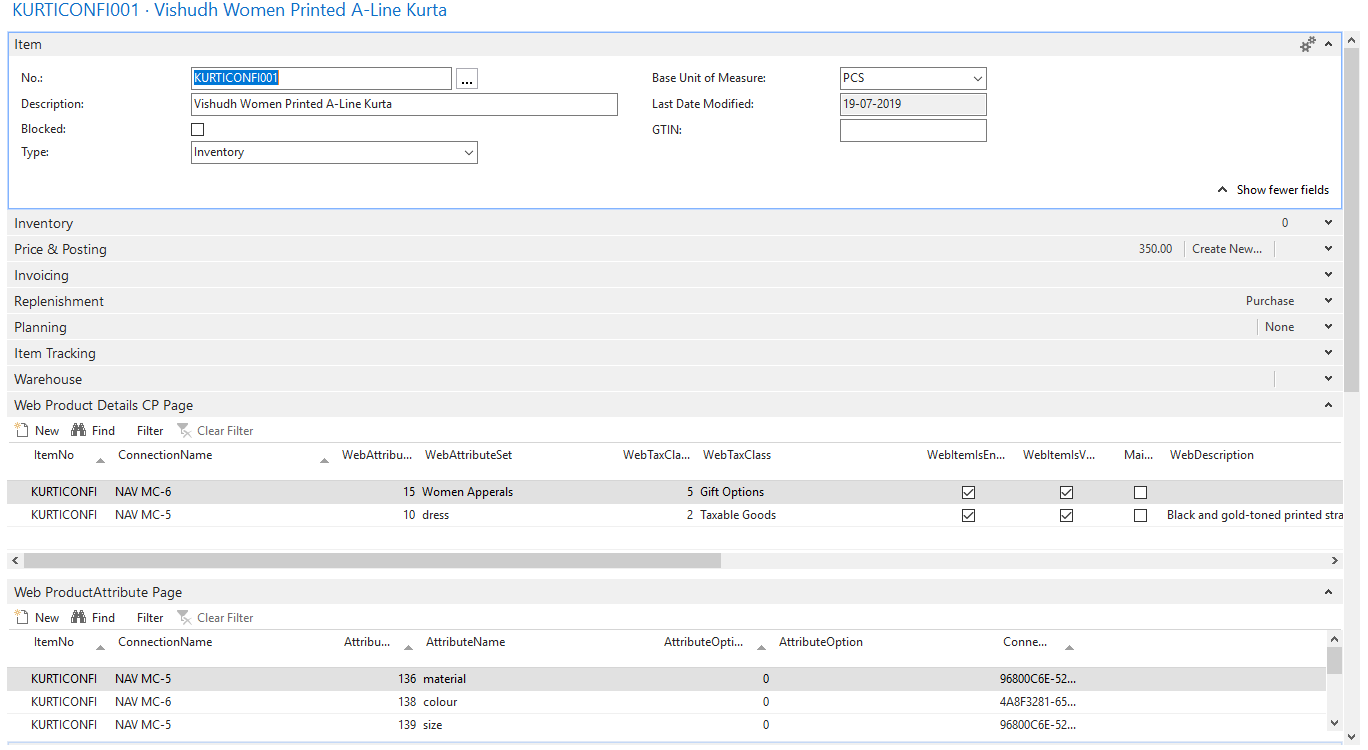
Note: The AttributeId can be opted from the drop-down only when the WebAttributeSetId is selected from the Web Product Details CP page.
The AttributeOptionId can be opted when the AttributeId is selected.
AttributeOptionId needs to be kept blank. WebAttributeSetId and AttributeId needs to be same as that the
child items (which will be added in the section WebProductChildDetails of the Item card) of this new configurable
product which are already been synced as simple products.
- In the WebProductChildDetails page select the
ChildItemNo and the ConnectionNamefrom the drop-down options.
Note : TheAttributeIdcan be opted from the dropdown only when theWebAttributeSetIdis selected from the Web Product Details CP page. TheAttributeOptionIdneeds to be kept blank.WebAttributeSetIdandAttributeIdneeds to be same as that the child items (which will be added in the section WebProductChildDetails of the Item card) of this new configurable product which is already been synced as simple products. - Navigate to the WebProductCategorypage and select the
CategoryId, CategoryName and the connection namefrom the drop-down. - In the AEC Application Item List the details will be auto-populated as per the input provided in the Web Product Details CP page.
- On completion of the process, click on the OK button. The entire
ItemCardfor this Configurable product is given below.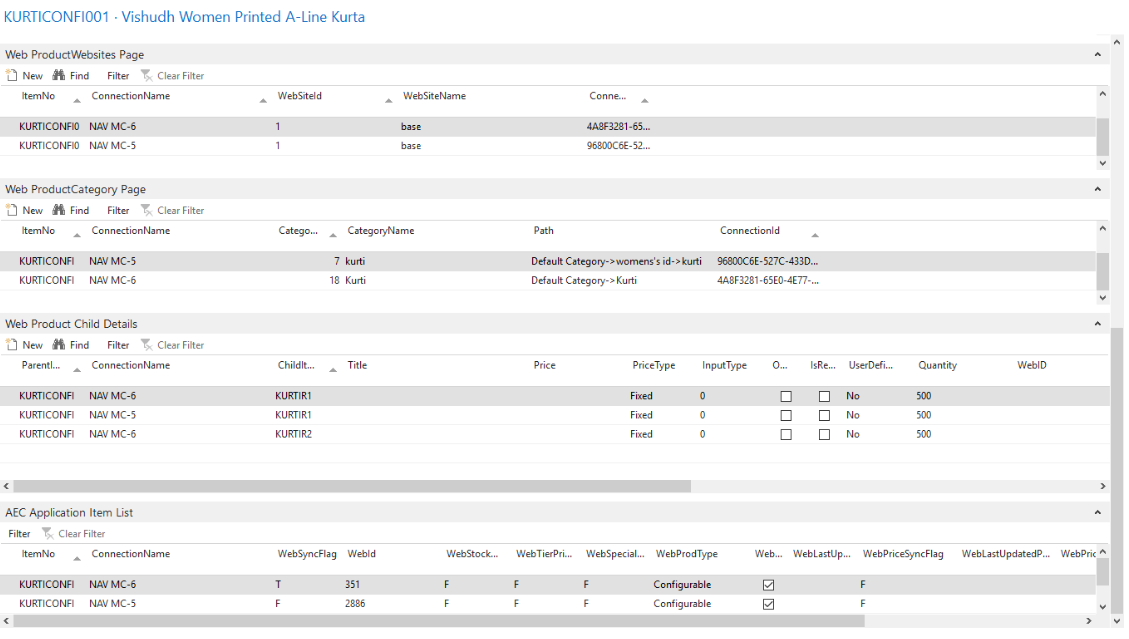
Note: The same product can be added to multiple connection by creating a new line in Web Product Details CP Page and choosing the
desired connection name. Further repeat the same steps as discussed above for the newly chosen connection. Also there is no need to create duplicate products
in NAV to be synced in multiple magento that is we can sync the same item in NAV to multiple Magento urls.
LookUp Mapping
The Lookup mapping for Currency shall be required in case the business logic deals with multiple currencies.
Attribute Mapping/Transformation
Following the Provided Mapping, the user can sync the Configurable Product Add from Ms Dynamics NAV to Magento2. To know more see Transformation Techniques
Mapping for the Transformation of Configurable Products add Touchpoint
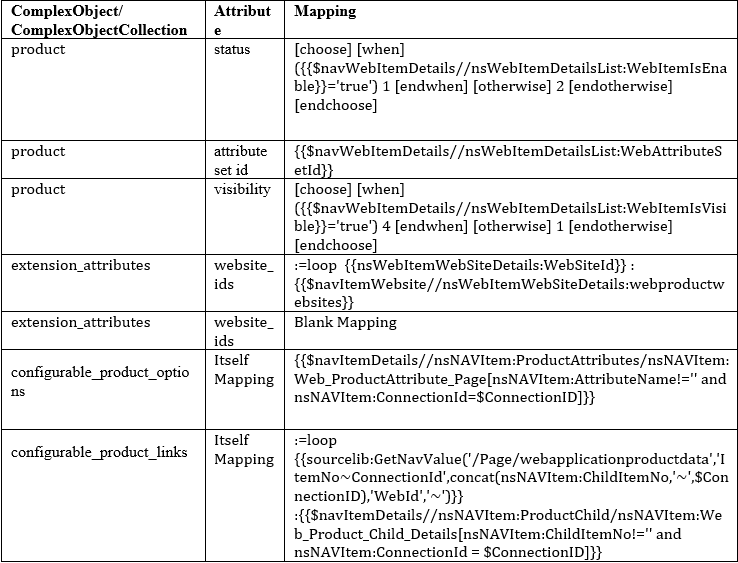
Note: If the Magento has a single website a Blank Mapping is required in the second website_ids attribute.
In case of multiple website, no mapping is required for the second website_ids attribute
Mapping for the Root Variables for the Configurable Product add Touchpoint

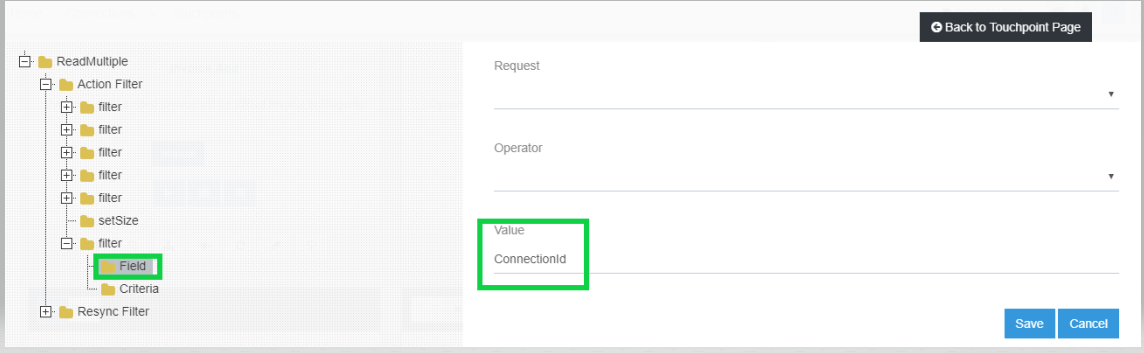
Action Filter
Add a node to the given pre-packaged order of the Action filter with two sub-nodes Field and Criteria.
View the image below to define the Action Filters

Executing the Workflow Integration
Note: Before integrating with Magento2 and MS Dynamics NAV sync all the Master Data Touchpoints
- Once the workflow is designed, Update the Configuration in agent for deploying the workflow in the agent.
- Navigate to the Workflow Panel in the agent and click on the Start Sync Button for executing the Process.
- Once the Execution is finished, click Resync Button in the agent.
- The Resync Panel show the Success Result in the agent.
.png)
Integration Data Survey
The user can survey the data by viewing the Processed Snapshot from the node level of the workflow. This Snapshot View displays the successful execution of the workflow.

Post Condition
-
The user can view the product synced in Magento2.

-
The sync flag update & WebId from magento is returned in sync backThe user can also go to NAV and check if the WebID has returned and the WebSyncFlag has been set to ‘T’ (True) from ‘F’ (False).

Frequency of use
The user can execute the Integration through workflow as and when required.
Troubleshooting
NA

