
Odoo
Updated:
Odoo is one of the leading ERP software for open source, also previously known as OpenERP.
Odoo covers a wide range of Apps and modules such as CRM, Sales, Development,
Project Management, Sales, Management of Human Resources etc. There are different apps
available based on business verticals that can be installed and used by companies.
Some apps are available through the Open Source model for free.
The creation and execution of Odoo enable you to choose from thousands of modules available in the store.
Benefits of using Odoo
-
One solution for your entire business :
Odoois a business software suite that can cover all your needs in various modules such asInventory,Sales,CRM,Accounting,Manufacturing,Human resourcesand many more. -
Low cost of implementation :
Odoohas a relatively low cost of implementation as well as low recurring costs by providing bothCommunity VersionandEnterprise Edition. -
Intuitive user interface :
Odoois a user-friendly tool since the main page after logging in shows the different modules each user has access to. After selecting one of these modules, users can further navigate by using the navigation bar at the top. -
Easy to implement : Since,
Odoohas a modular structure(sales, accounting, inventory, etc. split into parts or modules), it can be implemented in a phased approach one module at a time. -
Easy integration : Apart from being customizable,
OdooisAPI-friendlyand easy to integrate with any other application.
However, APPSeCONNECT is a Business Process Automation tool, this will allow you to develop and configure seamless integration between business applications.
Therefore, application configuration is a fundamental activity prior to the process of integration. If your chosen application is
Odoo, credentials need to be provided for validating them in OP agent. Here you will find the detailed description on
how to configure the agents for the application Odoo, Troubleshooting issues, action and its filters.
Pre-requisites for Odoo Configuration
1) Create an account in odoo with necessary credentials.
2) Click here to know the authentication mechanism and APIs of the application along with their structures.
3) Email ID and Password of Odoo application to login successfully.
4) BaseURL, Database Name, UserName and Password of the application to validate the credentials in the agent.
On-Premise Agent Configuration
Installation of On-Premise Agent
You need to install the agent on your local server. To Know about On-Premise Agent Configuration, Click here.
How to configure Odoo Application in OP Agent
1) Create a processflow with Odoo as source or destination application, and deploy the processflow in On-Premise agent.
2) Open the agent and click the checkbox in Settings Panel.
3) Move into the App Configurational Panel of the agent and configure the details of the respective application.
Steps to configure the credentials in the OP agent
1) Open the OP Agent by providing valid credentials.
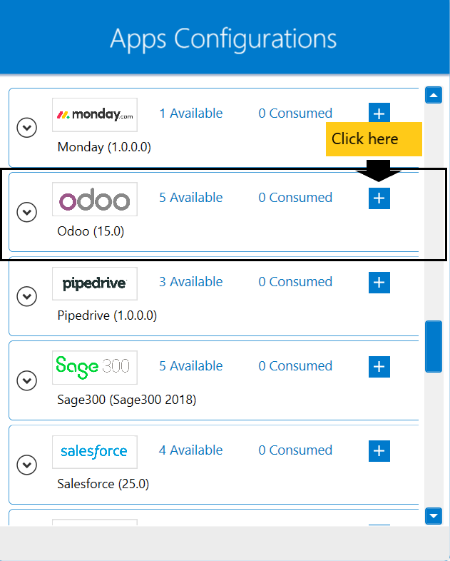
2) In the App Configurations panel of the agent, click on the + button, beside the application Odoo.
The credential panel opens for the application Odoo.
 3)Provide the
 Base Url, Database Name, User Name and Password.
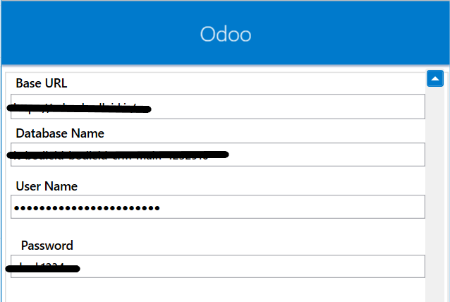 4) Click on the “Validate” button, to validate the connection. A message
 Test Connection Successful will appear
if all the credentials provided by you for Odoo is valid. After validating the credentials, click “Save” button to save the credetials.
Following the above processes, you can configure the Odoo application in the OP agent.
Troubleshooting
ISSUE 1
Some of the basic troubleshooting issue happens due to improper validations or even if it is accurately validated but the
processflows do not sync the data successfully. This basic issue resolves after removing the Temp and Cache files from the
portal and from your system. Therefore, after clearing the Temp and Cache files, again deploy and execute your processflow.
ISSUE 2
User validation may fail due to invaild Base URL, Database Name, User Name and Password.
Check the credentials once again and re-Validate the credentials.
Attributes and Actions
While defining a connection to an API in Odoo, you require clear understanding about the data requirements and endpoint configurations.
You can refer to this document to find all the endpoint details of Odoo application. To define the endpoint in APPSeCONNECT, you need
to define Schemas and Actions. Actions are specifically targeted for an endpoint while schema is the data needed to execute the API. Here is the
list of some of the pre-packaged API actions defined for you which you can easily plug and play while doing your integration.
| Endpoint | Action | Action Type | Schema | UI Help | API Path |
|---|---|---|---|---|---|
| /api/product.template/search | product.template | GET | products | Retrieves a number of products. | - |
| /api/res.users/search | res.users | GET | users | Retrieves a number of users. | - |
| /api/res.users/create | res.users | POST | users | Creates a new in the application. | - |
| /api/product.template/ | product.template | PUT | product | Updates contents of the data of the application | - |
Action Filter Implementation
Data is fetched from source application using APIs, and as you are aware of, API provides filters
which will allow you to specify a subset of data from the whole bunch of data created in the server,
the same can be specified through Actions and Action filters. The Action generally defines the
endpoint of the application which is being fetched, while the filters define the search criteria
of the data. You can add any parameters in the action filter to define the search criteria.
The parameters are added in the body section of the action filter. We shall look into, how
you can provide the action filter.
Let us consider that any user wants to fetch registered users from Odoo. You need to know the API strcuture of each such endpoints
to fulfill your request. From the API structure, we are using domain keyword as the key and mention the id of the users in the value field.
{
    "success": true,
    "message": "Allowed all Models Permission: all",
    "responseCode": 2,
    "domain": "[('id','in',[10,11,12,13,14])]",
    "object_name": "res.users",
    "permisssions": {
        "read": true,
        "write": true,
        "delete": true,
        "create": true
    },
    "model_id": 90,
    "data": [
        {
            "partner_id": [
                {
                    "id": 45
                }
            ],
            "login": "seek",
            "signature": false,
            "active": true,
            "action_id": [],
            "log_ids": [
                {
                    "id": 20
                }
            ],
            "share": true,
            "company_id": [
                {
                    "id": 1
                }
            ],
            "alias_id": [],
            "notification_type": "email",
            "out_of_office_message": false,
            "odoobot_state": "not_initialized",
            "sale_team_id": [],
            "oauth_provider_id": [],
            "oauth_uid": false,
            "oauth_access_token": false,
            "website_id": [],
            "id": 10,
            "create_uid": [
                {
                    "id": 2
                }
            ],
            "create_date": "2020-05-25T11:28:05.386938",
            "write_uid": [
                {
                    "id": 1
                }
            ],
            "write_date": "2020-08-10T13:42:06.490660"
        },
        {
            "partner_id": [
                {
                    "id": 48
                }
            ],
            "login": "shubham.chandani081@webkul.com",
            "signature": false,
            "active": true,
            "action_id": [],
            "log_ids": [
                {
                    "id": 132
                }
            ],
            "share": true,
            "company_id": [
                {
                    "id": 1
                }
            ],
            "alias_id": [],
            "notification_type": "email",
            "out_of_office_message": false,
            "odoobot_state": "not_initialized",
            "sale_team_id": [],
            "oauth_provider_id": [],
            "oauth_uid": false,
            "oauth_access_token": false,
            "website_id": [],
            "id": 13,
            "create_uid": [
                {
                    "id": 4
                }
            ],
            "create_date": "2020-06-22T08:52:02.479259",
            "write_uid": [
                {
                    "id": 1
                }
            ],
            "write_date": "2020-11-05T13:04:08.559024"
        },
        {
            "partner_id": [
                {
                    "id": 46
                }
            ],
            "login": "test",
            "signature": false,
            "active": true,
            "action_id": [],
            "share": true,
            "company_id": [
                {
                    "id": 1
                }
            ],
            "alias_id": [],
            "notification_type": "email",
            "out_of_office_message": false,
            "odoobot_state": "not_initialized",
            "sale_team_id": [],
            "oauth_provider_id": [],
            "oauth_uid": false,
            "oauth_access_token": false,
            "website_id": [],
            "id": 11,
            "create_uid": [
                {
                    "id": 4
                }
            ],
            "create_date": "2020-06-02T12:14:33.012711",
            "write_uid": [
                {
                    "id": 4
                }
            ],
            "write_date": "2020-06-02T12:14:33.012711"
        },
        {
            "partner_id": [
                {
                    "id": 47
                }
            ],
            "login": "test32@webkul.com",
            "signature": false,
            "active": true,
            "action_id": [],
            "share": true,
            "company_id": [
                {
                    "id": 1
                }
            ],
            "alias_id": [],
            "notification_type": "email",
            "out_of_office_message": false,
            "odoobot_state": "not_initialized",
            "sale_team_id": [],
            "oauth_provider_id": [],
            "oauth_uid": false,
            "oauth_access_token": false,
            "website_id": [],
            "id": 12,
            "create_uid": [
                {
                    "id": 4
                }
            ],
            "create_date": "2020-06-15T11:19:16.840137",
            "write_uid": [
                {
                    "id": 4
                }
            ],
            "write_date": "2020-06-15T11:19:16.840137"
        }
    ]
}
However, while fetching sales order, you need to use create_date as the key, specify any operator(<=,<,>,>=)
and the date in the value field such as 2020-10-30. If you use <=, then sales orders created before the mentioned date
will be retrieved.

