DocuSign
Updated:
What is DocuSign?
DocuSign is the fast, reliable way to electronically sign documents and agreements on
practically any device from almost anywhere in the world. Whether you’re signing any permission slip
or a contract for your model, using DocuSign this task will be executed in a smooth and flexible way.
What are the Advantages of Using DocuSign eSignature?
- Ease of use - Easy to use technologies are important for employees who need to send documents, and for organizations seeking to ensure a good customer experience for signers.
-
Cost savings -
DocuSigneSignature eliminates the costs included with printing, sending and storing agreements, which adds up to saving costs per agreement. -
Security -
DocuSignmeets the most stringent global security certifications, and offers enterprise-grade security and compliance controls to protect their customers’ information, documents and data. -
Time savings -
DocuSignhelps customers increase operational efficiency and reduce the time it takes to prepare, send and sign documents. -
HR/Onboarding -
DocuSignhelps HR teams provide a great onboarding experience, by streamlining the necessary paperwork and eliminating the need to sign and return stacks of hardcopy documents.
As APPSeCONNECT is a Business Process Automation tool, this will allow you to develop and configure seamless integration between business applications.
Therefore, application configuration is a fundamental activity prior to the process of integration. If your chosen application is
DocuSign, credentials need to be provided for validating the agent both in case of OP and Cloud agent. Here you will find the detailed description on
how to configure the agents for the application DocuSign, troubleshooting issues, action and its filters.
Pre-requisites for DocuSign Configuration
1) Create a developer account in DocuSign with necessary and essential credentials.
2) You need to create an App under Apps and Keys such that Client ID and Client Secret are available to you.
3) Click here to know the authentication mechanism and
different APIs of the application along with their structures.
How to create an App and configure Redirect Url?
1) Login to DocuSign with valid credentials. While you are logged in, you will land onto
the dashboard page.
2) Navigate to INTEGRATIONS -> Apps and Keys.
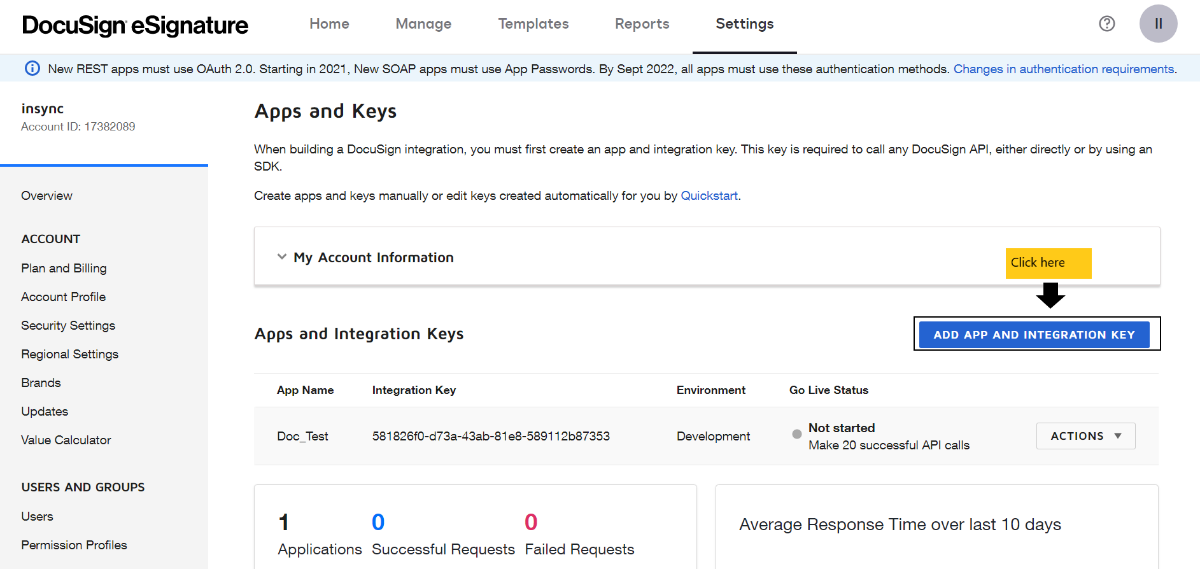 3) On clicking
 ADD APP AND INTEGRATIONS KEY, a dialog box appears where you need to provide the App Name. Click on CREATE APP.
4) From the App details page, navigate to Authentication and click on ADD SECRET KEY. A secret key will be generated and save it for future use.
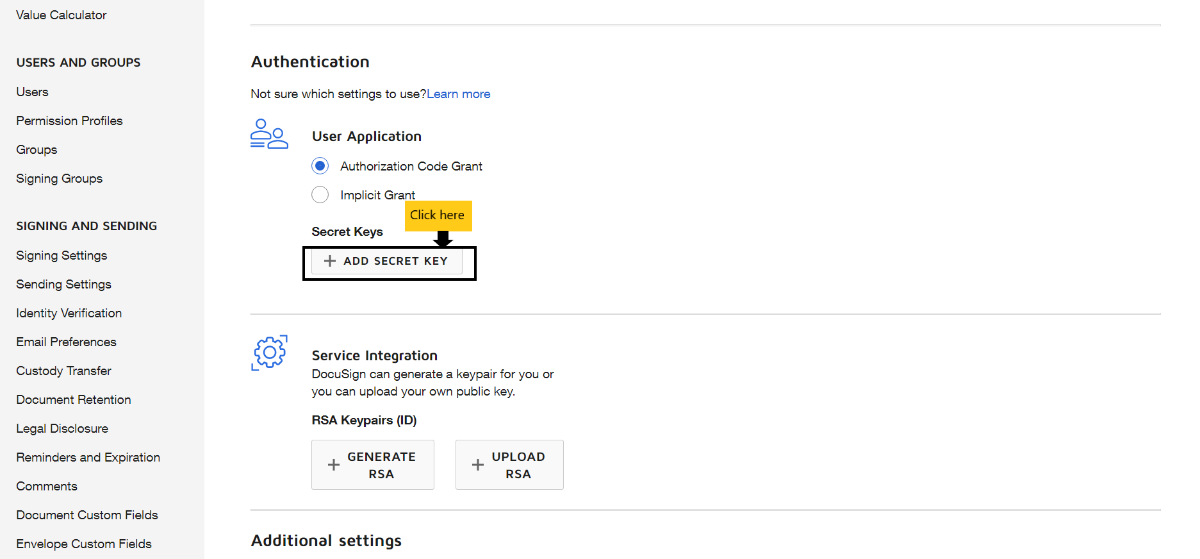 5) Navigate to
 Additional Settings -> Redirect URIs. Use https://portal.appseconnect.com as the Redirect URIs.
On-Premise Agent Configuration
Installation of On-Premise Agent
You need to install the agent on your local server. To Know about On-Premise Agent Configuration, Click here.
Configure the DocuSign Application in OP Agent
1) Create a processflow with DocuSign as source or destination application, and deploy the processflow in On-Premise agent.
2) Open the agent and click the checkbox in Settings Panel.
3) Move into the App Configurational Panel of the agent and configure the details of the respective application.
Steps to Configure the credentials in OP Agent
1) Open the OP Agent by providing valid credentials.
2) In the App Configurations panel of the agent, click on the + button, beside the application DocuSign.
The credential panel opens for the application DocuSign.
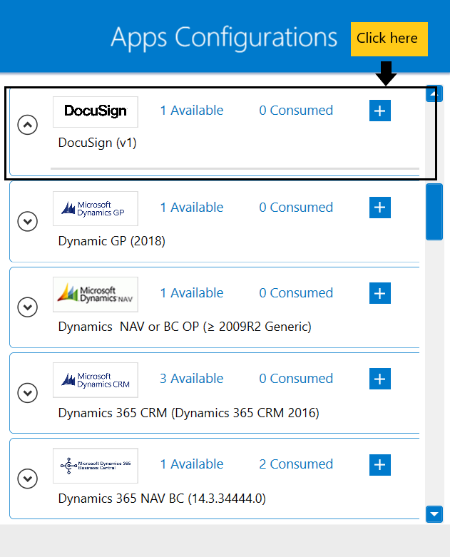 3) Enter
 Outh Uri as https://account-d.docusign.com/oauth, Client Id, Client Secret and Scope.
Use INTEGRATION KEY as Client ID and SECRET KEY as Client Secret.
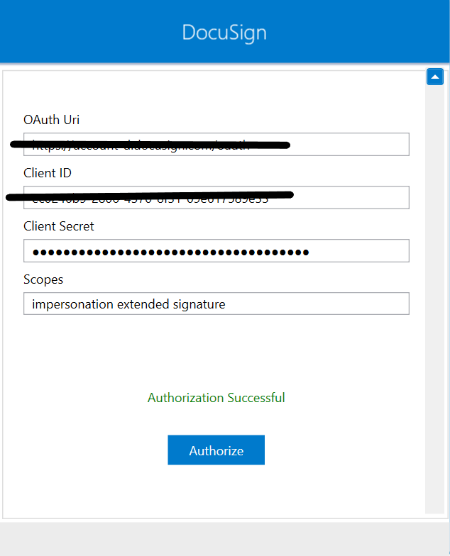 4) Click on the
 Authorize button, to validate the connection.
After clicking Authorize, a pop-up browser will open re-directing you to DocuSign login page.
Provide valid login credentials and click on Login. The validation starts immediately, and Authorization Successful will be displayed, if valid login credentials have been provided.
Following the above processes, you can configure the DocuSign application in the OP agent.
Cloud Agent Configuration
Configure the DocuSign Application in Cloud Agent
1) Login to APPSeCONNECT portal with valid credentials.
2) Navigate to Manage > App. Expand the docusign application and click on Credential.
3) Expand the REST node, click on Add New Credential.
4) Provide the necessary information Outh Uri as https://account-d.docusign.com/oauth, Client Id, Client Secret and Scope.
Use INTEGRATION KEY as Client ID and SECRET KEY as Client Secret.
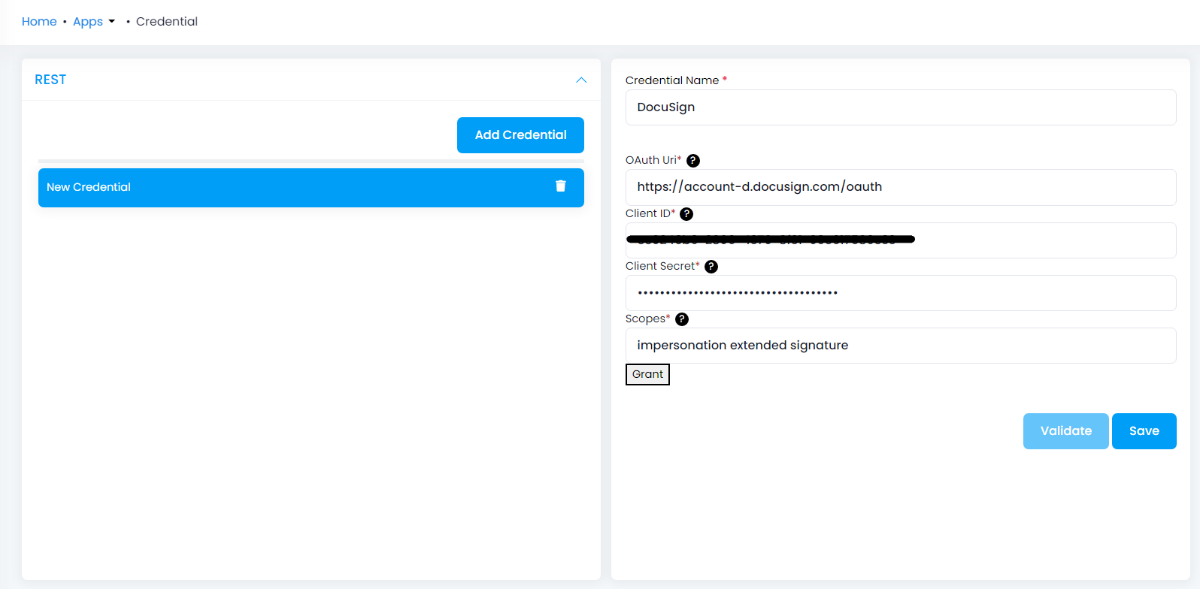
5) Click on Grant, to validate the connection.
After clicking on Grant, a pop-up browser will open re-directing you to DocuSign login page.
Provide valid login credentials and click on Login. The validation starts immediately, and Authorization Successful will be displayed, if valid login credentials have been provided.
Following the above processes, you can configure the DocuSign application in the Cloud agent.
Troubleshooting
ISSUE 1
Some of the basic troubleshooting issue happens due to improper validations or even if it is accurately validated but the processflows do not sync the data successfully. This basic issue resolves after removing the Temp and Cache files from the portal and from your system. Therefore, after clearing the Temp and Cache files, again deploy and execute your processflow.
ISSUE 2
User validation may fail due to invaild Outh Uri, Client ID, Client Secret and Scope. Check the credentials once again and re-Validate the credentials.
Attributes and Actions
While defining a connection to an API in DocuSign, you require clear understanding about the data requirements and endpoint configurations.
You can refer to this document to find all the endpoint details of DocuSign. To define the endpoint in APPSeCONNECT, you need
to define Schemas and Actions. Actions are specifically targeted for an endpoint while schema is the data needed to execute the API. Here is the
list of some of the pre-packaged API actions defined for you which you can easily plug and play while doing your integration.
Click here DocuSign to know the authuorization and APIs details.
| Endpoint | Action | Action Type | Schema | UI Help | API Path |
|---|---|---|---|---|---|
| envelopes | envelopes | GET | envelopes | Retrieves the overall status for the specified envelope. | envelopes |
| envelopes | envelopes | POST | envelopes | Creates and sends an envelope or creates a draft envelope | envelopes |
Since, we are using a triggered processflow, no need to use any action filter.


