
Dynamics 365 Business Central
Updated:
Introduction
Business Central is a business management solution for managing your business for various sized organizations that automates and streamlines business processes. Companies can eventually add functionalities which is relevant to the domain of operations, and can customized to support even highly specialized industries. Business Central provides solutions to the companies to manage their business, including finance, manufacturing, sales, shipping, project management, services, and many more with its highly adaptable and rich features.
Business Central is fast and easy to implement and configure, and its simplicity guides to innovate product design, development, implementation and usability.
Pre-requisite of Business Central
- Valid credential of Business Central account.
- You should have extension installation permission
Installing the extension
Navigate to https://dynamics.microsoft.com/en-us/business-central/signin/ for Sign in to Dynamics 365 Business Central with a valid credential. New users may apply for new account.
Navigate to Setup & Extensions > Extensions > Manage > Upload Extension.
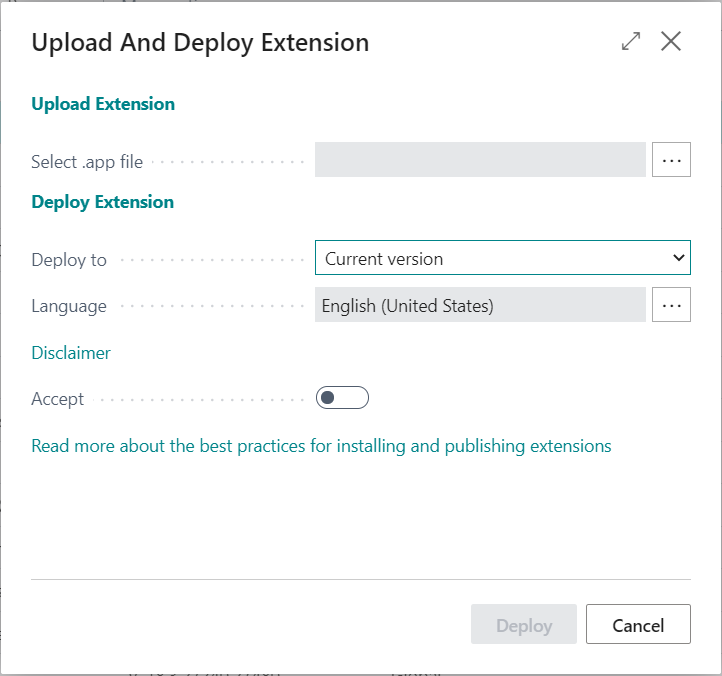
Browse and upload the .app file from the folder location. You may choose the current version and language to for the deployment. Activate Accept to enable the deployment of the extension.
During deployment of the extension, you may check the status of the deployment. For that choose Deployment Status and then view the status of the extension deployment. Navigate to the row to view additional details. In the deployment status details you can reach out to Refresh button in the actions from where you may retrieve the most recent status and details.
After successfully deployment of the .app extension, choose the Refresh button to see the new extensions in the list of installed extensions.
Web services exposed
To reach the Web Services List, enter “Web Services” in the search section of the top menu bar and select the Web services option.
 The list will guide you about the fields of the web services like Object Name, Object Id, Service Name, Published Mode etc, while calling the web services from the different applications. Keep the format as mentioned in the list.
| Object ID | Object Name | Sevice Name | Published | Details |
|---|---|---|---|---|
| 55000 | AEC Application | aecapp | Yes | used to create different type of Application Details |
| 55001 | AEC Application Item | aecappitems | Yes | used to create Web related application specific Item Details data during Item creation |
| 55002 | AEC ShipInv Sync | aecshipinvsync | Yes | used to create Web related application specific Customer Shipping Invoice Details data while generating Shipping Invoice |
| 55003 | AEC Application Customer | aecappcustomer | Yes | used to create Web related application specific Customer Details data during Customer creation |
| 55004 | AEC Order Header | aecorderheader | Yes | used to create Web related application specific Order Details data during Oder creation |
| 55004 | AEC Order Header | aecsalesorderheader | Yes | used to create Web related application specific Sales Order Details data during Sales Order creation |
| 55005 | AEC Order Header Cart | Aecsalesorderheadercarts | Yes | used to create Web related application specific Sales Order Cart Details data during Order Cart creation |
| 55007 | AEC SalesOrder Header | Aecsalesorderheaders | Yes | used to create Web related application specific Sales Order Details data during Sales Order creation |
| 550012 | AEC Order Lines | aecorderlines | Yes | used to create Web related application specific Order Item Lines Details data during Order creation |
| 550013 | AEC Shipment Lines | aecshipmentlines | Yes | used to create Web related application specific Order Shipment Lines Details data during Order Shipping |
| 550016 | AEC Item LocationInventory | aecitemlocationinventory | Yes | used to store Web related application specific Item Location Inventory Details data while generating Item Inventory |
| 550021 | AEC Child Details | aecchilddetails | Yes | used to store Web related application specific Child Details data |
Troubleshooting
We haven’t identified any troubleshooting steps till date. But if you face any issues with the APIs, feel free to comment here or else add a Support Ticket.
How you can configure Basic Authentication in Dynamics 365 Business Central for On-Premise Agent?
Installation of On-Premise Agent
You need to install the agent on your local server. To Know about On-Premise Agent Configuration, Click here.
Configuring Dynamics 365 Business Central
- Create and Deploy ProcessFlows in the cloud portal.
- Open the agent and click the checkbox in Settings Panel.
- Move into the App Configurational Panel of the agent and configure the details of the respective application.
Steps to Dynamics 365 Business Central Application
- In the App Configurations panel of the agent, click on the + button, beside the app
Dynamics 365 Business Central. The credentials panel opens for the applicationDynamics 365 Business Central.
- Select the
Authenticationtype from the drop-down asBasicand enter the value forAPI Path,User NameandWeb Service Access Key. Click on Validate Button. A success message will be displayed if the credentials are validated properly. Finally, click onSAVE.
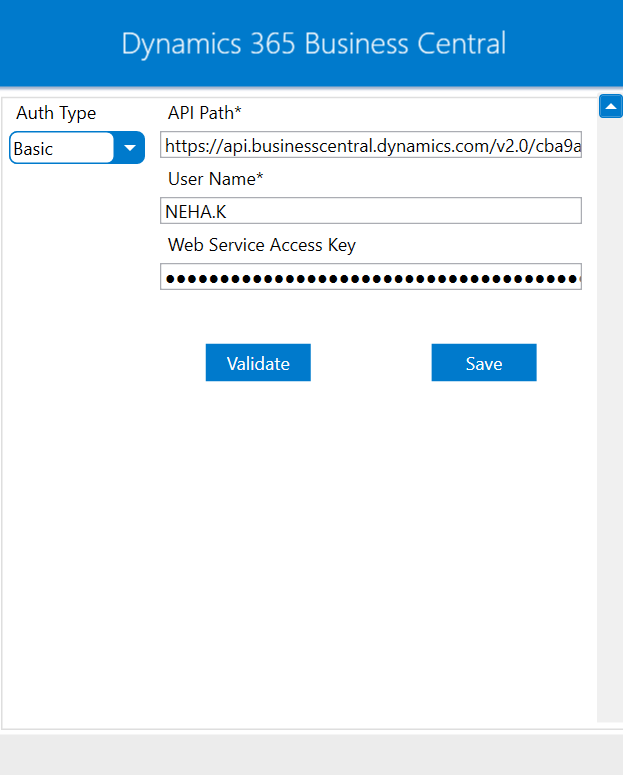
Following this process, the Dynamics 365 Business Central can be configured in the OP agent.
Cloud Agent Configuration
Configure the Dynamics 365 Business Central Application in Cloud Agent
-
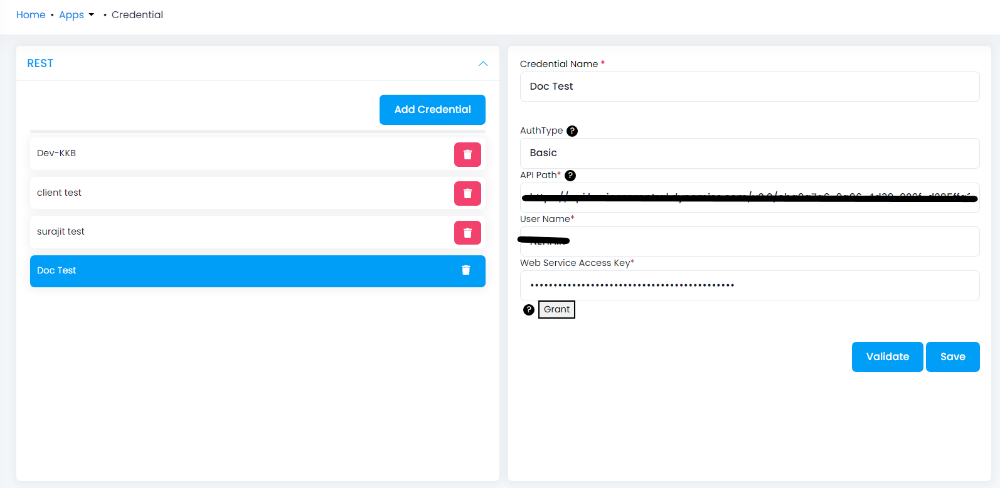
Login to
APPSeCONNECTportal with valid credentials. -
Navigate to Manage > App. Expand the Dynamics 365 Business Central application and click on
Credential. -
Expand the
RESTnode, click onAdd New Credential. -
Provide the necessary information
Credential Name,AuthType,API Path,User NameandWeb Service Access Key.
-
On clicking
Validate, a success mesaage will be displayed, if all the credentials provided are correct. Finally, click onSave, a toaster message will be displayed confirming the same.
How you can configure Outh2.0 Authentication in Dynamics 365 Business Central for On-Premise Agent?
Installation of On-Premise Agent
You need to install the agent on your local server. To Know about On-Premise Agent Configuration, Click here.
Configuring Dynamics 365 Business Central
- Create and Deploy ProcessFlows in the cloud portal.
- Open the agent and click the checkbox in Settings Panel.
- Move into the App Configurational Panel of the agent and configure the details of the respective application.
Steps to Dynamics 365 Business Central Application
- In the App Configurations panel of the agent, click on the + button, beside the app
Dynamics 365 Business Central. The credentials panel opens for the applicationDynamics 365 Business Central.
- Select the
Authtype from the drop-down asOAuth2.0and enter the value forAPI Path. Click on Authorize Button. A custom browser opens for validating your chosen application. You need to provide any user login credential ofDynamics 365 Business Central. Immediately,portal.appseconnect.comappears and the credentials in theOPagent gets validated and saved.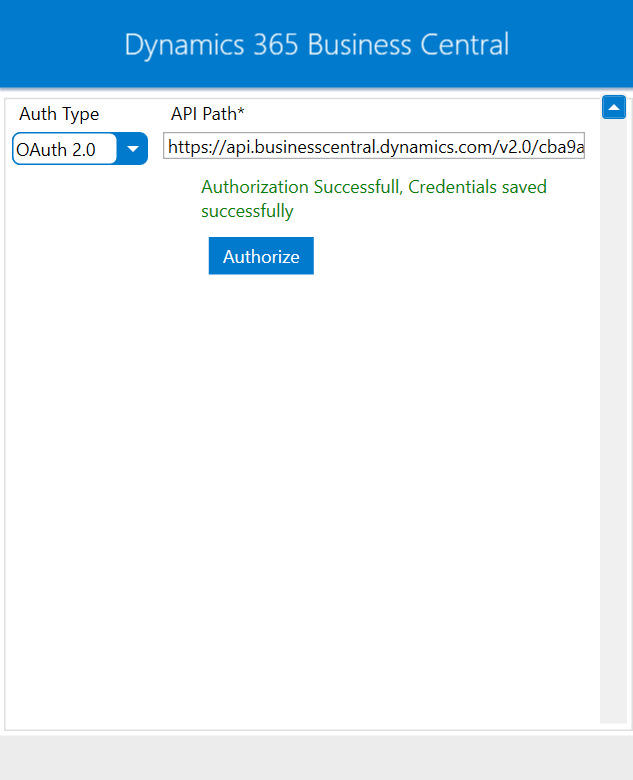
Following this process, you can configure Dynamics 365 Business Central usingOuth2.0authentication in the OP agent.
Cloud Agent Configuration
Configure the Dynamics 365 Business Central Application in Cloud Agent
-
Login to
APPSeCONNECTportal with valid credentials. -
Navigate to Manage > App. Expand the Dynamics 365 Business Central application and click on
Credential. -
Expand the
RESTnode, click onAdd New Credential. -
Provide the
Credential Name, selectAuthTypeasOuth 2.0andAPI Path. In case ofOuth 2.0, no need to specify any value forUserNameandWeb Service Acess Key. However,UserNameandWeb Service Acess Keywill contain some default values.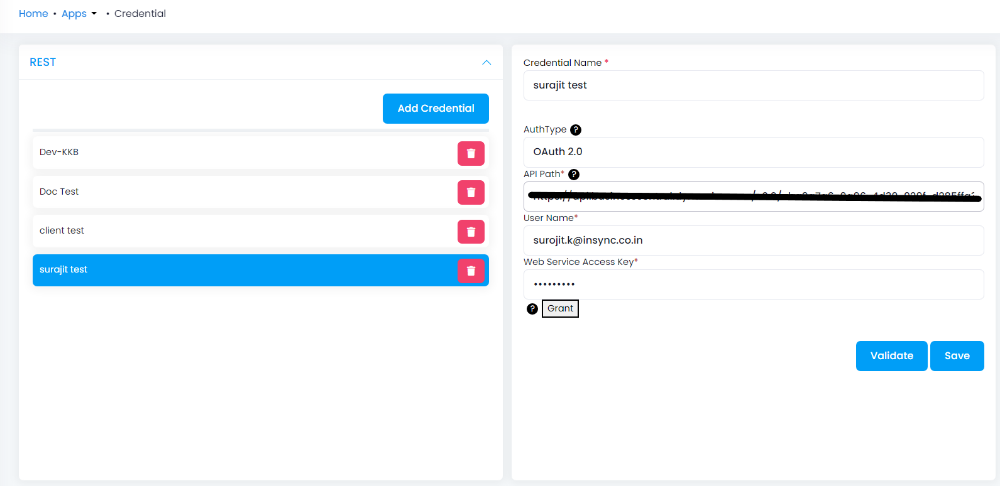
-
On clicking
Grant, a custom browser opens for validating your chosen application. You need to provide any user login credential ofDynamics 365 Business Central. Immediately,portal.appseconnect.comappears and your credentials gets validated. Follow the above procedures to validate your credtials forOuth 2.0in cloud.
How to get the API Path?
You need to login to Dynamics 365 Business Central account with valid credentials. From the Home page,
navigate to Web Services List page. Consider any Web Services from the list, the data present under the column
OData V4 URL, will be your API Path except the service name.
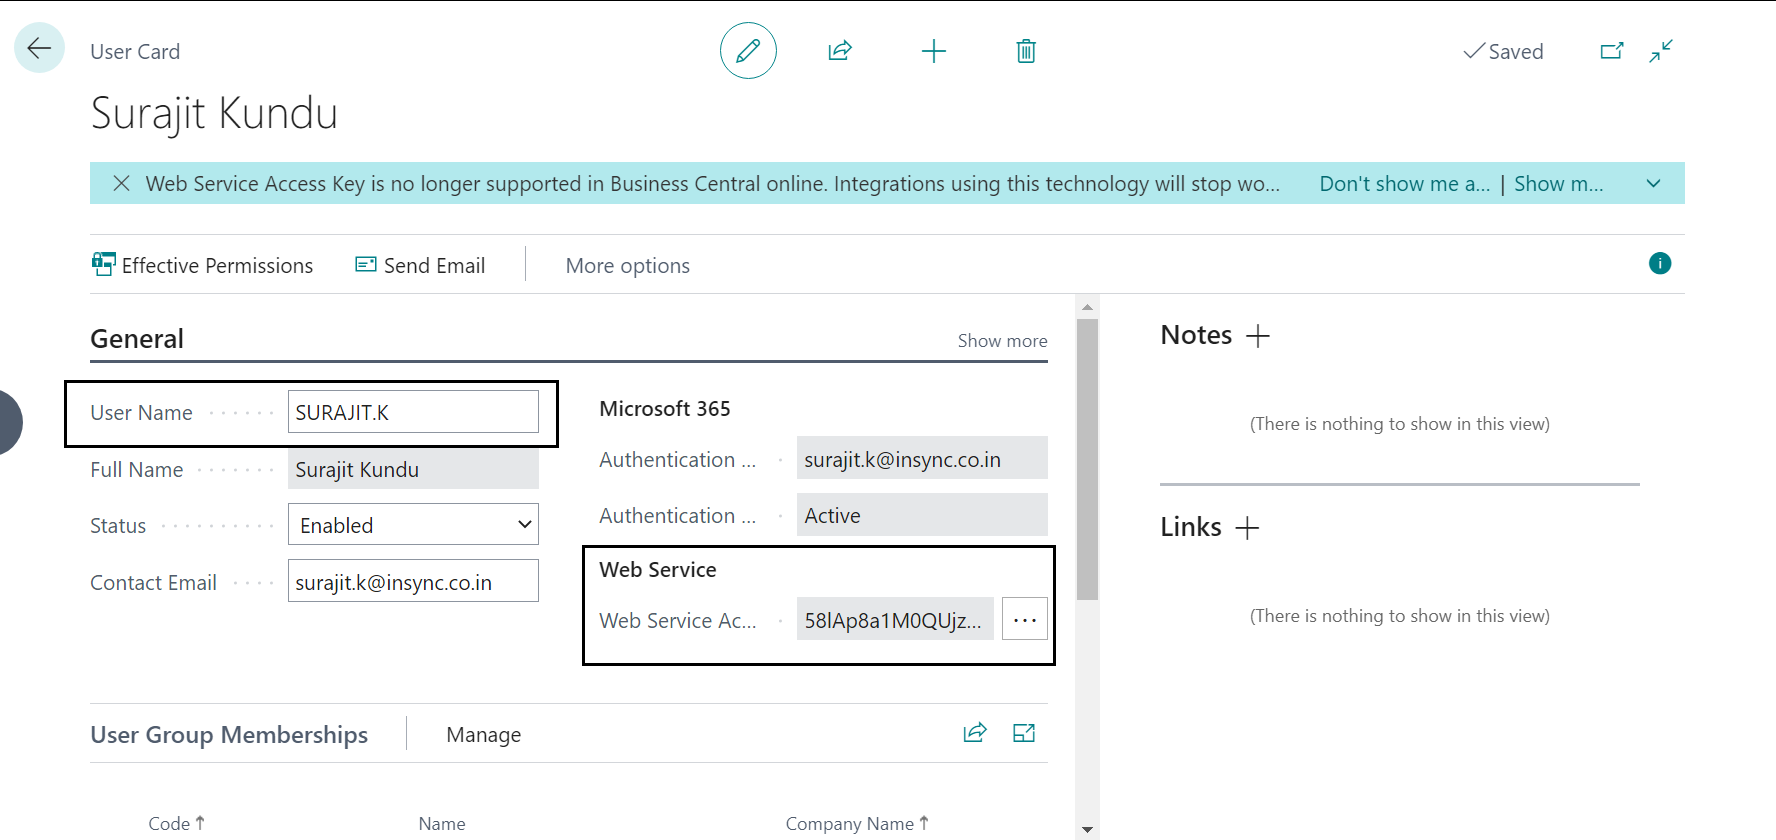
How to get User Name and Web Service Access Key?
Login to Dynamics 365 Business Central account with valid credentials. From the Home page, click on the three
ellipses. You will be navigated to Business Manager Evaluation page, click on Explore more roles.


Under System Administration, expand Users. Several users that have already been created will be visible,
expand any one of them. While expanding any user, the User Name and Web Service Access Key will be visible,
copy them and use these credentials in the agent.
Login user should have execute permission for table, page and API.

